plaster not drying due to damaged render (Ed.)

Status
Not open for further replies.
Joined
10 Mar 2024
Messages
3
Reaction score
0
Country
United Kingdom
Hello,
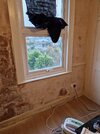
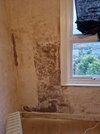
I had some plastering done last August, there was one section of the room where the previous plaster was crumbling off the walls, so that wall had much more plaster used to full it, so has taken much longer to dry. It is now 7 months later and the plaster still hasn't dried (see first picture), for the last two months we have had a heater next to it and dehumidifier and it has turned a lighter colour and doesn't feel damp, could it be dry and that will just be the colour of the plaster?

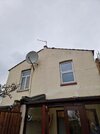
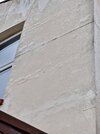
Secondly, I have looked on the outside of the plastered wall and I'm unsure if there is water getting in due to the wall being damaged. I have attached pictures below, are the blocks on the wall a type of cladding, or waterproofing? Can it be repaired and would that solve the issue? A builder suggested digging out the cracks and using exterior filler and using a thermal plasterboard for the internal wall and reskimming.

Thank you in advance for your advise that you can give.
 

Attachments

  • 20240310_150317.jpg
    20240310_150317.jpg
    324.9 KB · Views: 76
  • 20240310_144408.jpg
    20240310_144408.jpg
    269.8 KB · Views: 68
  • 20240310_144400.jpg
    20240310_144400.jpg
    225.8 KB · Views: 62
  • 20240310_144411.jpg
    20240310_144411.jpg
    335.8 KB · Views: 62
  • 20240310_144355.jpg
    20240310_144355.jpg
    221.6 KB · Views: 66
  • 20240310_150315.jpg
    20240310_150315.jpg
    278 KB · Views: 69
Sponsored Links
What did he use as a base coat to reinstate the inside walls, sand and cement then skimmed over, or browning skimmed.
The blocks on the wall are a pattern scratched into sand and cement render if you want a proper long term fix then it needs to be all knocked off and redone any thing else is just a temporary bodge as far as I am concerned. That could well be the reason for your penetrating damp but there could be other reasons such as brick ties being bridged with mortar along with the render problem. I am making the assumption that you have cavity walls. If they are solid then the render definitely needs replacing.
 
Thank you for your response, as far as I'm aware the plasterer used plasterboard followed by a much thicker layer of plasterer in that area due to the previous plaster crumbling on that wall.
I don't have cavity walls as it's a victorian property.
 
Judging by the dirt on the outside wall, you've got water running off the edge of the roof and down the wall which is penetrating through the render.
 
Sponsored Links
jene troy,
1. Your solid walls have been penetrated by damp - what you see on the inside is damp penetration.
2. all the plaster etc must be hacked off back to brickwork and then rendered with sand & NH lime in 3:1 mix. And skim finished with a custom remedial finish. Plasterboard must not be used
3. Investigate inside the built-in closet for perhaps more damp or condensation.
4. The outside render to the whole back elevation has failed - damage can also be seen on the side wall render. It must be hacked off to brickwork and rendered with a 3:1 S&L mix.
5. The "blockwork" lines are merely decorative render - its called Ashlar or pretend stone blocks.
6. The verge above your rear wall is wrong - its allowing water to drip down the render. The verge needs correcting with an undercloak and pointing.

7. FWIW: the flashing above the shed extension and the side wall bay is wrong, and needs re-doing.
The chimney stack might need attention?
The extn parapet is covered with felt - felt used as flashing usually fails.
 
A word of advice don't use the same plasterer again as he should have advised you of all the problems that need rectifying unless you told him just to do as he did. Frankly what he has done has been a waste of money.
 
Thank you for all of your responses and advice.
If the cause of the penetrating damp is fixed (externally), will this not allow the plaster to dry, instead of hacking off all of the plaster?
Why should plasterboard never be used? Is that due to having solid walls? Or does it always have the potential to allow damp in?
 
If the cause of the penetrating damp is fixed (externally), will this not allow the plaster to dry, instead of hacking off all of the plaster?
It might do. Fixing the source of water is certainly the first thing you should do, because it will stop things getting worse, and allow the house to start drying.
 
6. The verge above your rear wall is wrong - its allowing water to drip down the render. The verge needs correcting with an undercloak and pointing.

7. FWIW: the flashing above the shed extension and the side wall bay is wrong, and needs re-doing.
The chimney stack might need attention?
The extn parapet is covered with felt - felt used as flashing usually fails.

Ask around for an experienced local roofer with a good reputation.

Note that websites where people pay to be listed are not recommendation sites, they are advertising sites. Even if they have misleading titles to trick you into thinking they check the workmanship of advertisers and verify that they should be rated. Be aware that reviews might be written by their mum.

Keep an eye out for houses having work done, make a note of the address and the name and number of the firm. After they have finished, have another look and try to speak to the householder. If you can take photos without causing offence, they might show quality of work. Roofs are very visible.

Do not use anyone with no address and just a mobile phone, or any itinerant who knocks on your door.
 
OP,
The external render must come off.
The interior has to be dealt with as my above post - no easy way out.
If you attempt to save a few quid by leaving any damaged plaster on the wall it will come back to haunt & cost you - more money, more disturbance.
I've advised renewing with S&L render specifically to give the wall a chance to breathe - plasterboard would eventually end up stained and decaying.
 
I don't think you need to hack off the external ashlar render as it looks as though it is only the masonry paint that has blistered , find a broken roof tile and run the rough side over the rendered wall to see if it sounds hollow, if so its failed ,if it sounds solid then it has not failed, you may need a brick plane to clean the paint off and repair the cracked areas and then treat with a water proofer and repaint, get the roof sorted out so you stop water running off the roof and down the wall, the interior looks like it is an original sand and lime render with a lime finish that has been patched up at some point using a carlite based plaster like bonding or browning, now carlites love water and will find it from anywhere and eventually rot, personally I would hack those small areas out and redo with sand and cement and a water proofer or a limelite plaster that inhibits damp, as long as the backing is sound there is no need to hack everything off, unless you can afford the mess and expense , it is water penetration that is your enemy,get that sorted first before dealing with the cosmetics
 
Poster #11,
Some of your post is wrong - in parts you are offering very bad advice.
Then, in your final sentence, you go and shoot yourself in the foot: " get that sorted before dealing with the cosmetics" - what cosmetics?
 
Poster
  • #12
  • I disagree that my advice is wrong , it is funny that I viewed yours as wrong and over the top, there is no way you can tell by looking at the photo that the render has failed , you have to physically examine it , there are a few parts around the windows that have been repaired in the past and they appear to correspond with the repairs on the wall internally (possibly due to settlement or when the new windows were fitted), as for cosmetics that refers to the interior as if you are experienced you would know that the internal plaster work is cosmetic/decorative and not structural, in truth when I read your post I was flabbergasted on how over the top you have gone, Oh and to be clear Damp does not rise above 1 metre in height so how has damp penetrated an upstairs bedroom wall ( water has penetrated through the crack in the render and that area needs attention as stated )
  • you also stated plaster board must not be used ? , in the original post it states "A builder suggested digging out the cracks and using exterior filler and using a thermal plasterboard for the internal wall and reskimming."
  • =
  • Thermal plus plaster boards are used on external walls (they have a vapour check) where there are cold spots causing condensation and mould on windows and walls, and they are perfectly acceptable once the water penetration has been sorted, so the builder gave good advice, you should check out what they are and their benefits before giving bad advice.
Op.
"The previous plaster was crumbling off the walls, so that wall had much more plaster used to full it, so has taken much longer to dry. It is now 7 months later and the plaster still hasn't dried (see first picture"
=
as I stated in my post the plasterer possibly used a carlite plaster like bonding or browning and these plasters will suck water from anywhere and must not be used where damp or water penetration is an issue as they rot and will always find water and mineral deposits will appear
 
Last edited:
Poster #13,
I do hope that you know the thread is from 10 March 20?

Your last post only got more foolish - your garbled attempts to explain/google yourself are ludicrous - you simply do not know what you are talking about.

I notice that you are quoting from my historic posts but not understanding what I previously wrote, you are getting it all wrong.
For example, my previous mentions of cosmetics refers to the decorated surface - its not a name for a plaster.

A little test for you: how would you install the ashlar?
 
Stop digging, you clearly have some DIY knowledge, but that's it, leave this to the professionals ,
=
"A little test for you: how would you install the ashlar?"
=
there is nothing hard and fast about rendered ashlar, it is just a sieved sand and cement external render rubbed flat with artificial joints cut in either with a nail or a "V" cut using a wooden float with a small pointed piece of metal attached in the middle of the toe of the float that cuts out a "V" shaped grove, to make it imitate expensive block work, as with anything if you set your stall out and mark the wall out it is simple and nothing to write home about
 
Last edited:

DIYnot Local

Staff member

If you need to find a tradesperson to get your job done, please try our local search below, or if you are doing it yourself you can find suppliers local to you.

Select the supplier or trade you require, enter your location to begin your search.


Are you a trade or supplier? You can create your listing free at DIYnot Local

 
Status
Not open for further replies.
Sponsored Links
Back
Top