putting a hatch into a wood floor

Joined
8 Aug 2008
Messages
81
Reaction score
0
Location
Berkshire
Country
United Kingdom
I'm just about to brave fitting my solid oak floor.

I have a decent gap under the chipboard in which I have hidden all my wiring but would like access to them in the future.

The obvious choice is to put a hatch under the TV where everything disappears into the floor but I'm struggling to see how I'm going to do this without making it an eyesore.

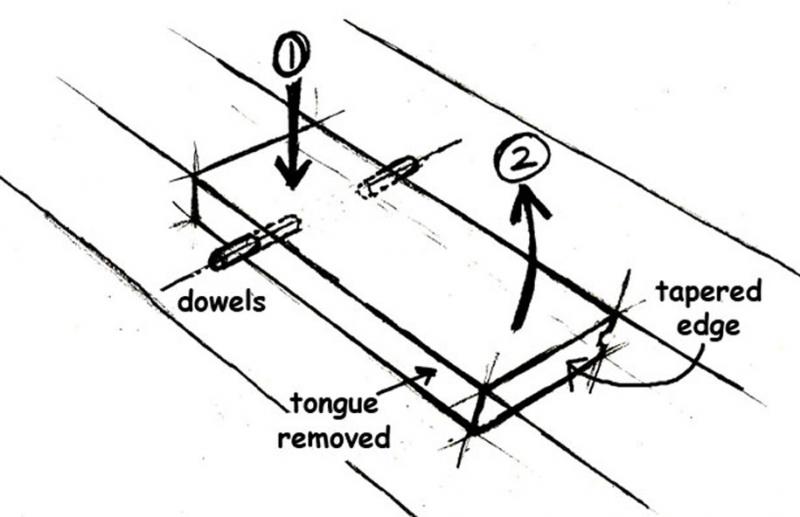
Any suggestions? I was thinking cut it wide enough to be between two joists, use flat ring to enable me to pick it up (or even screw it done).

The bit I cannot figure out is how to ensure its flat and fits well....
 
Sponsored Links
dam - assuming you floorboards are something like 150mm wide then make a hatch flap out of a short section of the stuff - infact most packs of random length flooring will contain short bits. Trim off the tongue along one long edge, cross-cut across the ends creating slight tapers (these tapers accommodate the opening & closing). What you have just created is the trap-door/hatch flap. Now you have 2 choices on how to install this into the floor: loose fit (drop-in) or hinged.

Loose-fit/drop-in means it'll have to be supported in-situ by 'below floor' cleats or battens. Obviously you'll need a handle of some type to lift or a finger hole.

The the best functioning type of hinge for the second method is a couple of dowels (pivots) drilled into the edges of this flap; corresponding holes are drilled into the adjoining floorboards. If you position these pivots correctly you can open the flap by pressing down on the 'short end' beyond the pivots ... the 'long-end' will pop-up. This method does away with the need for a handle. We use this technique for installing 'below floor' safes. What you see from above is what looks just like a bit of ordinary flooring.
 
Many thanks, the hatch will be near a wall so I can just end my floor a bit early to leave a gap for the hatch.

I'm liking the hidden door idea but don't quite get the hinges you will use - any link to piccy?

I will probably lift the hatch about 6 times a year (audio cables etc) - so if I can avoid screwing down I will.
 
dam - the 'hinges' are infact pivots made from wooden dowel (or metal rod). The secret to making this work is careful marking-out so the dowels and associated holes are inline otherwise the flap's action will bind. Also, on the underside of the flap create a groove (router or chisel) inline with the dowel holes ... this groove allows you to insert the dowels outwards into the mating holes in the adjoining floor boards. You'll notice, in my rough sketch, the opening end of the flap has a slight taper, this is to prevent the leading edge from binding. To operate you press down at 1 and it open at 2.
 
Sponsored Links
Excellent - many thanks.

I'm gluing my first row tonight!

I need to do some thinking as the loose end of the hatch will need supporting and the floor is going onto chipboard (floating) so I'm assuming I will have to glue the lid onto the chipboard (or something the same width) to get it to sit flush.

I'll ask again if I hit any problems.
 
dam - the taper on the leading edge of the flap matches a taper cut on the meeting end of the floorboard. These tapers prevent the flap from dropping down below floor level. If you want a belt & braces job leave a small section of your sub-floor (your chipboard) protruding below where the flap drops - this will act as a kind of cleat or support.

Also, and this only applies if you don't have a right-angle drive for you lekky drill, bore the holes (to receive the dowels) in the adjoining boards before you lay them, then do a dry-fit to check the flap action before applying the sticky stuff.
 

DIYnot Local

Staff member

If you need to find a tradesperson to get your job done, please try our local search below, or if you are doing it yourself you can find suppliers local to you.

Select the supplier or trade you require, enter your location to begin your search.


Are you a trade or supplier? You can create your listing free at DIYnot Local

 
Back
Top