Query about adding new light to existing cabling

  • Thread starter Thread starter slu
  • Start date Start date

slu

Joined
8 Jan 2015
Messages
8
Reaction score
0
Location
London
Country
United Kingdom
Hi All

first post - hopefully a simple one to solve. My flat still has the original cabling from when built (late 70's), and in the living room there is currently one light, one switch.

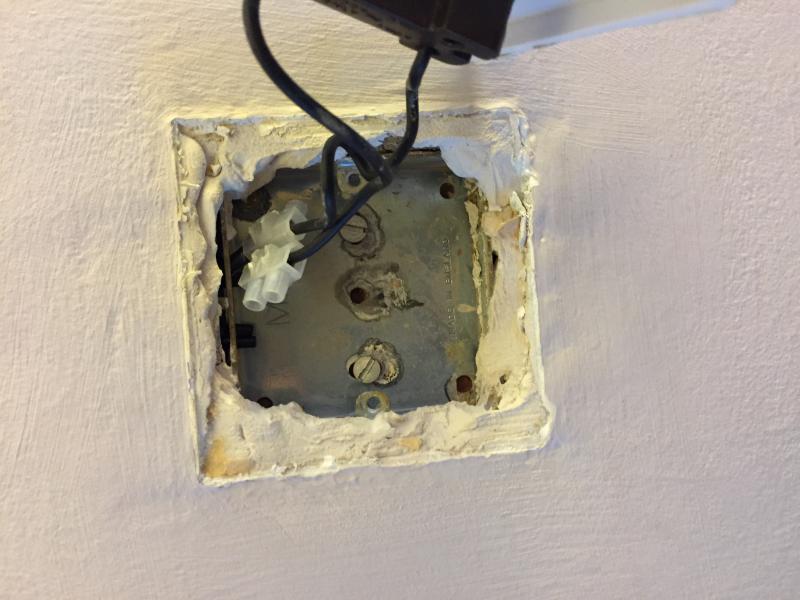
as it stands there is an old ceiling rose further along from the current light that appears to be linked by a channel thats been filled. its been removed and just the fitting still exists.

the unused rose has a few cables in ot connected together by screw down connectors - im guessing once upon a time at that point the connectors were spured off the the light that was there and now its almost like a pass through from the switch to the next fitting down that channel.

I just want to add a new light fitting where that rose once was, that operates off the same switch as the existing light - nothing flash, nothing fancy.

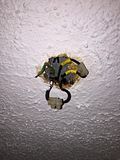
I have tested the voltage with a meter across the two black cables (see pic) and its at 240v regardless of if the light is on or off. One of the cables also has piece of tape wrapped round it (again see pics below).

Can anyone shed any light on how this might be cabled and if it will cause any issues to add another light.

This is the old, unused rose location with cover removed (click for bigger view):


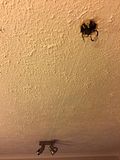
View of old rose connected by channel to existing light fitting:


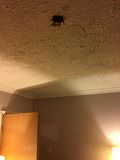
view of ceiling, rose and location of wall switch to give perspective:


ANy pointers would be helpful, was expecting standard live, neutral and earth cabling - not really sure where to start. thanks!
 
Your first picture doesn't seem to be showing.

Also what is the wiring like at the working light?
 
Your first picture doesn't seem to be showing.

Also what is the wiring like at the working light?

Thanks for the reply - sorry think i was just in the process of resizing, if you refresh it should be ok now. On the working light front, I haven't whipped that other one down yet, was aiming to do so at the weekend once I had purchased the pair of new light fittings.

intending using these:
http://www.homebase.co.uk/en/homeba...ts/rome-3-light-fitting---satin-nickel-959686
 
Does the channel run to your existing fitting?
Is it 240v between the earth and the taped cables?

It looks like they're joined for continuity to the next fitting, if you want to work both lights off one switch you will need to join into the switched live to reach the new fitting. The existing cables can just be connected to your new rose
 
What I find odd is I see the "channel" in the ceiling but I don't see any cables going in that direction. The only cables I see are going in a different direction and look like MICC which probablly means they have been there a long time (MICC is still available but rarely used for domestic wiring nowadays)
 
What I was trying to verify first is are the 2 taped cables neutrals, if they are you should get 240v between them and live

You just need to run a cable from switched live to your new rose as I said before
 
What I was trying to verify first is are the 2 taped cables neutrals, if they are you should get 240v between them and live

You just need to run a cable from switched live to your new rose as I said before

well, having used a meter I checked from the pair of taped cables to the other pair of connected black cables - which showed 240v regardless of the switch being on or off.

The problem is going to be getting a cable across from the existing rose, I was hoping that the existing roses were interconnected and wouldnt require additional cables adding (which would be somehow accessing the channel thats up there, although looking in the open rose I cannot see an opening).

:edit: and yes, the channel seems to span the gap between the two fittings, although as the poster above mentioned I don't see where/if the cables actually enter that channel as they are in a different direction.
 
A couple of questions and a guess.

Are all of the conductors in that box coloured black?
In the first picture (box close up) there are a couple of black things at about 12o'clock. Is that the end of two more wires that have been cut short?

If so, I would guess that the short wires are old unused ones from a switch and that the existing connectors are the live and neutral just remaining and looping through the box to other lights (you could disconnect one and see if other light(s) stop working.

Which takes us to the "channel". Maybe it is not a channel that has been filled (have you examined it to see?). Maybe there was a long track light, or a fluorescent strip connected to the remaining light fitting and those lines are just where a coat or two of paint has piled up against the track/florrie.

As I say, just a guess.
 
Things are looking good, try to thread a bit of 1mm cable along the trunking to your existing rose, you will only need the red or brown depending on age of your stocks and job is easy after that

Turn off mcb to your lights, connect live to to middle 3 connections ( you will only need 2, one is for a switch cable that you dont need), neutrals to conns marked n, your new cable connected at "switch" terminals at both roses, wire the light to your new rose
 
A couple of questions and a guess.

Are all of the conductors in that box coloured black?
In the first picture (box close up) there are a couple of black things at about 12o'clock. Is that the end of two more wires that have been cut short?

If so, I would guess that the short wires are old unused ones from a switch and that the existing connectors are the live and neutral just remaining and looping through the box to other lights (you could disconnect one and see if other light(s) stop working.

Which takes us to the "channel". Maybe it is not a channel that has been filled (have you examined it to see?). Maybe there was a long track light, or a fluorescent strip connected to the remaining light fitting and those lines are just where a coat or two of paint has piled up against the track/florrie.

As I say, just a guess.

Yes - all cables are black - and yes there are two cut cables not terminated, you are correct (I actually forgot all about these).

You could well be right - it may have been a tube or some other type of strip that left the indentation on the ceiling - I will have another proper look this evening, and try disconnecting one of the connectors to see how it affects the other light.

One thing I would say is, if there was another switch in the room - there is no sign of where it may have been - I guess there is a possibility its wired back to the same switch box, and that one upon a time there may have been two switches there, or alternatively the existing working light was retro fitted back to the same switch box and the original just left.

thanks all for your replies, good place to start.
 
Have a peek in the switch box, there may be an unused pair of wires there.

If so, there my be an easy(ish) solution)
 
click for bigger view

shake%20head.gif


screenshot_307.jpg
 
Pics are just uploaded to photobucket and linked, nowt more than that.

Having taken a look in the switch box now, can confirm that there is a snipped pair of black cables in the box (very similar to what is in the spare light fitting), so im assuming that once upon a time the light fitting may have had 2 switches, one for each fitting.

I have also tried disconnecting the cables in the spare fitting, to see how it affects the other light - having tried both the cables individually, and then both, nothing affects the other fittings power or switching so it seems it must be linked individually, and as suggested above what I though was a channel must be some form of paint effect on the ceiling.

So im guessing that its a case of trying to put in a new switch plate and reconnect the original cables in the spare rose - problem now is that the cables that are cut are cut back so short with no slack.
 
Hi Slu
This is the old, unused rose location with cover removed (click for bigger view):
Problem is with Photobucket links you do not get a bigger view.
You do get a bigger view if you do it the DIYNOT way .

So im guessing that its a case of trying to put in a new switch plate and reconnect the original cables in the spare rose - problem now is that the cables that are cut are cut back so short with no slack.

Possibly. But before you go too far, I suggest you do a continuity test to see if the wires are still connected and havent been snipped anywhere else!

If they are too short, you may be able to chop out a bit of the ceiling that will be covered by the new light fitting, and make a joint at that point, > join and shrink sleeve a crimped joint. Sounds like fun?
 
  • Thanks
Reactions: slu
(imagine this photo rotated 90 degrees clockwise - but you get the idea with the snipped cables)

Yep makes sense - will need to check the existing cables, although testing is going to be a bit of a chore with the cables being as short as they are, the rose end isn't so bad but switch end has all of 2-3mm to spare and the box is well and truly embedded, with no access behind it.

will have to put a voltage across the cables and stick a meter across them at the switch end to see if they still connected.

thanks for the replys so far - any ideas on how to extend that cable would be appreciated (providing its connected still).
 

If you need to find a tradesperson to get your job done, please try our local search below, or if you are doing it yourself you can find suppliers local to you.

Select the supplier or trade you require, enter your location to begin your search.


Are you a trade or supplier? You can create your listing free at DIYnot Local

 
Back
Top