• Looking for a smarter way to manage your heating this winter? We’ve been testing the new Aqara Radiator Thermostat W600 to see how quiet, accurate and easy it is to use around the home. Click here read our review.

Removal of radiator no bleed valve

Joined
9 Nov 2025
Messages
6
Reaction score
0
Country
United Kingdom
Hi there,

First time doing this, and trying to learn.

Attempting to remove a radiator with no bleed key.

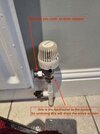
I have isolated the valve on the left with a spanner (it's now tight), and closed the thermostat on the right.

I have attached a photo - the 'drain valve' below the thermostat valve drains if the thermostat is on 5 or 0.

Trying to drain the radiator by loosening the horizonal nut, and the amount of (clean) cold water is excessive, and the pressure isn't reducing.

Have I missed a step?

Should I expect the water to run fpr a long time with some pressure?

What am i doing wrong?

Thanks in advance.
1000114586.jpg
1000114585.jpg
1000114584.jpg
 
Look behind the radiator there will be a pladtic round cap and once you’ve taken that off a bleed valve

But this isn’t needed to remove the radiator. To do that..
You may need to unscrew the thermostatic head and screw on a cap or simply find a way to keep the pin pushed in.

Edit.

I just realised what you are doing.

The “drain valve” is to drain the system. Not the radiator. Once you’ve isolated the radiator by closing each end you will need to drain the radiator into a pot or bucket by opening one end. Once it feels like most of the water is gone. Open the other end and more will come. After maybe 5 mins it will be empty.
 
Last edited:
The valve below the 'stat is for the system water, if the valves are completely shut, using that drain cock will not empty the rad, just the rest of the system. Slacken the big nut on the left hand valve while keeping a baking tray under it (baking tray should be shallow enough to fit under rad), water will come out, but should quickly stop if the valves have shut off. Have some old towels handy to soak up any water.
 
Thanks all.

Interesting, this is the very video I watched before attempting.

I have tightened both the thermostat dial to 0, and the left hand valve.

I ran the water out on the left hand side, below the thermostat valve, and above the system drain for perhaps 15 minutes. The water was clean, cold, and kept a constant pressure. I was expecting the water to slow and the pressure to dull, it didn't.

Should I be thinking that the thermostat valve isn't closed?

Also, it's getting late, I have stopped the job, opened both valves and put the heating on. The radiator heated immediately. Is this a sign that one of the valves we filling the radiator whilst I was draining it?

Thanks again.
 
Well one of the valves isn't working so assuming it's the radiator valve you need to remove the top control section of this via the knurled nut holding it in place and replace it with a capping piece that holds the thermostat pin down
 
Why do you want to remove the radiator, if it's just to decorate and then put it back there is another option.
 
what do you mean by
I ran the water out on the left hand side, below the thermostat valve, and above the system drain for perhaps 15 minutes.
if thats what i think you mean - then you drained the system down - not the radiator at all - if off

see image with annotation

opened both valves and put the heating on.
so that maybe an issue - if it pressurised or if just gravity feed - then the header tank in loft may have topped up
 

Attachments

  • 1000114586.jpeg
    1000114586.jpeg
    240.9 KB · Views: 20
Plus...

I have tightened both the thermostat dial to 0, and the left hand valve.

Yup - in your photo the TRV is on the right, and the lockshield one is on the left.

But then

I ran the water out on the left hand side, below the thermostat valve,

But anyway - whichever side, if you loosen a valve where it joins the pipework, you'll drain the entire system. And if it's gravity fed and you've not turned off the feed to the header tank or tied the ball valve up, it will drain forever.
 
Why do you want to remove the radiator, if it's just to decorate and then put it back there is another option.
I would like to remove it to repair the wall behind it, and redecorate. What is the other option?
 
Plus...


Yup - in your photo the TRV is on the right, and the lockshield one is on the left.

But then


But anyway - whichever side, if you loosen a valve where it joins the pipework, you'll drain the entire system. And if it's gravity fed and you've not turned off the feed to the header tank or tied the ball valve up, it will drain forever.
Yes, the horizonal valve to the left hand side of the thermostat (not the valve on the left of the radiator)

There IS a tank in the attic, yep. However, I thought if I isolated the radiator using the valves either side, than that would isolate everything? No?

Thanks all.
 
If you close both radiator valves the radiator can be drained by loosening the joint/s where the valve connects to the radiator. A receptacle will be needed to contain the water.
As others have advised ,the drain cock below the TRV will drain the system ,and not what you want.
 
I would like to remove it to repair the wall behind it, and redecorate. What is the other option?
If you can lift the radiator enough to get it off the bracket, you can loosen the fittings a tad and hinge it downwards. You'll get some water coming out until you tighten them again, but not a lot.

But that said, if you remove it completely, you can take it outside, shove a hosepipe into it, and give it a flush.
 

If you need to find a tradesperson to get your job done, please try our local search below, or if you are doing it yourself you can find suppliers local to you.

Select the supplier or trade you require, enter your location to begin your search.


Are you a trade or supplier? You can create your listing free at DIYnot Local

 
Back
Top