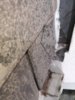
When slating a roof like yours every slate has a "lead soaker"up the abutting wall underneath then starting off with lead soaker under the first slate and stretching over the facia board so the rain runs down the roof and the lead under the first slate kicks it into the gutter.They are usually turned up the wall about 4 inches and every one over laps each slate as they go up the roof.Then a lead cover flashing goes up the wall and over laps the upstand of the soakers.The lead flashing is not made of one piece of lead, it might be four or more sections of flashing and they are over lapped (about 4-6 inches or more) before the flashings have been put on, it it must be decided wether it is "chased" into the wall.That means there must be a chase cut into the wall and the flashings must have a "lip"bent over (I used to bend them over about an inch). After grinding a chase down the wall at the height you want them to go into (Not forgetting the chase has to be double the size of the lead you use as when each lip of the flashing are put into the chase each one over laps the one below).We used to tap them into the wall and make lead wedges to tap into the groove where the lead fits and and knock them in with a thin chisel to knock them home.After they were all in then you use non silicon mastic and run a line of it up the gap where the edges of the flashings are. Any rendering or beads put on the wall starts above mastic joint, so if in future if a slate or slates have to be replaced all you do is fold the lead up and no bother (also having the flashings done in sections it helps to lift them when you need to. It looks like they did the right thing about keeping the height of their work above the flashing but instead of returning their work a bit further down below the gutter line has caused the problem of not letting the water get away as it runs down the roof and gets trapped in that little corner!!! They should of let the gutter run through and dressed lead under the last slate to run the water off into the gutter. I don't think they thought or couldn't think that one out. So get them back and make them cut that bottom right hand side area out so the water coming down that edge goes into the gutter!!! Shouldn't be too hard and that would sort the problem out...One last question did they put new lead down the wall before cladding it? If so you will have problems if you ever need to change a broken slate in that area.P,S. Never use silicon on lead!!!