

Hi
I recently bought a big old 1959 detached house in Worcester in need of complete refurbishment.
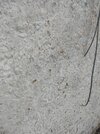
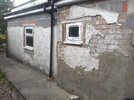
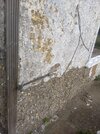
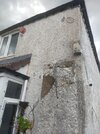
My first main job is the outside. The whole house down to waist height level is covered in what I believe is called 'Roughcast', a lumpy porridge like rough finish painted white with chips/stones that appear to be between 6mm to 8mm. In general, it is in fairly good condition apart from 12 cracks. 5 of these cracks are hairline and the rest are significant, blown and lifting with damp underneath including the previous owners attempts at repairing them. In places it appears to have had roughcast sprayed over old rough cast and this is where some of the main cracks are. I do feel these cracks just need repairing at this stage and doesn't really warrant taking it off to redo the whole wall. There are no hollow areas when I tap.
I am a fairly competent DIYer but have never experienced or worked with roughcast/render before. I didn't want to be lazy and just post a message here. I have searched through various posts and archives on the net but I am still unsure as the exact process involved to repair these. Some guidance and correction would be appreciated.
Is this correct guys?
I am to grind out the more damaged suspect areas/cracks back to the brickwork making the area sound and clean.
Apply a 3 to 1 sand and cement mix to the wetted bricks and scratch that coat up and leave for 24 hours. I have been told NOT to use any PVA type sealer, just water the bare bricks only.
Next day apply a 4 to 1 sand and cement mix (less cement) to build up the area but keeping it just below the rough cast top coat surface. Is this 2nd render coat to be more sandy/less cement to reduce future cracking? This to be left a further 24 hours. Next day do I use a PVA sealer at this stage? Or keep that off altogether?
Now do I use a 'Tyrolean mix' with my chosen aggregate? I have two 25kg bags of Tyrolean and believe I am to flick/throw this on? I am ok with the application process. I have some plastering experience and patience. So I can mess with this and manipulate the finish to make it blend in etc. I think!
Do I need to include an additive of any kind in the 3 mixes such as a primer/render bonding additive or what I have read is a damp proofer to be included???
The materials I have at the moment are bags of building sand, cement, Tyrolean, SBR add mixture, PVA sealer. I have a trade account with Selco Birmingham so have access to most of the materials I may need. I was also told I will need 6mm or so, lime chippings. Is this something I can acquire from most building suppliers as I have never heard of them??? Do I also grind out even the hairline cracks or just brush a cement type mix up in these minor ones? Will that last a while or will the cracks re-appear if I don't open them up and repair them properly?
Please advice me on my thinking as I want to get this correct in my head before I attempt this. I have a roughcast coated wall inside the garage to play around with first. I will do some test areas in there. Not sure if I am making an over the top fuss with all the detail here. When I am unsure of a procedure that I have not done before I do fuss till I know what I need to do.
Your advice on this will be really appreciated as the few people I have chatted with have given me conflicting information on how to proceed.
Luke
I recently bought a big old 1959 detached house in Worcester in need of complete refurbishment.
My first main job is the outside. The whole house down to waist height level is covered in what I believe is called 'Roughcast', a lumpy porridge like rough finish painted white with chips/stones that appear to be between 6mm to 8mm. In general, it is in fairly good condition apart from 12 cracks. 5 of these cracks are hairline and the rest are significant, blown and lifting with damp underneath including the previous owners attempts at repairing them. In places it appears to have had roughcast sprayed over old rough cast and this is where some of the main cracks are. I do feel these cracks just need repairing at this stage and doesn't really warrant taking it off to redo the whole wall. There are no hollow areas when I tap.
I am a fairly competent DIYer but have never experienced or worked with roughcast/render before. I didn't want to be lazy and just post a message here. I have searched through various posts and archives on the net but I am still unsure as the exact process involved to repair these. Some guidance and correction would be appreciated.
Is this correct guys?
I am to grind out the more damaged suspect areas/cracks back to the brickwork making the area sound and clean.
Apply a 3 to 1 sand and cement mix to the wetted bricks and scratch that coat up and leave for 24 hours. I have been told NOT to use any PVA type sealer, just water the bare bricks only.
Next day apply a 4 to 1 sand and cement mix (less cement) to build up the area but keeping it just below the rough cast top coat surface. Is this 2nd render coat to be more sandy/less cement to reduce future cracking? This to be left a further 24 hours. Next day do I use a PVA sealer at this stage? Or keep that off altogether?
Now do I use a 'Tyrolean mix' with my chosen aggregate? I have two 25kg bags of Tyrolean and believe I am to flick/throw this on? I am ok with the application process. I have some plastering experience and patience. So I can mess with this and manipulate the finish to make it blend in etc. I think!
Do I need to include an additive of any kind in the 3 mixes such as a primer/render bonding additive or what I have read is a damp proofer to be included???
The materials I have at the moment are bags of building sand, cement, Tyrolean, SBR add mixture, PVA sealer. I have a trade account with Selco Birmingham so have access to most of the materials I may need. I was also told I will need 6mm or so, lime chippings. Is this something I can acquire from most building suppliers as I have never heard of them??? Do I also grind out even the hairline cracks or just brush a cement type mix up in these minor ones? Will that last a while or will the cracks re-appear if I don't open them up and repair them properly?
Please advice me on my thinking as I want to get this correct in my head before I attempt this. I have a roughcast coated wall inside the garage to play around with first. I will do some test areas in there. Not sure if I am making an over the top fuss with all the detail here. When I am unsure of a procedure that I have not done before I do fuss till I know what I need to do.
Your advice on this will be really appreciated as the few people I have chatted with have given me conflicting information on how to proceed.
Luke

 .
.")