
- Joined
- 14 Jul 2021
- Messages
- 7
- Reaction score
- 0
- Country

Hello everyone, like the subject suggests I try to replace my by UP2 ( Invensys T45 ) with a Honeywell T6 thermostat. The boiler is a Glowworm Fuelsaver 35F.
My UP2 controls both the hot water and heating but the T6 only does central heating. I will not use the hot water - only the central heating to this is okay.
I do not know how to connect the wiring. I thought I did it correctly and powered it on and the boiler did not come on so obviously I had wired it wrong.
The wiring inside the boiler on the chocolate block does not marry up with the wiring diagram in the manual for the boiler.
This is the existing setup:
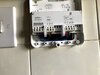
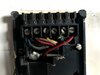
Programmer:


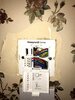
Thermostat:


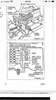
Boiler connections:


How it is now:
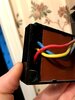
Thermostat (yellow wire isolated in wago block in backbox)

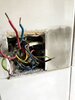
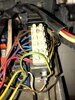
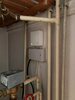
Programmer location:
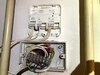
(Far left I believe is incoming supply, top two (Rd and Bl) from thermostat which has been confirmed by belling it out - again yellow wire isolated in a wago. There is a chocolate block with L, N and E, coming from a twin and earth and other side is flex which I believe goes to the boiler. The flex that is visible - L,N and earth - the brown bells out to terminal 11 on the boiler but the flex coming into the boiler is 4 core on the boiler picture but here it is just 3 core. There is also a random neutral wire on its own coming into the back box - I have no idea where this is from.

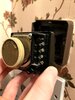
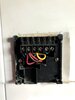
Programmer replacement:
Wired to diagram A which did not work when requesting the boiler to turn on - note terminal B connected to brown as seen far right on photo above.


I have no idea how to connect the wiring up - someone please help me!
My UP2 controls both the hot water and heating but the T6 only does central heating. I will not use the hot water - only the central heating to this is okay.
I do not know how to connect the wiring. I thought I did it correctly and powered it on and the boiler did not come on so obviously I had wired it wrong.
The wiring inside the boiler on the chocolate block does not marry up with the wiring diagram in the manual for the boiler.
This is the existing setup:
Programmer:
Thermostat:
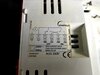
Boiler connections:
How it is now:
Thermostat (yellow wire isolated in wago block in backbox)
Programmer location:
(Far left I believe is incoming supply, top two (Rd and Bl) from thermostat which has been confirmed by belling it out - again yellow wire isolated in a wago. There is a chocolate block with L, N and E, coming from a twin and earth and other side is flex which I believe goes to the boiler. The flex that is visible - L,N and earth - the brown bells out to terminal 11 on the boiler but the flex coming into the boiler is 4 core on the boiler picture but here it is just 3 core. There is also a random neutral wire on its own coming into the back box - I have no idea where this is from.
Programmer replacement:
Wired to diagram A which did not work when requesting the boiler to turn on - note terminal B connected to brown as seen far right on photo above.
I have no idea how to connect the wiring up - someone please help me!


")

") I wish all so called 'professional' installations looked as good as that.
I wish all so called 'professional' installations looked as good as that.