

I need some help with my nest install. With my old system I could either have the hot water, or heating and the hot water on. I'd like to be able to select either or/both via the nest.
The old set up: I had an old randall 102 and Honeywell T6360 stat in my 1980s house. It looks like it's an Y plan system, one pump with a T valve, hot water tank in the airing cupboard with two tanks in the loft, a small one (expansion) and a large one. The boiler is a Glow-worm Flexicom 24HX.
New set up: I took out the Honeywell stat and connected the wires together (as per instructions). I run the nest 3rd gen from a dock in the corner of the living room. I replaced the randall 102 with the link unit.
Problem: When I turn the heating on, the nest and nest app says it's heating but the boiler and pump dont kick in. If I turn the hot water on as well then the pump and boiler turn on and the house gets warm, as does the hot water obviously.
Attached are photos of:
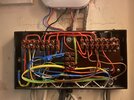
-The old and new wire boxes,
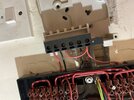
-The old randall plate (1 Water on, 2 Heating on, 3 Com, 4 earth, 5 N, 6 L)
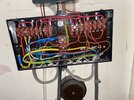
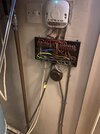
-Nest link. L is looped to pins 2 and 5
-The nest link wiring, fyi the red cable from nest 6 that's on the right comes down and around in the bottom of block 11. The red cable from nest L goes to the top of block 10.
-Other info
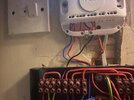
--The thick white cable on the left goes to the tank thermostat,
--The black cable (look on old wiring box for better light) goes to the valve,
--The dark grey on the right goes down to the boiler, you can see it come back up to a brown round junction box which goes off to the pump
--At the top of the junction box is a thick grey cable, this is the power from the switched spur to the left of the link
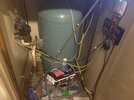
-Airing cupboard
I suspect I need to change the wiring, any help would be much appreciated.
Thanks
A
The old set up: I had an old randall 102 and Honeywell T6360 stat in my 1980s house. It looks like it's an Y plan system, one pump with a T valve, hot water tank in the airing cupboard with two tanks in the loft, a small one (expansion) and a large one. The boiler is a Glow-worm Flexicom 24HX.
New set up: I took out the Honeywell stat and connected the wires together (as per instructions). I run the nest 3rd gen from a dock in the corner of the living room. I replaced the randall 102 with the link unit.
Problem: When I turn the heating on, the nest and nest app says it's heating but the boiler and pump dont kick in. If I turn the hot water on as well then the pump and boiler turn on and the house gets warm, as does the hot water obviously.
Attached are photos of:
-The old and new wire boxes,
-The old randall plate (1 Water on, 2 Heating on, 3 Com, 4 earth, 5 N, 6 L)
-Nest link. L is looped to pins 2 and 5
-The nest link wiring, fyi the red cable from nest 6 that's on the right comes down and around in the bottom of block 11. The red cable from nest L goes to the top of block 10.
-Other info
--The thick white cable on the left goes to the tank thermostat,
--The black cable (look on old wiring box for better light) goes to the valve,
--The dark grey on the right goes down to the boiler, you can see it come back up to a brown round junction box which goes off to the pump
--At the top of the junction box is a thick grey cable, this is the power from the switched spur to the left of the link
-Airing cupboard
I suspect I need to change the wiring, any help would be much appreciated.
Thanks
A
Attachments
Last edited: