Hi,
The Flush / Siphon in our cistern al has been playing up difficult to flush and has now got to the point where it’s becoming a real issue. It’s an old toilet and seems to have a one piece flush / Siphon. How do I ensure I get the correct size / type replacement.
Only markings on the top of the blue Syphon are the names “Caradon Bathrooms Ltd Made in England” and a clock face on its 96 and an arrow pointing to the 5 - is this Month/ Year of manufacture (May 96)?
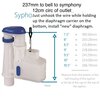
Measured from the bottom of the flush to the underside of the cap of the Siphon (as per pictures) is 237mm. The outlet pipe into the toilet bowl has an external circumference of about 12cm.
I take it I empty the cistern, tie off the inlet (to stop water re filling, then undo the plastic nut on the underside of the cistern, disconnect the handle and replace?
Just need help getting the correct replacement. Screwfix or City Plumbing link would be best.


The Flush / Siphon in our cistern al has been playing up difficult to flush and has now got to the point where it’s becoming a real issue. It’s an old toilet and seems to have a one piece flush / Siphon. How do I ensure I get the correct size / type replacement.
Only markings on the top of the blue Syphon are the names “Caradon Bathrooms Ltd Made in England” and a clock face on its 96 and an arrow pointing to the 5 - is this Month/ Year of manufacture (May 96)?
Measured from the bottom of the flush to the underside of the cap of the Siphon (as per pictures) is 237mm. The outlet pipe into the toilet bowl has an external circumference of about 12cm.
I take it I empty the cistern, tie off the inlet (to stop water re filling, then undo the plastic nut on the underside of the cistern, disconnect the handle and replace?
Just need help getting the correct replacement. Screwfix or City Plumbing link would be best.