Replacing Altech ALTHC001 Controller with Nest 3rd Gen

Thanks @ianmcd and @stem in advance.

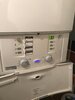
As above I got the boiler running last night which was fine for rads and hot water. It ran really hot (85 degrees C?). Got it to turn off by flicking the valve back over to auto (took about 5 mins then switched off).

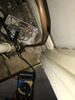
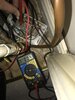
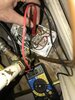
This morning I did a similar procedure to get the radiators warm -> valve to manual, controller HW/CH both on continuous, ran some hot water for a few minutes then around 5/10 minutes later the boiler fired up and started heating the water (which had the effect of warming the radiators too since the valve was open). Again ran really hot (picture attached) till I flicked the valve back over to auto.

I couldn't really tell which of these steps was required/having an impact so ran some experiments this afternoon:

1/ Valve to manual -> waited 10 mins - nothing
2/ 1 + HW on controller -> waited 10 mins - nothing
3/ 2 + CH on controller -> waited 10 mins - nothing
4/ 3 + ran hot tap for 3 mins -> waited 10 mins - nothing
5/ Repeated 4... still nothing. However I did notice the hot water coming out of the tap was very very hot - measured with the only thermometer I had to hand and it was 60 degrees at least out of the tap.
[EDIT AGAIN: some 20/30 mins after this experiment, and after typing this post, boiler has fired up and is heating radiators...]

So my current working assumption is the boiler will fire if the thermostat in the tank triggers - i.e. the tank has cooled below c. 60 degrees - and the controller hot water is on. But the valve is not operating correctly and the central heating control is not operating correctly (and/or the boiler is not responding correctly). I think the boiler is "overheating" the water because I was using it to also drive the CH but I'm not sure.

Is there any way to test each component separately to try and figure out what needs fixing?

Any help here much appreciated before I get someone out... thanks

EDIT: forgot picture
 

Attachments

  • boiler at 83.jpg
    boiler at 83.jpg
    164.8 KB · Views: 45
Last edited:
Sponsored Links
I can't see anything obvious.

From your description, it appears that the hot water may be working properly. The boiler will heat up the hot water cylinder and switch off when it is hot. It will only come on when a considerable quantity of water has been used and the temperature has dropped. Although the blown fuse does worry me slightly. Normally with a 3A fuse you tend to get away with it, usually I find that it's when there's a 13A fuse fitted the welding of the contacts occurs. However it can be tested.

It appears that you have a multimeter, so if you are able to perform the tests below safely, it might give you a pointer.

Remove and isolate all of the the wires from the Nest Heat link switching terminals 1 to 6, leaving just the N & L connected, and restore power.

Set the multimeter to resistance (Ohms Ω)

With the heating set to be 'on'
measure the resistance between terminals 2 & 3 (correct result will be OΩ)
measure the resistance between terminals 2 & 1 (correct result will be infinity)

With the heating set to be 'off'
measure the resistance between terminals 2 & 3 (correct result will be infinity)
measure the resistance between terminals 2 & 1 (correct result will be OΩ)

With the hot water set to be 'on'
measure the resistance between terminals 5 & 6 (correct result will be OΩ)
measure the resistance between terminals 5 & 4 (correct result will be infinity)

With the hot water set to be 'off'
measure the resistance between terminals 5 & 6 (correct result will be infinity)
measure the resistance between terminals 5 & 4 (correct result will be OΩ)
 
Have to say as I said earlier when you popped the fuse I think you have damaged something, you didnt say why the fuse blew and what you did to stop it blowing
 
Have to say as I said earlier when you popped the fuse I think you have damaged something, you didnt say why the fuse blew and what you did to stop it blowing
I’m quite sure I’ve damaged something yes.
The short which blew the fuse was across the L/N connections to the nest controller (I think I had stripped the wires too far back - it’s amazingly fiddly) and I was initially very concerned I had damaged it but since it powered on and communicated with the wireless thermostat it didn’t seem to be damaged. In any case, the system doesn’t work when I revert to the old Altech controller either as far as I can tell so I’m pretty it’s something else.

Typically the battery on my multimeter has gone from lack of use but I will pick up a fresh one first thing tomorrow and do as @stem suggests first to just confirm nothing is damaged in the nest controller before any further steps.

edit: should add thanks both for continued support
 
Sponsored Links
As the short circuit occurred between the Nest N and L supply wires, they are outside of its switching circuits therefore I wouldn't have expected it to cause any damage to the Nest switching contacts. So, then based on the symptoms you describe, I would start to consider that the motorised valve is faulty.....except if it was the heating wouldn't work when you restored the original controls, and you say it does.

One quick test you could do, when the heating is set to be 'on', the motorised valve white wire should be live. If it is live and the valve isn't moving to the heating position, then the valve is faulty.

Nest Heat links have horrible connections, they can be difficult even for those of us familiar with them. As you have discovered they are quite close together and I have seen several that appear to be installed properly but on closer inspection the screws were not tight enough, or were on the insulation instead of the conductor. Having said that, this would be unlikely to be the situation here, it would be very unlikely that you would install the Heat link with a bad connection and then remove it, reinstall it and repeat the bad connection. Unless the bad connection was the loop in terminal 2 and it wasn't disturbed in the transfer (long shot here)

However the bottom line is, if the heating works with the Altech and when you replace it with the Heat link it doesn't. Then all indications are that there's a problem with the Heat link....finding it would appear to be another matter. Keep us posted.
Sorry to be clear - the CH doesn't work when I reinstall the Altech. So my sense is it's something else. I will check the valve as well as the Nest when I've sorted my multimeter and report back. Many thanks

I also forgot (foolishly) there is a separate loop for the under-floor heating in the conservatory with its own thermostat and pump. But I think it's pretty "stupid" in that it's got a built in timer on the thermostat and literally runs the pump when the main central heating is on (or doesn't if the temperature is met). Having said that the pump has not been running today when I switched the main CH valve to manual so that suggests to me that the CH control line is somehow not working. Will test a few lines and report back as I say!
 
Ah OK that's sort of good news then, the Heat link is probably alright. If neither of the controllers are working, then that would indicates that the fault is not with them. When you said:
I have reverted the controller wiring (before and after pic attached - I note an earth wire is loose in the picture - subsequently fixed). This seems ok.

I thought by 'seems ok' you meant it was working.

The check for 230V between the motorised valve white wire (L) and blue wire (N) when the heating should be 'on' would be my first check.
 
I think you have damaged the mid position valve when you shorted and blew the fuse the circuit
 
Ah OK that's sort of good news then, the Heat link is probably alright. If neither of the controllers are working, then that would indicates that the fault is not with them. When you said:


I thought by 'seems ok' you meant it was working.

The check for 230V between the motorised valve white wire (L) and blue wire (N) when the heating should be 'on' would be my first check.
[Ok so with the nest on manual (both hot water and CH on) I’ve got a reading of nil across those poles (see picture).
With just CH and no HW same result. Pretty sure I’m on the right wires from the valve (black cable entering wiring from the bottom in this picture -as awkward as everything in this system!)]
EDIT 2 - ignore this did it wrong as below


EDIT: does the valve need to switch to trigger the boiler to fire? I presume this is then the fault
 

Attachments

  • 9F6BA686-8907-4A38-821F-1AA5DAB6C26C.jpeg
    9F6BA686-8907-4A38-821F-1AA5DAB6C26C.jpeg
    274.8 KB · Views: 53
Last edited:
your Multi meter is set to DC you need to set it to AC, also why are you testing to earth when you have been told to test between the white wire and neutral ?
 
Last edited:
your Multi meter is set to DC you need to set it to AC, also why are you testing to earth when you have been told to test between the white wire and neutral ?
Doh! I blame the crap lighting in that cupboard!
You are right on both counts. Testing white to earth 240V... more importantly... testing white wire to neutral with HW or CH on gives 0V in both cases.
 

Attachments

  • 6679A674-1289-47EA-A4B5-2B4E16E66FF8.jpeg
    6679A674-1289-47EA-A4B5-2B4E16E66FF8.jpeg
    351.3 KB · Views: 57
select heating and HW both to on and test at the nest between N and 4 then 5 then 6 you should get 230v AC at all 3 terminals
 
select heating and HW both to on and test at the nest between N and 4 then 5 then 6 you should get 230v AC at all 3 terminals
Both CH and HW on
Neutral and 4 - nil
5 and 6 - nil

appreciate pictures aren’t great terrible angle let me know if need better ones ... many thanks for your patience!
 

Attachments

  • 36030A6E-8C39-4B40-9D36-558854835903.jpeg
    36030A6E-8C39-4B40-9D36-558854835903.jpeg
    302 KB · Views: 40
  • 4DB63BEF-6750-4705-8B70-D27BF9CED7D1.jpeg
    4DB63BEF-6750-4705-8B70-D27BF9CED7D1.jpeg
    334.6 KB · Views: 49
you have no idea what you are doing, put the red probe on the terminal with the white wire and the black probe on the second end terminal with the blue wires going into both ends
 
you have no idea what you are doing, put the red probe on the terminal with the white wire and the black probe on the second end terminal with the blue wires going into both ends
The white wire is terminal 5. You said terminal 4... so I did terminal 4 - see picture 1?
I guess you meant N+4, then N+5, then N+6?
If I knew what I was doing I wouldn't be asking chap.
Give me 2 mins and I will update.
 

DIYnot Local

Staff member

If you need to find a tradesperson to get your job done, please try our local search below, or if you are doing it yourself you can find suppliers local to you.

Select the supplier or trade you require, enter your location to begin your search.


Are you a trade or supplier? You can create your listing free at DIYnot Local

 
Sponsored Links
Back
Top