Replacing An Old Potterton Controller for a Drayton

Joined
13 Dec 2017
Messages
11
Reaction score
1
Country
United Kingdom
Hello

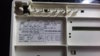
Hopefully a quick question. Moved into a house and one of the long list of issues is fixing the central heating. The issue is that the controller unit for our Potterton boiler is broken. Not sure of the exact model but its something like the EP2002 7 day unit. From what I'm aware I cant buy a new unit like for like, so I went for a Drayton LP722 model.

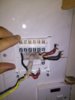
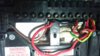
When I took the old unit away, I was presented with two wires (one 2 and one 3 core). I studied carefully how the old unit was wired in relation to the wiring diagram. But I wasn't confident of translating that across to the Drayton unit. Can anyone help me. I've included a picture of the wiring below. Its a standard open vented system with feeder and expansion tank in the loft. Hot water tank in one of the upstairs rooms, and boiler in the kitchen.

Many thanks
Ribble
 

Attachments

  • wiring.jpg
    wiring.jpg
    193.6 KB · Views: 818
Sponsored Links
To do that we need to know what each of the terminals of the original programmer did (and there are lots of variants, not all programmers have identical connections, even those from the same manufacturer). There should be a diagram marked on it somewhere showing this information.

Then we need to know which of the wires in your photo went to each terminal. From that we can work out what each wire does and then tell you where to connect them at the Drayton.

There's no such thing as a standard system when it comes to wiring unfortunately, much depends upon the layout of the various components of your heating system in relation to each other and the personal preferences of the installer.

Also, with the previous installation, could you have the central heating 'on' on its own, without the hot water also being on at the same time?
 
Ok - Posted a pic of the Potterton wiring diagram and a better pic of how the guy that installed it had wired it up.
 

Attachments

  • 20171214_230959.jpg
    20171214_230959.jpg
    153.5 KB · Views: 1,257
  • 20171214_231110.jpg
    20171214_231110.jpg
    222.3 KB · Views: 1,152
Sponsored Links
OK, thanks for the photo's you have all the information you need from those diagrams. So, it's just a matter of determining the function of each wire from its connection at the EP2002, and moving it to the terminal at the Drayton that has the same function, as follows:

Remove the link between the EP2002 L and terminal 5. The remaining red wire in terminal 5 is the Live = L at the Drayton
Black wire in N EP2002 = N at the Drayton
Red wire in 3 EP2002 (Hot water on) = Drayton terminal 3 (Hot water on)
Black wire in 4 EP2002 (Heating on) = Drayton terminal 4 (Heating on)
 
Stem - many thanks for all your help on this. Changed it over last night and really easy to follow your instructions. For the first time since we bought the house, we woke up this morning with the heating on! Thanks again
 

DIYnot Local

Staff member

If you need to find a tradesperson to get your job done, please try our local search below, or if you are doing it yourself you can find suppliers local to you.

Select the supplier or trade you require, enter your location to begin your search.


Are you a trade or supplier? You can create your listing free at DIYnot Local

 
Back
Top