Replacing single radiator for double - pressurised system

Joined
5 Mar 2013
Messages
58
Reaction score
3
Location
Berkshire
Country
United Kingdom
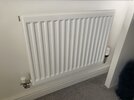
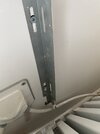
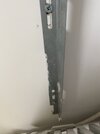
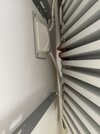
Hi, am planning on replacing a single radiator in my new build (ish) property. One of the bedrooms has 2 x windows, and a single radiaor of 450mm x 600mm and just doesn't seem to get it warm enough due to 2 x windows. Room is approx 3 x 3 ish but has 2 x windows and exposed to SW winds. I assume i can simply turn lockshield off one end, TRV off at other end, and then check they are holding by loosening bleed screw and make sure not a constant flow, before taking off at the radiator tails and putting double radiator on (hoping to find one with similar mounts as it is flexi pipe and doesn't have much play and don't want to be drilling new holes for rad mounts). Sorry there is a question in here! In order to fill up radiator after replacment, can i use a funnel on one top side of the radiator once installed to pour in water? I am paranoid about getting an air lock and thought maybe would help and then once i have put as much in manually this way, i can top it up using the filling loop / bleed etc, before turning on heating.

Thanks
 
Sponsored Links
Once you have isolated you need to crack open one end with a spanner and drain the old radiator in to a bucket etc. It's better to leave the bleed valve closed to control the drain. It wont actually tell you if the valve are holding. When you fit your new rad, assuming there is enough play in your pipes to allow for the single to double spacing from the wall, then you refill the radiator by opening the bleed screw, once all the nuts are tight again. If its a presurised system you'll need to let a bit of water back in via the fill loop.

I couldn't find a 450 x 600 double rad. If there is room for a 500 x 600 then you will double the output. But before going to all this bother it might be worth trying to balance the system by closing all the other rads except this one and let the central heating give it a good push through. Also double check your TRV isn't stuck by taking the head off.

In terms of making the mounts work, sometimes its easier to drill extra holes in the metal.
 
Last edited:
Thanks for the assistance, appreciated. It is an ideal logic heat 15, which is odd as i have 14 x radiators although a few small ones, and not sure it is designed for that many! But it works well, in that it heats up pretty quickly, but this small radiator just can't seem to heat that room (it does get hot though, the rad itself). Its the last room to warm up properly when the heating it on. I can certainly bring the radiator out a couple more inches, but my concern is fitting a taller one even 500mm would it move the radiator too low down to get it connected. I guess if i do as you say and drill the current mounts, i can make it work as can shift the mounting brackets up to accommodate the revised height. A few pics for reference. Looks like i could adjust the height of the mounts by sliding it up, although the bottom screws wouldn't then line up so i'd need to work round this, or maybe use the bottom one only as the fixed screw and top one in the sliding part (not sure if that makes sense)
 

Attachments

  • IMG_0319.jpg
    IMG_0319.jpg
    199.3 KB · Views: 43
  • IMG_0320.jpg
    IMG_0320.jpg
    212.5 KB · Views: 52
  • IMG_0321.jpg
    IMG_0321.jpg
    159.8 KB · Views: 51
  • IMG_0322.JPG
    IMG_0322.JPG
    93 KB · Views: 49
  • IMG_0324.jpg
    IMG_0324.jpg
    184.6 KB · Views: 44
Sponsored Links
can i use a funnel on one top side of the radiator once installed to pour in water
If you are asking that kind of question, then it may be advisable to get someone in to do the work for you. You wouldn't use anything like that to fill the rad, it is filled via the system and the system is filled via the filling loop. Turning off the lockshield valve and the TRV should isolate the rad, once they are turned off then open the bleed valve, if the water eventually stops then the rad is isolated.

Very unlikely to get the same brackets and mounting as what is currently there unless you can match the make.

You can get 450mm high by 600mm wide Type 22 (K2), if that's what you are looking for?
 
Thanks Rob - maybe i should leave it to a professional, i just thought it might save some air entering the system by filling from the top but ignore that comment then! It seems straightforward to do but appreciate the bracket issue. The screwfix one i have seen comes with brackets. And there is room above the radiator to allow for a slightly taller one.
 
So you'll need some plasterboard fixings and PTFE tape as well as an adjustable spanner, some towels and saucepan / bucket.

Are you competent to install the plasterboard screws, should you need new ones?

The self tapping metal ones are good.
 
Yeh i've done DIY with plasterboard holes etc in the past, got all the tools as i do my own car servicing etc. Think i will get the screwfix radiator, and measure where the hangers are on the back of the radiator so i can see if they would possibly fit the existing brackets, or alternatively try and understand if i am going to need to drill new holes for the new brackets, or as you said, drill the actual bracket instead which would avoid some agro with plasterboard.
 
Obviously (hopefully) make sure your heating is not on, when you refill the new radiator.
 
As long as the width is the same then the pipework should stretch.

It will need a bit of juggling with the brackets but given it's on 10mm plastic then a little change in the height won't matter much.

Mark on the wall, in pencil to rub out later, where the current valves sit, that give you the starting point to mark up the new brackets. Always check the old ones to the new in case they are the same, if so then happy days. If not just make sure you use a level for the new brackets to ensure the fitted rad sits right once finished.
Many thanks - there is some pipe movement due to them being the plastic type, but i would say they only really move out and not down if that makes sense, hence my thought on re-locating the new rad brackets slightly higher up to account for the difference in the radiator height being 500mm instead of 450mm. When you say mark the values on the wall, do you mean mark the old brackets on the wall? Sorry was not sure. thanks
 
No need, the bottom of the rad will be the same regardless, as is the position of the valves, it will just end up being 50mm higher up the wall. You want to mark the current valve positions so you know where they need to be when the new rad is fitted. They are a fixed point so they are the starting point for lining up and measuring.

There are lots of tutorials on how to fit rads but the key measurements will be - the height from the floor to the current horizontal valve centre, then the distance from the centre of the radiator tapping where the valve tail will be fitted (which is the same as the valve centre) on the new rad to the bottom of the rad hanging bracket. That dictates where the bottom hook of the bracket's horizontal line will need to be marked on to the wall. Offer up the new rad to the wall between the valve marked positions and mark the centres of the top brackets on the wall, that gives the bracket vertical line. Then use a level to plumb a line through the vertical mark down to the horizontal height mark, then the bracket gets offered up against that line so the hole positions can be marked.
 

DIYnot Local

Staff member

If you need to find a tradesperson to get your job done, please try our local search below, or if you are doing it yourself you can find suppliers local to you.

Select the supplier or trade you require, enter your location to begin your search.


Are you a trade or supplier? You can create your listing free at DIYnot Local

 
Sponsored Links
Back
Top