
Has stopped dispensing water, suspected water valve but is taking in water on ice maker and freezer running normally, a couple of days after water stopped fridge side stopped cooling properly only maintaining 12 degree's.Any ideas?

You are using an out of date browser. It may not display this or other websites correctly.
You should upgrade or use an alternative browser.
You should upgrade or use an alternative browser.
SAMSUNG SIDE BY SIDE F/FREEZER PROBLEM.
- Thread starter foxhole
- Start date
Found the problem here.http://forums.moneysavingexpert.com/showthread.html?t=227697&page=7
seems to be very common design fault in Samsung F/F.
seems to be very common design fault in Samsung F/F.
Open fridge side, turn off power and disconnect from mains supply, water connection can remain though you will need to access the rear of the fridge.Lower half is a panel which needs to be removed, it's held in by 4 screws.Before you can access these you need to remove all shelving and then the 2 screws holding in the water cooling section [a double S shaped lump of plastic] at the bottom of fridge.
Lower this gently to the bottom of the fridge as it has water connections you do not want to disturb.
Once removed you have access to lower 2 screws, remove them, at top of this section are 2 small clip out vents, remove these [and two small items that look like t bags] and you should be able to access the upper 2 screws, remove them.
The plastic cover is fairly stiff and will be frozen in place I used a hair dryer to gentle warm the edges as it helps with removal.Pull out bottom of panel and prise out along the edges [the panel is quite stiff to remove but is quite strong and is held in place by clips along the side in three places.] This panel has a fan attached by a wire at the top, to aid cleaning remove the four screws holding it to the panel and remove panel completely from fridge.[you will need to tear a bit of tape which holds the wire in place.]Your cover should look like this
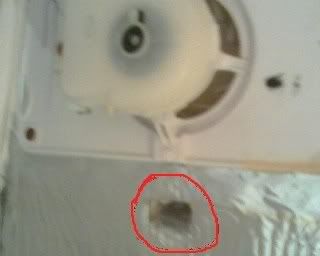
the small vent circled will be full of ice, I used boiling water poured slowly over it to melt out the ice plug, you will then see thru the fan hole that the vent hole is about one third the size it is on the outside hole, I used a small serated knife to trim this inner hole to the same dimension as the outer hole.You do not have to do this but it should slow down the ice build-up for longer.
The next step is to remove the ice plug that will be blocking the drain hole, circled here in red,
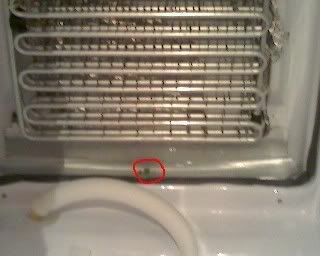 at the rear base of the fridge, do not poke anything in the hole to break ice as there are wires running thru it, I used boiling water again poured slowly on hole, wait a minute , mop up water and repeat until hole is clear, it will run out to rear drainage area [a small hose at the back which can be placed in a cup to catch the hot water when it finally clears.]
To access this you will need to remove the lower panel at the rear of the fridge, half a dozen screws hold it in place , be care not to snag anything when replacing it.
It took about a dozen treatments of hot water to clear this , but it will eventually clear. Before re-assembly you could run a little hot water over the water cooler section as this is also be frozen but should have defrosted by now as you will have taked at least half an hour to get this far.
Re assembly is just a matter of reversing the strip down , but , the cover goes back easier if the bottom is offered in first and then pressure applied to the top to snap it back under the top cover, the panel will need a bit of a thump to get it to snap back into place.
Turn on power and you should now have running water.
I would suggest keeping the fridge temp at about 4 degree, freezer at 18.
If you need too the freezer drain hole can be cleared in a similar manner.[/img]
Lower this gently to the bottom of the fridge as it has water connections you do not want to disturb.
Once removed you have access to lower 2 screws, remove them, at top of this section are 2 small clip out vents, remove these [and two small items that look like t bags] and you should be able to access the upper 2 screws, remove them.
The plastic cover is fairly stiff and will be frozen in place I used a hair dryer to gentle warm the edges as it helps with removal.Pull out bottom of panel and prise out along the edges [the panel is quite stiff to remove but is quite strong and is held in place by clips along the side in three places.] This panel has a fan attached by a wire at the top, to aid cleaning remove the four screws holding it to the panel and remove panel completely from fridge.[you will need to tear a bit of tape which holds the wire in place.]Your cover should look like this
the small vent circled will be full of ice, I used boiling water poured slowly over it to melt out the ice plug, you will then see thru the fan hole that the vent hole is about one third the size it is on the outside hole, I used a small serated knife to trim this inner hole to the same dimension as the outer hole.You do not have to do this but it should slow down the ice build-up for longer.
The next step is to remove the ice plug that will be blocking the drain hole, circled here in red,
To access this you will need to remove the lower panel at the rear of the fridge, half a dozen screws hold it in place , be care not to snag anything when replacing it.
It took about a dozen treatments of hot water to clear this , but it will eventually clear. Before re-assembly you could run a little hot water over the water cooler section as this is also be frozen but should have defrosted by now as you will have taked at least half an hour to get this far.
Re assembly is just a matter of reversing the strip down , but , the cover goes back easier if the bottom is offered in first and then pressure applied to the top to snap it back under the top cover, the panel will need a bit of a thump to get it to snap back into place.
Turn on power and you should now have running water.
I would suggest keeping the fridge temp at about 4 degree, freezer at 18.
If you need too the freezer drain hole can be cleared in a similar manner.[/img]
Forgot to mention smear a little vaseline or similar around fan hole to discourage water and therefor freezing over.
Open fridge side, turn off power and disconnect from mains supply, water connection can remain though you will need to access the rear of the fridge.Lower half is a panel which needs to be removed, it's held in by 4 screws.Before you can access these you need to remove all shelving and then the 2 screws holding in the water cooling section [a double S shaped lump of plastic] at the bottom of fridge.
Lower this gently to the bottom of the fridge as it has water connections you do not want to disturb.
Once removed you have access to lower 2 screws, remove them, at top of this section are 2 small clip out vents, remove these [and two small items that look like t bags] and you should be able to access the upper 2 screws, remove them.
The plastic cover is fairly stiff and will be frozen in place I used a hair dryer to gentle warm the edges as it helps with removal.Pull out bottom of panel and prise out along the edges [the panel is quite stiff to remove but is quite strong and is held in place by clips along the side in three places.] This panel has a fan attached by a wire at the top, to aid cleaning remove the four screws holding it to the panel and remove panel completely from fridge.[you will need to tear a bit of tape which holds the wire in place.]Your cover should look like this
the small vent circled will be full of ice, I used boiling water poured slowly over it to melt out the ice plug, you will then see thru the fan hole that the vent hole is about one third the size it is on the outside hole, I used a small serated knife to trim this inner hole to the same dimension as the outer hole.You do not have to do this but it should slow down the ice build-up for longer.
The next step is to remove the ice plug that will be blocking the drain hole, circled here in red,at the rear base of the fridge, do not poke anything in the hole to break ice as there are wires running thru it, I used boiling water again poured slowly on hole, wait a minute , mop up water and repeat until hole is clear, it will run out to rear drainage area [a small hose at the back which can be placed in a cup to catch the hot water when it finally clears.]
To access this you will need to remove the lower panel at the rear of the fridge, half a dozen screws hold it in place , be care not to snag anything when replacing it.
It took about a dozen treatments of hot water to clear this , but it will eventually clear. Before re-assembly you could run a little hot water over the water cooler section as this is also be frozen but should have defrosted by now as you will have taked at least half an hour to get this far.
Re assembly is just a matter of reversing the strip down , but , the cover goes back easier if the bottom is offered in first and then pressure applied to the top to snap it back under the top cover, the panel will need a bit of a thump to get it to snap back into place.
Turn on power and you should now have running water.
I would suggest keeping the fridge temp at about 4 degree, freezer at 18.
If you need too the freezer drain hole can be cleared in a similar manner.[/img]
I tried this and it worked just fine. However, for those who might be nervous about taking your fridge apart and can do without your Fridge Freezer for a couple of days, I offer the following simple alternative.
Run down the contents of your fridge and freezer (or put them in a friends freezer), and then unplug for 24 to 48 hours to allows to fully defrost. Note:although the fridge may appear to be defrosted there is still likely to be ice packed in the cooler element and drain holes so don't be tempted to plug it back in too quickly.
Remember to leave the fridge and freezer doors open whilst defrosting.
I found this very helpful thread when I was searching for a solution to our Samsung fridge problem, model RSH1 DBBP. However, I'm not sure whether these instructions apply to my specific model.
The symptoms are exactly the same: noisy fan (which has now stopped), water dispenser not working, water leaking inside fridge (or possibly ice melting).
My first course of action was to contact Samsung. From other sources online, I didn't expect much help and so was not too disappointed when their advice was to defrost the fridge or call the nearest service centre.
Anyway, many thanks Foxhole and, if you're still here, can you confirm that your instructions apply to my specific model?
Foxhole, I had a good look at this post and followed each step carefully..now my noisy fan has stopped and we have water ! This has helped me no end mate , thanks for your time putting this together very very helpful .
DIYnot Local
Staff member
If you need to find a tradesperson to get your job done, please try our local search below, or if you are doing it yourself you can find suppliers local to you.
Select the supplier or trade you require, enter your location to begin your search.
Please select a service and enter a location to continue...
Are you a trade or supplier? You can create your listing free at DIYnot Local
Similar threads
- Replies
- 3
- Views
- 12K