Hi all -- I've been away from this forum for a while but I found it really useful a couple of years back, not just for questions but for reading through various threads picking up tips from other people's expertise. So I'm really hoping someone can help me here!
I've installed bathrooms before in the course of general home renovation, so I've always been able to get the floors up, fix and reinforce joists where necessary, and install appropriate subflooring before tiling and putting in shower trays. Now I've been brought in to do some work on an extension, and the owners have already done the floor and stud walls for the proposed bathroom, which is in the corner of a larger room. The way they've done it has left me scratching my head a bit ...
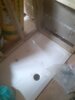
The floor is a fairly thin OSB, with the sheets not staggered. Consequently there's a fair amount of deflection. Additionally, the studs have been installed so that the bottom plate fits snug against three sides of the shower tray (which they'd already 'installed' by sitting it on the OSB and siliconing round the top!). I'm at a loss as to what to do here -- in the past I've always boarded down to the floor and then put the shower tray up against boards and upstand seal, then tiled up from the tray, whereas here it seems like I'm expected to have the sides of the shower tray flush with exposed studs and have the bottom of the boards boards on the surface of the shower tray. I'm worried it means that any movement in the building or from people standing on the tray is going to gradually pull open a gap for water. If that's the case, the only alternatives I can see are to take the studs out and move the bottom plates back, or get a smaller shower tray.
Could anyone give me any guidance about how to proceed? I can install a decent bathroom left to my own devices, but I'm not sure enough of myself to do it on top of someone else's half arsed job. Would it be adequate to glue and screw some more appropriate flooring on top of the current OSB and bed the shower tray on tile adhesive / sand & cement on top of that? Is there a way of doing the walls that will keep a water tight seal against the top of the shower tray, or will it mean moving studs / changing shower tray?
I'm a bit desperate for help here -- thanks in advance!
I've installed bathrooms before in the course of general home renovation, so I've always been able to get the floors up, fix and reinforce joists where necessary, and install appropriate subflooring before tiling and putting in shower trays. Now I've been brought in to do some work on an extension, and the owners have already done the floor and stud walls for the proposed bathroom, which is in the corner of a larger room. The way they've done it has left me scratching my head a bit ...
The floor is a fairly thin OSB, with the sheets not staggered. Consequently there's a fair amount of deflection. Additionally, the studs have been installed so that the bottom plate fits snug against three sides of the shower tray (which they'd already 'installed' by sitting it on the OSB and siliconing round the top!). I'm at a loss as to what to do here -- in the past I've always boarded down to the floor and then put the shower tray up against boards and upstand seal, then tiled up from the tray, whereas here it seems like I'm expected to have the sides of the shower tray flush with exposed studs and have the bottom of the boards boards on the surface of the shower tray. I'm worried it means that any movement in the building or from people standing on the tray is going to gradually pull open a gap for water. If that's the case, the only alternatives I can see are to take the studs out and move the bottom plates back, or get a smaller shower tray.
Could anyone give me any guidance about how to proceed? I can install a decent bathroom left to my own devices, but I'm not sure enough of myself to do it on top of someone else's half arsed job. Would it be adequate to glue and screw some more appropriate flooring on top of the current OSB and bed the shower tray on tile adhesive / sand & cement on top of that? Is there a way of doing the walls that will keep a water tight seal against the top of the shower tray, or will it mean moving studs / changing shower tray?
I'm a bit desperate for help here -- thanks in advance!