
- Joined
- 13 Jul 2012
- Messages
- 79
- Reaction score
- 0
- Country

hi guys,
Just to set the background I had a leak in the kitchen directly underneath the shower tray upstairs. I pulled down 2 sections of plasterboard to see what was going on.
Straight away I noticed that the waste trap for the shower tray was fouling on a joist and it wasn't flush with the tray. I think the previous installer has got around this by absolutely caking it with silicone which has worked until now but it has given way.
I purchased a new waste trap which is now fitted flush with the tray and is clear of the joist - happy days!
Leak checks done and the water is draining away efficiently with no leaks.
This morning I had a shower (still not plastered the kitchen below thank god)and when coming into a kitchen I have noticed a slight drip but it's running down the edge of the wall. I have figured out that the leak is coming from the edge of the shower tray where it meets the tiled wall. How unlucky to have another leak but at least I hadn't replastered the kitchen already!
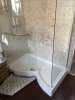
The problem is the shower tray is sealed on the edges with the sealux style edging which actually has a backing plate behind the bottom row of tiles!
I am after advice for the best way forward to stop the leak. Do I removed the bottom row of tiles and reapply? Try and silicone seal the existing edging?
I have attached photos
Thanks all
Just to set the background I had a leak in the kitchen directly underneath the shower tray upstairs. I pulled down 2 sections of plasterboard to see what was going on.
Straight away I noticed that the waste trap for the shower tray was fouling on a joist and it wasn't flush with the tray. I think the previous installer has got around this by absolutely caking it with silicone which has worked until now but it has given way.
I purchased a new waste trap which is now fitted flush with the tray and is clear of the joist - happy days!
Leak checks done and the water is draining away efficiently with no leaks.
This morning I had a shower (still not plastered the kitchen below thank god)and when coming into a kitchen I have noticed a slight drip but it's running down the edge of the wall. I have figured out that the leak is coming from the edge of the shower tray where it meets the tiled wall. How unlucky to have another leak but at least I hadn't replastered the kitchen already!
The problem is the shower tray is sealed on the edges with the sealux style edging which actually has a backing plate behind the bottom row of tiles!
I am after advice for the best way forward to stop the leak. Do I removed the bottom row of tiles and reapply? Try and silicone seal the existing edging?
I have attached photos
Thanks all

")