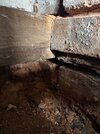
The floor in the corner of the room is sagging, I pull up a couple of floorboards expecting a rotted joist but find out that the joist has been laid directly on top of a slate (I assume, it’s very crumbly) DPC which I understand isn’t ideal at the best of times but that slate has just completely crumbled away in that spot leaving a 15-20mm gap between the wall and the joist so obviously when you stand on it then it sinks down. The wood itself seems fine just a bit stumped with what the fix here would be - keen not to bodge but also not sure how you’d reinstate a small course of slate. House itself is a solid wall semi built in the 1930s.
I’ve had a couple ideas but I’m neither a builder, bricklayer, or carpenter just someone who knows enough to be dangerous! The bodgiest idea I had was to get some treated timber, wrap it up in plastic DPC, and then slather a bunch of bitumen over it before wedging it in the gap to give something for it to sit on. My next best idea was building a small plinth a few inches away from the wall with its own DPC and supporting the joist on top of that.
I’m a bit worried that this obviously was caused by some damp which I _think_ is fixed due to a badly leaking gutter not too far away on the outside, but if this much of the DPC is crumbling away whats the correct fix. It definitely firms up and requires far more encouragement to flake after 300-400mm or so.
Very happy to get someone in to take a look just a bit stumped on which trade to call - feels like a job sitting somewhere between a bricklayer and a carpenter, and I’ve got some trust issues with companies that target damp issues after someone popped around with a moisture meter and all but claimed the house needed rebuilding due to the readings.
Cheers!
Attachments

Last edited:
")