Solid wood worktops and butler sinks!!!

Joined
22 Nov 2005
Messages
312
Reaction score
15
Location
London
Country
United Kingdom
Hello,

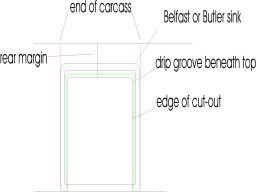
I am in the process of fitting out kitchen. We have purchased the solid oak worktops from IKEA and have a Butler sink with a large mixer tap from MFI. I am just after some tips, a: for cutting these worktops as they are block wood rather than sawn sheets and b: what's the best way to get the sink in the right place as the worktop hangs over the sides and back of the sink??

Thanks for any advice!!
 
Sponsored Links
First work out the depth of the "margin" you'll need for your worktop. You can get this roughly by positioning the sink in the units and measuring the distance from the wall behind the sink to the inside edge of the sink back. Add the overhang you require to get the full width of the margin. Next remove the sink and mark the ends of the two adjoining carcasses onto the wall behind the sink. Cut your worktop to length and fit it into place. A circular saw with a fine blade (i.e. one with more than 16 teeth) and a jigsaw with a fine upcut blade will do the job - the jigger will make a better job if you turn the orbit action off and go slowly. Clamp a batten to the worktop to guide the saw and always make the cuts from the under side - a blade running in tension like this will cut squarer than a downcut (which is in compression) ever can. Reposition the worktop on the units and transfer the marks off the wall onto the worktop. Strike a square line across the worktop starting with a large (12in preferably) square and finishing with a straight edge. You may want to use masking tape on the worktop to help you see the line. Mark the ACTUAL CUT LINE on the worktop inboard of the carcass end lines by the thickness of the Belfast sink end walls PLUS the overhang you require. Mark the rear of the cut-out using a pencil (you already know where as you've calculated the width of this margin). Mark the rounding of the corners (corner fillets) using a large coin. Roughly cut-out the main part of the opening using the jigsaw and a fresh blade (again an upcut blade) This cut is made 4 or 6 mm INSIDE the line you've marked as the final edge. Next, set-up a template jig on the top of the worktop. This is made from strips of straight timber or plywood 3/4in thick GLUED onto the surface of the worktop with the edge dead on the line you want to finish at. These strips need to be wide enough to support the base of a router. If you are concerned about marking the visible surface, take the worktop out and flip it over then work from the underside. Now using plunge router with a top bearing template bit make multiple passes to the line, increasing the depth of each pass by 4 or 5mm. This requires a VERY STEADY HAND and a router of at least 1500 watts running a cutter with a 1/2in shank I'd say (personally I use a DW625 with a 1in diameter cutter). The larger the diameter ofthe template cutter the smoother the cut will be. When you reach a certain depth you will need to knock-off the guide timbers and use the edge of the worktop itself as the guide for the bearing. Finally sand-out the edges by hand and seal. You'll also (probably) need a 32mm hole saw to cut the hole in the worktop for the tap.

You will also need to consider putting a drip groove on the underside of the overhang and sealing the worktop where it sits on the sink (silicone). A typical overhang might be 25 to 30 mm:

Belfast thickness 30mm
Margin 10mm
Drip groove 6.35mm (the diameter of the cutter you use to cut the drip groove)
Margin 10mm

Total 56.35mm (from finished sink cut-out edge to end of carcass)

Or an overhang of 26.35mm

Scrit
 
Jeeeeez!!!!

Thanks for that, a huge help, I will have a long hard think about this one!!!
 
Sponsored Links
Actually more difficult than it sounds, but definitely a job for someone with a grounding in carpentry or joinery as the edge finish has to be just right. If it helps here's a drawing of what I was talking about. Notice that the drip groove stops short of the edge of the worktop so you won't get drips on yout shoes! You'll notice that I also round the lead-in to the sink cut out as I feel this is aesthetically more pleasing:

sinkcut-out.jpg


(Sorry - not quite to scale)

Scrit
 

DIYnot Local

Staff member

If you need to find a tradesperson to get your job done, please try our local search below, or if you are doing it yourself you can find suppliers local to you.

Select the supplier or trade you require, enter your location to begin your search.


Are you a trade or supplier? You can create your listing free at DIYnot Local

 
Back
Top