Tidying up around sockets/switches

Joined
13 Sep 2011
Messages
46
Reaction score
4
Location
Bristol
Country
United Kingdom
Hi there,

We had our house replastered and rewired throughout.
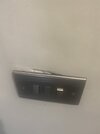
The builder who did the plastering did a pretty messy job generally (should have found a dedicated plasterer I know...) but particularly rough around the sockets/light switches. He has offered to come back and tidy with some filler but I'm not inclined to let him over the threshold.

I've bought some plastic 'sockitz' boxes to go around the sockets while I fill the gaps in, sand and paint - but any suggestions on the best filler to be using?

Attached a couple of photos for context (these are some of the better ones!).

Steve
 

Attachments

  • IMG_2655.JPG
    IMG_2655.JPG
    147.8 KB · Views: 84
  • IMG_2706.JPG
    IMG_2706.JPG
    175.4 KB · Views: 77
Sponsored Links
Good grief!

Need to take sockets off.
Make wires safe..Use wago and tape.
Put straight edge across to check all is flat.
Those socket things are good although I've never used. Will need to chip plaster back first so they sit flush with wall.
Not sure how they are held on wall but I use polymer grab to stick beads ect on prior to skim.
Use toupret quick dry powder to make good.

Go watch CharlieDIY YouTube channel on fitting and filling sockets for interest.
Yours will be different but get tips on getting it done
 
Thank you so much @Wayners - really useful advice.
I've purchased a box of Toupret today and have some of the Sockitz boxes already in situ so I'll see how I go over the weekend.


Perhaps a stupid question - but any tips on the best grit of sandpaper to be using once the filler is set?
 
If a lot of movement, I have used no-more-nails first (before the filler) to lock metal back box in place. Works well as you can squrt it through a hole in the back of the metal box and then a good thick line around the outside of the box at the back. Let dry and then fill as per @Wayners.
Suggest using a short spirt level to check metal boxes are level before filling gaps.
 
Last edited:
Sponsored Links
If a lot of movement, I have used no-more-nails first (before the filler) to lock metal back box in place. Works well as you can squrt it through a hole in the back of the metal box and then a good thick line around the outside of the box at the back. Let dry and then also fill.
Use a short spirt level to check metal boxes are level before filling gaps.
Good tip thank you - actually the boxes are in place pretty well, the electrician was a perfectionist. The plasterer less so...
 
  • Like
Reactions: SFK
Re sanding

180 Grade to get filler smooth.

120 Grade is the most popular general sandpaper in the decorating trade, but it can be a bit aggressive on soft filler
 

DIYnot Local

Staff member

If you need to find a tradesperson to get your job done, please try our local search below, or if you are doing it yourself you can find suppliers local to you.

Select the supplier or trade you require, enter your location to begin your search.


Are you a trade or supplier? You can create your listing free at DIYnot Local

 
Back
Top