

Hi all,
I recently installed PIR insulation under the floorboards in my lounge. Hopefully some of the details here might help someone, given there aren't many tradesmen who offer this service (given the time involved, I can see why!).
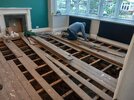
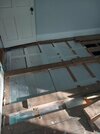
The house is 1930's with a suspended floor and it's about 18 m2.
I ended up buying Celotex GA 4000 PIR boards with a 70mm thickness.
Here are some of the learnings/thoughts:
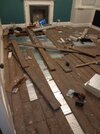
- Take up all the floor. It was taking up to 10 minutes per floor board to lift them and remove the old nails. Because it was time consuming, I decided to leave the odd board or two in situ and just batten under them. This was a mistake. The time spent trying to knock in battens under these boards, ended up being way in excess of the time it would have taken to just lift the floor boards.
- Lifting and removing all the boards, also makes the area easier to work in and safer (often I was treading on boards which were unstable, resting on others etc.
- Make sure you clearly label or number the boards, so you know where they need to go back to
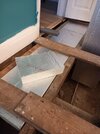
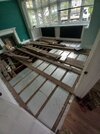
- I used wooden battens to hold the PIR boards in place, which worked well (you just spend a long time cutting them to shorter lengths).
- The PIR sections don't slide very well on the battens when they are a good, tight cut. When I tried to slide the sections under the floorboards I didn't lift, it was very difficult. Another reason to lift all the boards!
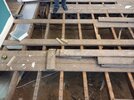
- The sub-floor area was a mass of old pipes, dwarf walls, electrical wires etc, which made moving around, installing battens and cutting the PIR very tricky.
- The gap between the joists aren't consistent and the joists themselves often aren't horizontal. Every section of PIR had to be cut specifically for that space. It's very time consuming.
- We also found that one of the joists was just 7 or 8 cm from the wall and the skirting board made access from the top very hard. I then cut the PIR board to make a thin strip and pushed it up in to the gap but holding that section in place was very difficult. Putting a batten in there was nearly impossible, so I ended up screwing through the joist in a number of places, to give the board something to sit on.
- If you have a nail gun this will make the whole process much faster but they are expensive bits of kit.
- I ended up buying a multi-tool to cut some of the floor boards, where the board itself went under the hearth tiles or extended in to the hallway.
- I made sure to keep the sub-floor vents clear.
- I used expandable foam to fill some of the gaps around the side and silver insulation tape over the joints.
- I would say it took about 20-25 man hours to do the insulation work and replace the floorboards. It took another full day to lift the old boards and remove the old nails.
- Costs wise....I've spent about £540 (excluding the multi-tool and new saw). Insulation and foil - £370, lagging for pipes - £70, foam - £12, battens - £60 and nails/masks/glue - £20.
It was hard physical work and very time consuming!
I don't claim to be an expert but I'm happy to give thoughts on my experience if anyone is interested.
I recently installed PIR insulation under the floorboards in my lounge. Hopefully some of the details here might help someone, given there aren't many tradesmen who offer this service (given the time involved, I can see why!).
The house is 1930's with a suspended floor and it's about 18 m2.
I ended up buying Celotex GA 4000 PIR boards with a 70mm thickness.
Here are some of the learnings/thoughts:
- Take up all the floor. It was taking up to 10 minutes per floor board to lift them and remove the old nails. Because it was time consuming, I decided to leave the odd board or two in situ and just batten under them. This was a mistake. The time spent trying to knock in battens under these boards, ended up being way in excess of the time it would have taken to just lift the floor boards.
- Lifting and removing all the boards, also makes the area easier to work in and safer (often I was treading on boards which were unstable, resting on others etc.
- Make sure you clearly label or number the boards, so you know where they need to go back to
- I used wooden battens to hold the PIR boards in place, which worked well (you just spend a long time cutting them to shorter lengths).
- The PIR sections don't slide very well on the battens when they are a good, tight cut. When I tried to slide the sections under the floorboards I didn't lift, it was very difficult. Another reason to lift all the boards!
- The sub-floor area was a mass of old pipes, dwarf walls, electrical wires etc, which made moving around, installing battens and cutting the PIR very tricky.
- The gap between the joists aren't consistent and the joists themselves often aren't horizontal. Every section of PIR had to be cut specifically for that space. It's very time consuming.
- We also found that one of the joists was just 7 or 8 cm from the wall and the skirting board made access from the top very hard. I then cut the PIR board to make a thin strip and pushed it up in to the gap but holding that section in place was very difficult. Putting a batten in there was nearly impossible, so I ended up screwing through the joist in a number of places, to give the board something to sit on.
- If you have a nail gun this will make the whole process much faster but they are expensive bits of kit.
- I ended up buying a multi-tool to cut some of the floor boards, where the board itself went under the hearth tiles or extended in to the hallway.
- I made sure to keep the sub-floor vents clear.
- I used expandable foam to fill some of the gaps around the side and silver insulation tape over the joints.
- I would say it took about 20-25 man hours to do the insulation work and replace the floorboards. It took another full day to lift the old boards and remove the old nails.
- Costs wise....I've spent about £540 (excluding the multi-tool and new saw). Insulation and foil - £370, lagging for pipes - £70, foam - £12, battens - £60 and nails/masks/glue - £20.
It was hard physical work and very time consuming!
I don't claim to be an expert but I'm happy to give thoughts on my experience if anyone is interested.
")


")