So I am nearing completion of a project that has been on the go for the last couple of months. I got some good advice from the site and the following threads and so thought I'd come back and post the results:
http://www.diynot.com/diy/threads/underfloor-insulation.470881/
http://www.diynot.com/diy/threads/subfloor-ventilation.463584/
The work started last November and was slow at first as getting into, and out of the lowest parts of the subfloor was hard work.
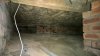
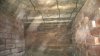
So what have I done, removed a large amount of builders rubble, particularly around the fireplace. This was necessary mainly to enable me to get in and out of this area. I also removed the remnants of the previous central heating installation, and at least two previous electrical installation - one from the 30's and one from the 60's.
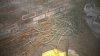
I then installed 100mm Knauf EkoRoll in between the joists pinning it up with lengths of polypropylene strapping and staples. At the same time I replaced all the pipe lagging, that which was in place has been on for about 20 years and in some places at melted!
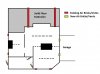
Also I sought to increase the underfloor ventilation by adding two new air bricks to one side of the house that previously had none as well at the door to the underfloor storage area which had not external ventilation. In the early stages of the job water would bead up and run down the wall, this has already been stopped during the course of the work. Some further monitoring of the ventilation will be required throughout the rest of the subfloor.
http://www.diynot.com/diy/threads/underfloor-insulation.470881/
http://www.diynot.com/diy/threads/subfloor-ventilation.463584/
The work started last November and was slow at first as getting into, and out of the lowest parts of the subfloor was hard work.
So what have I done, removed a large amount of builders rubble, particularly around the fireplace. This was necessary mainly to enable me to get in and out of this area. I also removed the remnants of the previous central heating installation, and at least two previous electrical installation - one from the 30's and one from the 60's.
I then installed 100mm Knauf EkoRoll in between the joists pinning it up with lengths of polypropylene strapping and staples. At the same time I replaced all the pipe lagging, that which was in place has been on for about 20 years and in some places at melted!
Also I sought to increase the underfloor ventilation by adding two new air bricks to one side of the house that previously had none as well at the door to the underfloor storage area which had not external ventilation. In the early stages of the job water would bead up and run down the wall, this has already been stopped during the course of the work. Some further monitoring of the ventilation will be required throughout the rest of the subfloor.
")