

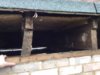
Finally, I have the old garage roof off and tarped in prep for OSB3 and EPDM.
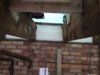
Unfortunately, I notice that when I place a straight edge across different parts of the roof structure it seesaws. Over 3 joists I often see a difference of up to 10mm. I am assuming that a couple of mm wouldn't matter but this is way too much.
After researching this I think the unevenness may be caused by a lack of strutting between the joists. I can see that the joists are quite twisted in places. In fact, there aren't even any noggins at either end of the roof. Where noggins exist they are quite wobbly and don't extend much beyond the depth of the furrings.
The garage is just under 50 years old and I noticed that the old roof board was mismatched on removal, seems like a bit of a botch job.
How would you fix this? The best I can come up with (with my limited experience) is as follows:
Add wooden structure at the ends of the joist shaped to hold the existing structure in place and support the edges of the OSB3 board.
Add in strutting (2 rows at least) as the garage roof is 837cm X 582cm.
Use something like plastic Broadfix shims to fix the unevenness as I add on the OSB3.
I am now also considering the use of a larger 18 X 1220 X 2440mm OSB3 (not tongue and groove as was advised). I am assuming that this will be more forgiving, than the smaller tongue and groove board. I know I will have to support the long edges which will be a pain I wonder if someone has experience fitting to an uneven roof and can help here?
Any help/thoughts would be much appreciated.

")