wall mounted tap leaking

Joined
24 Apr 2017
Messages
44
Reaction score
1
Country
United Kingdom
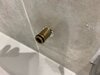
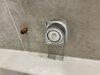
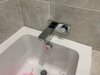
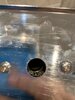
I recently got a wall mounted tap fitted above my bath and when I went to turn it on, it started to leak between the tap facia and tiles. I removed
the tap and found that one of the O'Ring on the mixer body male part was split. I thought this is easy I will just replace the O'ring, then I realised that the small grub screw below the tap spout which is used to tighten the plate to the mixer body has probably damaged the O'ring, suggesting the plumber has not left enough thread to allow the spout to fit. The plumber has left 22mm from the tile face. Im now not sure if that is enough to get a proper seal. I have been trying to get a hold of the plumber over the last few days, but no answer. I was thinking about not using the grub screw and fixing the tap to the body using silicon, is there anyway I could reduce the chances of leaking by using teflon tape over the O'Rings etc.******

Any help would really be appreciated.

Thanks.
 

Attachments

  • image0.jpeg
    image0.jpeg
    34.1 KB · Views: 332
  • image1.jpeg
    image1.jpeg
    40.8 KB · Views: 309
  • image2.jpeg
    image2.jpeg
    40.7 KB · Views: 289
Sponsored Links
The two O rings are enough to seal. Where is the grub screw in relation to the O rings. I would expect it to be close to the wall ?
 
the problem is that only one of the O'rings is going to seal properly, looks like the plumber has not left enough pipe coming out the wall for the spout to seal properly and cover both O'rings, this is why the grub screw has pierced the 2nd O'ring (closest to the wall), if there was enough length on the pipe, then the grub screw would have missed the O-Ring and fixed to the body of the pipe. See attached pic of back of spout, you can see that grub screw is a couple of mm from the fitting. Hope this makes sense.
 

Attachments

  • IMG_1406.jpg
    IMG_1406.jpg
    77.8 KB · Views: 249
Correct me if I am wrong ,but the chrome rectangular plate sits flat against the tile ,and the grub screw appears to be a few millimetres from the wall/ back of the chrome plate. The O rings look to be much further forward and not anywhere near the grub screw ??? Maybe it's just the pics decieving ??what is the thickness of the edging of the chrome plate ,that makes it stand off the wall ?
 
Sponsored Links
Correct me if I am wrong ,but the chrome rectangular plate sits flat against the tile ,and the grub screw appears to be a few millimetres from the wall/ back of the chrome plate. The O rings look to be much further forward and not anywhere near the grub screw ??? Maybe it's just the pics decieving ??what is the thickness of the edging of the chrome plate ,that makes it stand off the wall ?

Yip, the chrome rectangular plate sit flush against the wall or the lip sits against the wall, it has a 6mm lip, then from the plate to
where the pipe should seal is 10mm, therefore you need 16mm from the wall just to get to the start of where it should seal, the length of the pipe is 22mm, therefore I will have approx 6mm feeding into the fitting, which doesn't cover both O'rings, as the measurement from the tip of the pipe to the 2nd O'ring is 7mm. Can I seal over and between the O'rings to give some more protection from leaking with PTFE or something. This is why it has been leaking the plumber has pierced the O'ring with the grub screw. Any ideas would be appreciated, don't want to remove tiles, plasterboard etc......

thanks
 
You've answered your own question, there isn't enough pipe to ensure that the grub screw misses the o-ring once the back plate is on. There is no other way to get round that other than either extend the pipe or make the plate thinner so the spout can fit on further.

The installer should have checked that.

There isn't really anything else you can use as anything else would be just be a farf.

Thanks Rob, I need to do something or the tap will just keep leaking. Do you think a slightly bigger O'ring at the front would help, looks like I have to be dependant on the first O'ring creating the seal. Could I add anything else between the O'Rings, such as PTFE? to try and create a seal. C
 
It probably won't work, the reason for that is that the first O-ring takes most of the pressure but not all of it and the 2nd creates the final seal, it's just how it works and why there are 2 O-rings.

I'd be looking at the spout. I take it that the 2 screws are what holds the spout on to the plate? Is there enough meat on the end of the spout, where the screws fit, to say shave 5mm off the end of it so the pipe could sit further into the spout?

Any other way would still mean there isn't enough pipe length for both O-rings to be sealed in the tube of the spout. You could try PTFE tape or similar but I can't see it working and if it did then it wouldn't be for long.

Who's made the mistake here, the plumber or the tiler/joiner? I'd be tempted to get them back and tell them to sort it.
 
Thanks Rob, the face plate has a 6mm lip, im going to look at shaving 4mm off this, I removed the spout from the plate, the screw threads are about 7mm thick, wouldn't like to reduce that anymore. The issue is the plumber, he has not left enough on the spigot, he has left 22mm, looks like u need 30mm minimum, I'm trying to get a hold of the plumber, but he is not answering his phone, pretty dissapointing. cheers C
 
I take it there is a concealed mixer and diverter in behind the wall mounted on a piece of wood between the framing?

Basically he hasn't considered the plasterboard, adhesive and tile depth properly?

What's on the other side of the wall BTW? Wouldn't be the first time I've had to go in through the wall behind to repair a bodged shower and if it's just plasterboard then it's a really easy repair. On some I've even just fitted an inspection hatch.
 
looks like u need 30mm minimum

Looks like a generic tap but do you know the make and model or have the installation instructions?

It doesn't look correct but it would be better to get the correct dimensions before you start grinding things down. Just in case.....
 
Looks like a generic tap but do you know the make and model or have the installation instructions?

It doesn't look correct but it would be better to get the correct dimensions before you start grinding things down. Just in case.....


Its a Bristan Wall Mounted Tap, Alp range, I have reviewed the instructions there is nothing around how far the spigot should be from the finished face. I phoned Bristan today and they have suggested 10mm is the minimum you need the spigot to enter the tap spout to create a proper seal. Based on the spigot as it currently is, I would think I would achieve 6-7mm. Thanks C
 
I take it there is a concealed mixer and diverter in behind the wall mounted on a piece of wood between the framing?

Basically he hasn't considered the plasterboard, adhesive and tile depth properly?

What's on the other side of the wall BTW? Wouldn't be the first time I've had to go in through the wall behind to repair a bodged shower and if it's just plasterboard then it's a really easy repair. On some I've even just fitted an inspection hatch.

Yip, concealed mixer and diverter mounted on a piece of plywood between struts. I have an inspection hatch, but I imagine it being quite difficult to try and remove the screws from the backing plate (Mixer and diverter), then push through by 5-7mm. The mixer and diverter back into bedroom cupboard (Built in), so therefore if I needed to, I could remove a full length of plasterboard and try and fix it from that side. cheers C
 
I wasn't thinking of just removing the diverter/mixer, as you say that would have been screwed from the bathroom side. I would remove the whole thing, the mixer and the ply wood it sits on and then reposition the whole thing with a couple of small straps of wood either side to secure the ply wood back onto.
 

DIYnot Local

Staff member

If you need to find a tradesperson to get your job done, please try our local search below, or if you are doing it yourself you can find suppliers local to you.

Select the supplier or trade you require, enter your location to begin your search.


Are you a trade or supplier? You can create your listing free at DIYnot Local

 
Sponsored Links
Back
Top