Where do I start plastering this wall ?

Joined
30 Apr 2008
Messages
278
Reaction score
9
Location
Manchester
Country
United Kingdom
I'd like to plaster this kitchen wall with bonding. The wall is not straight at all.
There is some wall left at the right hand side I can use as a guide ? Where do I start ?

Do I set the corner beads first for door and window and use these as a guide or what do I do ?

I have number the different corners for easy identification...
 
Sponsored Links
iirc you must first set the beads making sure there plumb etc,is that a timber lintol above the front door?if so it needs some eml fixed to it.and im pretty sure it depends on whether your left or right handed on where you will start but i would start on the main wall(4) first then do the reveals.
 
(Preparation)

I think there are several things I would do Yanni before you can start to plaster this wall. First of all, forget about the area of old plaster to the right of the door, for all there is,I would take it all off back to bare brick. You can then start with a blank wall.....This is what I would do.... Clean the whole wall off, rough it up a bit, rake out some of the joints, anything to help with a key. Make sure that the light switch cable conduit is chased far enough into the wall. Give the wall a wet down, pva and then "scratch coat" everything, wall, window/door reveals with 4 to 1 sand and cement with a waterproofer additive, especially onto old red brick This would all be done in one go. Let it go off and then leave it for a day or two..... fit and undercoat/seal the window cill if required.......You now have a scratch coated wall ready for plastering.

Roughcaster.
 
I was just wondering....

I have just tanked the wall on the left of this photo with 1:5 SBR/cement and 3:1 render mix. This consistency is actually for external rendering.
SBR is very expensive, it costs me £15 for 5L. I've used in the past another waterproofer that looks like shampoo and you dilute 1:20 to 1:40 parts of water. Is there a particular reason for using SBR or can I use the cheapest solution for waterproofing...
 
Sponsored Links
Follow on from last time.

I don't know how much you know about plastering, but here is a way, by forming 3 screeds, you might be able to do the job starting at number 4, and come down the wall, leaving the reveals until last.


Fit expamet corner beading plumb and level around the window and door reveals, making sure they are lined through across, near the top of the window and the door with a long straight edge, and then bed a thin piece of timber(wooden dot) in line,on the far right wall, about 6" from the internal corner. This will give you an even plane all the way across the wall from left to right. All the beading is bedded on with multi finish. You can then form a screed with plaster all the way across to wall to work from. Do the same again across the wall near the "bottom"of the wall this time. With the long straight edge,using the plane across the beading on the door reveals, bed a length of timber on the wall 6 inches from the internal left hand corner, and another on the right. You can now form another screed with plaster to work from. Form another screed towards the top of the wall, by plumbing up from above the window etc, using 4 wooden dots across the wall, again bedded into plaster as a temporary guide. Just fill in between the screeds as you go. Don't forget to remove the wooden dots in the wall. Start plastering at the top and work down....... This is difficult to put into words, but I hope you can get some idea from what i've babbled on about. :rolleyes:

Roughcaster.
 
knock off all the old plaster on that wall, its an old wall do not use bonding, use sand and cement render with a water proofer,
buy some plain 4 inch skirting,
get a mate round to help,
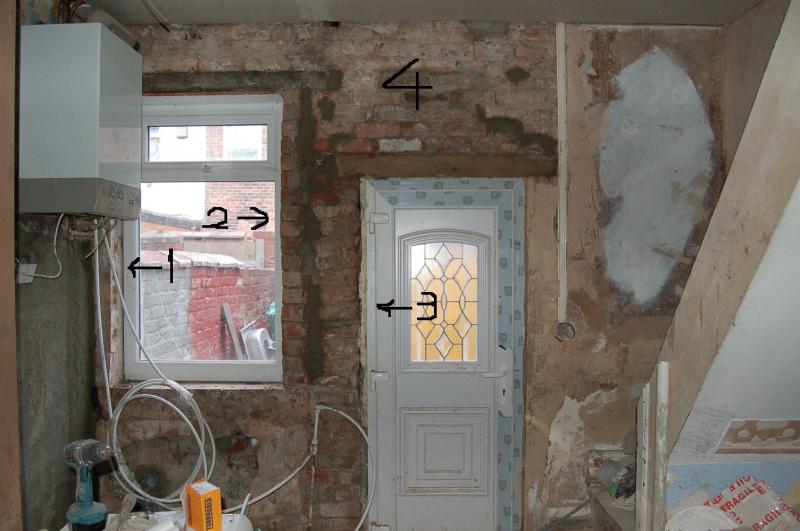
cut a piece of skirting to fit reveal 1 but 1 inch short, hold up a long straight edge upright from floor to ceiling over reveal 1 so you can get 20 mm of render
on top and bottom and nail skirting to reveal so its front face is touching the straight edge, just pin it firm 1 nail top, bottom and middle,
go to the reveal to the right off the door, now do the same as the window reveal but hold the skirting, have your mate hold the straight edge
from reveal 1 skirting across the one you are holding and look and see if you will get a cover of render on the wall at the foot of the stairs, if so nail it if not
adjust it, or you might want to bend the wall here, :eek: :oops:
now you have these two fixed do reveals 2 & 3 by holding the straight edge across the fixed 2 and set 2 & 3 out to the straight edge,
now fix new plaster board window and door heads they will go over your skirting ( inch gap ) and flush with the face edge, try to use the sealed paper edge
of the board to the front,
window sill, hold your straight across this and fix skirting,
don't worry about the skirting being bent around the bricks and when you nail it nail at a angle through into the brick joints as this will wedge the nails
and you will not have to drive them so deep to get a firm fix,
now you can scratch coat the face of the wall and dub it out as needed leaving 10-15 mm for top coat,
if scratched in the morning you can top coat in the afternoon and float it up.
you use the skirting to run you feather edge across to rule off,
for you it might be best to leave it over night before you remove and return the skirtings,
to return them, you'll want a square, a end corner of plaster board will do, lay this on your sill and against the window frame hold skirting up right from square and see what cover you'll get, mark square and check this against the other reveal you want to keep the same amount of frame showing each side, not what thickness of plaster, nail skirting to face render using the square to set the position do the same for the door reveals
use the square again with the marks on it to put a panel pin in the end of piece skirting the will run up your frames and keep you square as you rule off.
after floating the reveals and the render is firm remove skirting by sliding back and up at the same time, then cut back reveal flush with face render
with your trowel pushing away from the face of the reveals, plug nail holes.
I work with bull nose trowels but for ease just over bead the lot with skim bead.
 
Wow, great responses...many thanks.

marshman, at what stage do you place the corner beading ? I presume straight after scratch coat, before top cat ? The reveal of the window is almost 3 times that of the door. Also, I don't have a long straight edge that will go from the right reveal of the door to the left corner of the window. My straight edge is 1800mm. I presume I can use a long piece of timber for this.

I'm quite reluctant to take the remaining right wall down as it's all straight and level as well being sand and cement, not plaster. It took me a day trying to get this off from the side underneath the boiler and only did that because the wall was damp. ( Had to repair external wall pointing, create a gap between concrete floor and wall, repointing brick work etc ).

The reveal on the right hand side of the door is all been rendered too with corner beading in place. It must have been done some time during the 80s. The actual brick wall is bending above the left top door corner. The window's size has been altered during the 80s and the brick work at its right reveal not only is curved but is also up to 15mm out in relation to the rest of the wall between door and window.

Finally if I go with roughcaster's suggestion, how far out do I set out the expamet corner beading ?

I'm actually thinking of doing the 4" skirting thing that marshman suggested, use the skirting to rule off the render scratch coat, then set the corner beading before top coat. That sounds the easier solution to me...
 
The easiest way in my opinion is this. Get some battens about 16x 12mm.

Fix them to the wall with longish screws at intervals of about 2 ft from ceiling to floor. Then get someone to hold a straight edge across them all sideways. Use the screws to bring the battens out until they are all level then wedge them and tighten screws. Now do your scratch. Then add the beading and level that up. Now fill the segments a little proud and use your straight edge down your battens to rule off. Then remove battens, fill, and skim when ready. Job done. Doddle.
 
if you lave the stair wall then board reveal 1, 3 then 2.
over beading with skim bead ( thin coat bead) when the whole lot is render is easy you just stick it on before you skim,
if you use the bigger bead then you can fix these first instead of skirting using a waterproofed render mix,
if you scratch coat and load out with the skirting then bead still use render to stick the beads up,
its harder to stick them up with render but you are less likely to draw damp through the old bricks.
 

DIYnot Local

Staff member

If you need to find a tradesperson to get your job done, please try our local search below, or if you are doing it yourself you can find suppliers local to you.

Select the supplier or trade you require, enter your location to begin your search.


Are you a trade or supplier? You can create your listing free at DIYnot Local

 
Sponsored Links
Back
Top