Yes, yet another Nest!

Joined
24 Dec 2018
Messages
4
Reaction score
0
Country
United Kingdom
Hi All

I recently bought a Nest 3rd Gen and decided to install myself. I'm an Engineer, so thought that it would be a piece of cake (I'm not a heating engineer or an electrician though!)

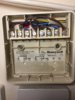
Attached is a pic of my Honeywell ST699 as it was (working perfectly)
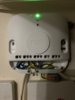
Attached is a pic of my Nest Heat Link as it is (not working perfectly)

I have a Y-Plan System with a Honeywell 42002116 wiring centre, handling the pump, room thermostat, tank thermostat, Mid Position Valve and boiler.

I had 2 cables going into the ST699, one from a fused spur (which also powers the wiring centre), and one coming back from the wiring centre. I have put the L, N & E from the spur into L, N & E in the Heat Link. I have then put jumper cables from L in the Heat Link to 2 and 5 Common in the Heat Link . I then transferred the 3 core cable coming from the wiring centre into the Heat Link as below:

I transferred L from terminal 3 Heating NO - terminal 3 Heating Call-for-heat
I transferred N from terminal 6 Hot Water NO - terminal 6 Hot Water Call-for-heat
Finally, the Earth (which had red tape wrapped around it???), which is going to terminal 7 Hot Water NC on the ST699, I transferred to terminal 4 Hot Water Satisfied on the Heat Link.

Everything appeared to fire up OK, but the boiler constantly fires up an then shuts down after a couple of minutes, despite the Nest Thermostat still calling for heat. It's as if the boiler is responding to the tank thermostat (no hot water is being consumed, so the tank is almost at the desired 70C all the time)

I decided to remove the 'Earth' cable from terminal 4 in the Heat Link , to see if it made any difference, but it's still the same.

As you'll see, the 'Earth' cable is currently in a Wago block below the Heat Link.

I appreciate that you're all bored of muppets like me, but if you see something obvious that will get me out of returning the whole thing back to the Honeywell ST699, so that I don't kill my boiler over Christmas, it would be greatly appreciated.

Thank you.
 

Attachments

  • 20181207_144729708_iOS.jpg
    20181207_144729708_iOS.jpg
    233.9 KB · Views: 474
  • IMG_0016.jpg
    IMG_0016.jpg
    170 KB · Views: 482
Sponsored Links
the earth wire was being used as hot water off. that needs to be in terminal 4. i guess the old room stat if it has one has been disconnected/bridged out in wiring centre. if there was a room stat. that cable could be connected to the heat link so the nest doesn’t have to be plugged into a socket
 
the earth wire was being used as hot water off. that needs to be in terminal 4. i guess the old room stat if it has one has been disconnected/bridged out in wiring centre. if there was a room stat. that cable could be connected to the heat link so the nest doesn’t have to be plugged into a socket

Hi, many thanks for your response. Yes, I did put the earth wire into terminal 4 on the Heat Link, but it didn't make any difference. The boiler still keeps shuting off, despite the Nest Thermostat calling for heat. Also, I haven't yet disconnected/bridged out the old room stat in the wiring centre, I just set it to 30C. I'd like to transfer the room stat wires into T1 and T2 on the Heat Link, so that I can put the Nest Thermostat on the wall, but I haven't identified which cables they are yet. Also, the wiring centre is about 500mm from the Heat Link, so I'd need to extend the cables.

Thanks
 
Last edited:
20181207_144729708_iOS.jpg


The links at the Heat link between L, 2 and 5 are correct.

The existing room thermostat should really have been decommissioned by removing it and linking the terminals where the live and switched live wires came from together. Alternatively as a temporary measure, you can set it to set it to its maximum setting as it appears you have done.

Apart from the blue wire in the N terminal, the green and yellow wire and the other blue wire have been used as hot water control live wires. They should have at least been identified as such by fitting a brown sleeve over them.
 
Last edited:
Sponsored Links
I’ve got to say all these Nest posts look very similar.

Mainly by new members.
 
One that every dumbass flash Harry buys between Christmas and this new fangled black Friday (and then thinks they're unique in being too thick to understand a basic wiring diagram despite being an engineer of high esteem) God help us if any of these so called engineers do anything remotely important .
 
View attachment 155215

The links at the Heat link between L, 2 and 5 are correct.

The existing room thermostat should really have been decommissioned by removing it and linking the terminals where the live and switched live wires came from together. Alternatively as a temporary measure, you can set it to set it to its maximum setting as it appears you have done.

Apart from the blue wire in the N terminal, the green and yellow wire and the other blue wire have been used as hot water control live wires. They should have at least been identified as such by fitting a brown sleeve over them.

Hi Stem

Many thanks for your diagram, but that's exactly how I have it wired (the previous installer hadn't labelled the wires correctly). Anyway, it's not working properly, so I've put the Honeywell programmer back. I will book a Nest Pro in The New Year.

Kind regards

Tony
 
that's exactly how I have it wired (the previous installer hadn't labelled the wires correctly). Anyway, it's not working properly.

The diagram is definitely right, so you can't have installed it correctly. Both the Honeywell and the Nest terminals are clearly marked with the appropriate connections. It's straight forward to move them across from the Honeywell to the Nest. Even if the wires were not labelled correctly, if the Honeywell was working as it should then the wires would have been in the correct terminals.

Hot Water 'off' [NC or normally closed] control wire (green/yellow with red tape on) presently in Honeywell 7 = Nest 4
HW 1.jpg


Nest 1.jpg


Hot Water 'on' [NO or Normally Open] control wire (single blue wire) presently in Honeywell 6 = Nest 6
HW 2.jpg


Nest 2.jpg


Heating 'on' [NO or Normally Open] control wire (single brown wire) presently in Honeywell 3 = Nest 3
HW 3.jpg


Nest 3.jpg


N to N and L to L are self explanatory, so no photo's required.

Did you also include:
The links at the Heat link between L, 2 and 5

And was the existing room thermostat taken out of service properly?
The existing room thermostat should really have been decommissioned by removing it and linking the terminals where the live and switched live wires came from together. Alternatively as a temporary measure, you can set it to set it to its maximum setting

If the above was all done correctly, either one or more of the wires was not properly terminated, the Heat link is faulty, or the Thermostat and Heal link not configured properly.

Some extra information might have been helpful. In what way didn't it work? Did neither the hot water or the heating work? Did the Heat link not power up at all?
 
Last edited:
Hi Stem, I re-installed it and it's now working properly. I wired it exactly as before, so I must have caught one of the wires on its sheath or something - as you suspected. Thank you so much for all your help (and patience!)

Cheers

Tony
 

DIYnot Local

Staff member

If you need to find a tradesperson to get your job done, please try our local search below, or if you are doing it yourself you can find suppliers local to you.

Select the supplier or trade you require, enter your location to begin your search.


Are you a trade or supplier? You can create your listing free at DIYnot Local

 
Sponsored Links
Back
Top