I sat in bed lastbnight thinking, why did i buy a bar shower again? and i couldnt for the life of me remember why, so ive decided to change it and go for a concealed mixer instead, wont be much work to change it now, and they look just that little bit more modern and sleek if you ask me. ill see if i can send the current one back or sell it on ebay, but looks like some of this weekend will be spent changing the pipes and moving stuff around

You are using an out of date browser. It may not display this or other websites correctly.
You should upgrade or use an alternative browser.
You should upgrade or use an alternative browser.
House Renovation diary
- Thread starter DeadBeat
- Start date
I should have a very handy niche in place for all my soap and shower gel worries, hopefully!
handy niche ... for ... my soap
I didn't realise you were building a shower block at the local jail..
This weekend was taken up planning fetching parts and fitting the new shower idea. the install is all working now, so i will soon be able to move back to getting the aqua board installed. Its a little bit less neat than the bar shower would have been as it was planned after putting all the beams in place, where as the beams were planned around the bar shower.
If I was to start again, i would have got a three way diverter valve in the center of the wall that filled the bath, and did the two showers, i would also have had the tap in the centre of the bath under the controls, but hey ho, that can be the plan for the next bathroom i do.
for now, here is what I did and what I ended up with.
took out the bar shower for a start and reconfigured the pipes under the bath to give me a little more room.
planned the position of the valve


put the shower "arm" directly in the centre of the controls and the taps to the left, so it should look in the correct place, luckily my laser does above below and gives me a nice big cross to mark.
Had to think of a way to hold it in place while i went in to the loft to fit the collar that holds it in place.

I decided to cut a piece of plywood to add above the ceiling to give the shower a solid base to screw down to, i screwed this plywood to the joists at each side. However this presented me with a problem...

Just enough thread to screw it down, but not enough to add a tap connector to join the pipework... Doh
I looked all over for some solutions that would extend the thread for me and allow me to add a collar and pipework, but the only available extensions only had enough room for the tap fitting, so i wouldnt be able to tighten it down.
much head scratching and a post to DIYnot later i found the following (i really needed something i could get from tool station or screwfix, due to them being open on sundays)

I forgot to get a pic of it in place before i put some insulation over the pipe, but I screwed it to the floor after adding an extra layer of plywood, to reduce the amount of thread showing on the underside. I then used a straight compression connector to add the pipework


I used compression fittings here as all will be inaccessible when the walls are in place and tiled, so i would rather it doesnt start leaking.
I then finished plumbing up the hand held shower head, that we can use to wash the dog etc.

valve plumbed in

just waiting for walls now!
If I was to start again, i would have got a three way diverter valve in the center of the wall that filled the bath, and did the two showers, i would also have had the tap in the centre of the bath under the controls, but hey ho, that can be the plan for the next bathroom i do.
for now, here is what I did and what I ended up with.
took out the bar shower for a start and reconfigured the pipes under the bath to give me a little more room.
planned the position of the valve
put the shower "arm" directly in the centre of the controls and the taps to the left, so it should look in the correct place, luckily my laser does above below and gives me a nice big cross to mark.
Had to think of a way to hold it in place while i went in to the loft to fit the collar that holds it in place.
I decided to cut a piece of plywood to add above the ceiling to give the shower a solid base to screw down to, i screwed this plywood to the joists at each side. However this presented me with a problem...
Just enough thread to screw it down, but not enough to add a tap connector to join the pipework... Doh
I looked all over for some solutions that would extend the thread for me and allow me to add a collar and pipework, but the only available extensions only had enough room for the tap fitting, so i wouldnt be able to tighten it down.
much head scratching and a post to DIYnot later i found the following (i really needed something i could get from tool station or screwfix, due to them being open on sundays)
I forgot to get a pic of it in place before i put some insulation over the pipe, but I screwed it to the floor after adding an extra layer of plywood, to reduce the amount of thread showing on the underside. I then used a straight compression connector to add the pipework
I used compression fittings here as all will be inaccessible when the walls are in place and tiled, so i would rather it doesnt start leaking.
I then finished plumbing up the hand held shower head, that we can use to wash the dog etc.
valve plumbed in
just waiting for walls now!
Last edited:
- Joined
- 18 Nov 2007
- Messages
- 929
- Reaction score
- 28
- Country

Nice work. I hate fitting those types of shower valve. They are designer really badly. I try not to have any compression fittings behind tiled walls or any inaccessible areas but sometimes you just can't avoid it. You can actually get 3/4" to 15mm solder male irons which go on the valve this saves using a compression joint.
yeah i went with compression because im pretty sure they are better than plastic, ive never done copper soldering so i thought compression was the best compromise
- Joined
- 3 Jan 2016
- Messages
- 14
- Reaction score
- 0
- Country
Thanks for the diary. Could you please expand on the above quote? I'm not sure what you mean.If I was to start again, i would have got a three way diverter valve in the center of the wall that filled the bath, and did the two showers
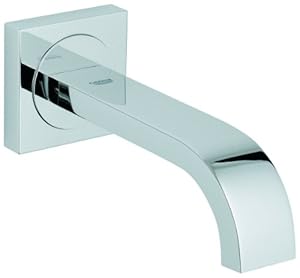
a shower valve such as this one
http://www.victorianplumbing.co.uk/...mostatic-shower-valve-w-diverter-kri3023.aspx
can be used for 3 things, so a main shower head, a hand shower and a third option
had i found it before drilling the tap holes in the bath i would have plumbed in the third option to be a bath tap like the following
you then control the bath tap from the same interface as the shower and cut down on clutter
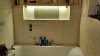
More movement on the bathroom, ive fitted all the aquaboard now, and ive added a light into the niche, Its 12v LED and IP67 fed for the time being from the main light switch, but i may put it on its own switch as it will be nice for low level lighting in the middle of the night when bright lights hurt your eyes. think its going to look great when tiled.
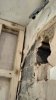
ive had to knock off all the plaster on the outside wall because i realised it was extremely uneven, at the worst point there was 3 or more centimeters of plaster where the thinnest part was less than 1cm thick, the wall itself is level, so god knows what inebriated soul did that job. I went to pick up moisture board to re cover that wall but it was too wide to fit into the estate, Doh! so i may get it delivered this week instead. I plan to use plasterboard adhisive to stick it to the wall which from my research looks to be acceptable.
Ive fitted the radiator in place so i can get the pipes ready in the wall, my biggest problem at the moment is the extractor ducting as i dont have a hole saw big enough to cut the brick on the outside, or a ladder tall enough. but im sure ill sort it soon enough.
Ive filled the gaps in the aqua board with some flexible tile adhisive and im going to tank the majority of it with a paint on tanking kit so it should be pretty waterproof when its done.
the bathroom unit, toilet and sink turn up on tuesday, so i may take some time off next week to try to get the new toilet in and get to a tiling stage as these are also ordered and on the way..
Attachments

Very nice, great job. Did you use plasterboard screws in the aqua board?
yeah, i read somewhere on here that it was fine. seems to be fine so far!
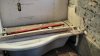
took 4 days off this week to crack on, 6 days in a row including the weekend, although some of the days i got more done than some of the other days put together, especially when i have to do a parts run, always seems to sap hours of the day anyway. heres some further progress
First step was to finish plaster boarding the walls, dot and dabbed into place still have the window surrounds to do, but all the walls are done

Next step was to rip up the old floor boards, i elected to try to leave the toilet in place as long as possible

I forgot to take pictures of the next stage, but its the same as i had already done on the other side of the bathroom. i used a level to mount new joists to the side of the old ones to provide a level support, i also then noggined all of the joists to add rigidity, and finally i screwed down a new plywood floor that i can tile on to.
in the middle of this i had to remove the old toilet, this was effectivly welded to the cast iron waste pipe, so in the interest of not creating too much noise and mess, i decided to saw it off with a hacksaw with a new blade

Fitted the new floor

finished plaster boarding where the toilet was, then moved on to the new bathroom unit
First step was to finish plaster boarding the walls, dot and dabbed into place still have the window surrounds to do, but all the walls are done
Next step was to rip up the old floor boards, i elected to try to leave the toilet in place as long as possible
I forgot to take pictures of the next stage, but its the same as i had already done on the other side of the bathroom. i used a level to mount new joists to the side of the old ones to provide a level support, i also then noggined all of the joists to add rigidity, and finally i screwed down a new plywood floor that i can tile on to.
in the middle of this i had to remove the old toilet, this was effectivly welded to the cast iron waste pipe, so in the interest of not creating too much noise and mess, i decided to saw it off with a hacksaw with a new blade
Fitted the new floor
finished plaster boarding where the toilet was, then moved on to the new bathroom unit
DIYnot Local
Staff member
If you need to find a tradesperson to get your job done, please try our local search below, or if you are doing it yourself you can find suppliers local to you.
Select the supplier or trade you require, enter your location to begin your search.
Please select a service and enter a location to continue...
Are you a trade or supplier? You can create your listing free at DIYnot Local
Similar threads
- Replies
- 1
- Views
- 4K