Amateur DIY Extension

Concrete Pour

So, the concrete. In short - it didn't go great. I recorded a video and everything, but in light of what I'm going to write I've not edited or posted it. But I think it's only right to include what goes wrong on these project write-ups too.

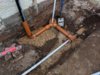
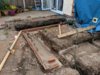
Due to various conflicting schedules and such, I was basically stuck by myself for the concrete pour. I had nobody to help me, and I was very conscious of the trench being left open for too long especially as the top of the trench was (and is) very crumbly. Because of this, I decided to speak to a few local concrete firms about pumping and while it was fairly expensive, it seemed like a sensible solution.

So, I enlisted Local Firm A who assured me confidently that they'd come and pump the concrete get it to height and I wouldn't have to touch a thing while they were there. Sounds ideal for a DIYer on their own, hey!

Well, the whole day was a s**t show really. They were many hours late due to some issue with a truck somewhere (I know that's not their fault really), but I think they turned up at past 4pm with several other jobs still to go. One of the guys was wearing sandals, which didn't exactly fill me with confidence.

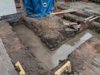
Anyway, I told them to bring it to just about rebar height and for whatever reason the guy struggled with getting the pump shut off with his remote control thing. It probably didn't help that he'd decided to position himself and work around the worst bit of the crumbly bits.

Even standing well back it was clear we were well over - I tried to get some out with a shovel, but it was an exercise in futility really and I started to worry I was going to end up in the trench! So all I could do was tamp it the best I could.

To be absolutely honest, I felt damned deflated after this but all we can do is fix forward!

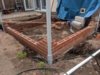
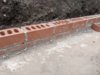
And hey, I've got a trench full of concrete! End result was it was about 30-40mm over where it should be


Attachments

  • IMG_20190520_181609.jpg
    IMG_20190520_181609.jpg
    532.7 KB · Views: 834
Last edited:
Sponsored Links
Initial Drainage Work

I decided to make a bit of a start on the underground drainage. For two reasons, really - one to get over my fear of cutting up clay pipe by "getting it over and done with" and two, to make it easier to ensure my drains can get through my foundations at the right height. And of course the best thing about DIYing your own project is you can just pick the bits you fancy doing on a given day!

Being an old 30's house, we had an old trap (That seemed to be leaky) connected to some clay pipe. I dug back hoping to find the soil pipe connection, but I imagine that's under the garage.

Anyway, not very exciting work - I used a 9" grinder to cut the clay (I did some practice cuts further up first!) which went through like butter. Then used a flexible clay -> 110mm coupling.

I then switched to my 4" grinder for cutting the plastic pipe and making a chamfer. To make the "backfill" in the new gully I had to buy a 110mm hole saw, and I used solvent weld to put in a short length of 110mm pipe. Hopefully, that works out!

Pics here: https://imgur.com/a/Ed5rhUF


(The downpipe 'connection' is, of course, temporary. At some point I need to drop a new piece of downpipe in and a nice rubber bung into the 110mm)
 

Attachments

  • IMG_20190529_182012.jpg
    IMG_20190529_182012.jpg
    574.4 KB · Views: 608
Hi Dan,
I'm following your thread with interest. I am also doing a self build extension. I'm further on than you it appears, approx 2000mm above ground now.
It's been a massive learning curve for myself, so many questions and dilemas along the way. Will you be doing the brickwork yourself too?
 
Hi Dan,
I'm following your thread with interest. I am also doing a self build extension. I'm further on than you it appears, approx 2000mm above ground now.
It's been a massive learning curve for myself, so many questions and dilemas along the way. Will you be doing the brickwork yourself too?

Nice one! And yes, as the adage goes - you don't even know what you don't know. I think my problem is I'm an "expert" in my field and I find not having a deep knowledge of something very hard, and then I find myself in analysis paralysis or panicking I've done the wrong thing and BCO are going to have a fit!

Yes, I'm doing the brickwork, literally just started the brickwork last weekend! Hoping to make some real progress now
 

Attachments

  • IMG_20190702_120314.jpg
    IMG_20190702_120314.jpg
    483.2 KB · Views: 803
  • IMG_20190630_184118.jpg
    IMG_20190630_184118.jpg
    561.2 KB · Views: 697
Last edited:
Sponsored Links
An excellent choice of gully and great write up. I like that’s your including the good and bad (y)
 
but I think they turned up at past 4pm

End result was it was about 30-40mm over where it should be

Yup, had both of those numerous times. Now you know why a builder adds in some cost for contingency.

Of course the bigger building companies will get a better service -a rrgular customer will always get priority, you can sure they get the 8.am slots
 
Will do a proper write up at some point, but just wanted to drop a progress pic for posterity!

Incredibly slow going as you can see - unfortunately I've lost a huge amount of time to rain (And really the heatwave hasn't been great either!), work and other commitments and then just generally being a slow DIYer!

Still, there is progress and I think I'm actually enjoying it! All 4 corners (Well 2 corners, 2 nearly corners) at DPM height and perfectly level so I'm happy with that.
 

Attachments

  • 67560850_10157433300541489_2174299546895515648_n.jpg
    67560850_10157433300541489_2174299546895515648_n.jpg
    112.8 KB · Views: 677
Footings

Wow, well that was emotional, but let me start on a positive note which is the footings are done:

8QNI0Y4.jpg


Progress pics here: https://imgur.com/a/nXPIPUc

But jeez, where to start - that was hard. And I've got a whole new respect for brickies! Firstly, rightly or wrongly, to fix the issue with the concrete levels I decided to do a course of split bricks. I actually felt this worked out well, though it was pretty slow going to cut them all. I know there are other, and perhaps better options to sort that now but at the time I really wanted to crack on and picked a route I felt most comfortable with.

Just as an aside, I decided to buy an Evolution Disc Cutter for this project, as I found the 9" grinder just too unwieldy and, frankly, dangerous. Didn't really want to spend the cash, but I'm glad I did - it's been fantastic and gives you far more control over cutting.

Bear in mind my entire bricklaying experience prior to this was on a 4 day weekend course - the switch to working in real life and in a trench was a big one. Being honest, after the first couple of days I thought I'd made a serious mistake. I'd done all my setting out with string and wooden profiles and found it really hard to transfer that to the ground while accurately building and everything just seemed to take forever, and I often wasn't happy with the result. And then you're effectively working overhand while in the trench.

But all you can do is keep on pushing, and get better and better and at least nobody will see most of the underground bit. I did decide to pick up some Blakes profiles and I'm pretty glad I did - I know this defeats half the point, but it was great being able to use the string line to build up the corners.

The weather was an absolute killer as I'm sure you all know - seemed to either be heatwave or thunderstorms, with very little inbetween, and I also found dealing with the cement mixer to be a real faff. Though I did eventually learn that I can dig a hole to get rid of the water and such for cleaning the mixer!

Tips for other people reading - I found that if you're just planning on doing a small bit of work (e.g., build up a corner) then hand mixing in the barrow was easier than dealing with getting the mixer and everything out. And on that note, I found evenings to be great for that - just a single small mix but spend some time getting a corner or two up. Then it just leaves you running in on a weekend, which also felt great.
 
Nice work (y)(y)

Bricklaying is pretty skilled - much more so than it looks.

You seem to have a lot of engineering courses below ground, rather than hi7 concretes ......could just be my imagination..
 
Nice work (y)(y)

Bricklaying is pretty skilled - much more so than it looks.

You seem to have a lot of engineering courses below ground, rather than hi7 concretes ......could just be my imagination..

Thanks Notch - yeah, it's a bit of both. Because it's all block above this, I kind of wanted to take the chance to lay some bricks - I know that sounds silly, but at least I'm honest! But, we're also considering bringing down the ground level a bit, so I wanted to leave plenty of scope for that.

I wish I'd have used blocks on the inner leaf though!

The awkwardness of laying bricks in a trench is why it is srd practic these days to mass fill trenches, then do just 1 block course and a few brick courses to get up to damp.

I am assuming you are doing suspended timber floor?
 
The awkwardness of laying bricks in a trench is why it is srd practic these days to mass fill trenches, then do just 1 block course and a few brick courses to get up to damp.

Yep, makes a lot of sense!

I am assuming you are doing suspended timber floor?

No...I was planning on solid......why?
 
No...I was planning on solid......why?

Ah ok, Im guessing your floor level is higher than Im guessing from the image.

I guess your brickwork is upto oversite level? -about 3 courses below damp (say 100mm celetex, 65mm-75mm screed, 25mm floor finish).

Dont forget that any doorway openings need brickwork / blockwork should finish at oversite level so insulation can run over and butt against outer skin

Hmm, you're worrying me now! The brickwork is at floor level / DPM level now and I was going to work backwards from there to work out where my hardcore needed to finish and follow something like the attached. Have I gone wrong?
 

Attachments

  • sf-os-sf-c (1).jpg
    sf-os-sf-c (1).jpg
    616.4 KB · Views: 404
Hmm, you're worrying me now! The brickwork is at floor level / DPM level now and I was going to work backwards from there to work out where my hardcore needed to finish and follow something like the attached. Have I gone wrong?

Yes, all youve got to do is remove the brickwork from the inner skin where the door opening is.

It needs to be removed down to top of oversite.Then when you do the floor, the insulation will run across the door reveal and hit the back of the outer skin.

The screed and insulation needs dpm between it and the wall.

Either put in a few straps or some slates or similar to support the insulation across the gap.
 

DIYnot Local

Staff member

If you need to find a tradesperson to get your job done, please try our local search below, or if you are doing it yourself you can find suppliers local to you.

Select the supplier or trade you require, enter your location to begin your search.


Are you a trade or supplier? You can create your listing free at DIYnot Local

 
Sponsored Links
Back
Top