Nest Installation - No Power To The Boiler

Joined
6 Jan 2022
Messages
8
Reaction score
0
Country
United Kingdom
Afternoon all,

Yesterday I attempted to install our new Nest Thermostat (Edit: 3rd Gen.) I'd wired up our one in our old flat previously with no issues so I was fairly confident in doing this one but the setup in our new house is more complicated.

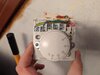
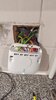
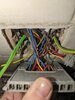
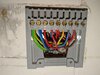
Disconnected the old Honeywell ST1501 control unit and wired up the Heat Link (what I'm assuming is correctly) however upon switching the electric back on, the boiler refuses to power up.

Attempted to call at least 10 or so tradespeople today but none had any availability to come and take a look for a few days, unfortunately, so just looking for some guidance on here if possible.

When I switch the boiler wall switch on, the Heat Link switches on and connects to the Thermostat but nothing from the boiler (Logic+ Heat h15). I connected the thermostat up via USB to see if it needed a trigger from the Thermostat to tick on but no luck. The Heat Link clicks but the boiler still has no power.

As a side note, the original thermostat (Honeywell t6360b1028) is still on the wall and connected. The original intention was to replace it with the Nest but it's 240v as you'd imagine. Couldn't find any guidance on whether to leave it or take it off and tape off the wires.

Any advice or guidance would be greatly appreciated - even if it's to stick it out and keep trying more Tradespeople.

Cheers!

Edit: Clarified it's the 3rd Gen, not the E.
 

Attachments

  • PXL_20220111_143925966.MP.jpg
    PXL_20220111_143925966.MP.jpg
    164.4 KB · Views: 116
  • IMG-20220110-WA0011.jpeg
    IMG-20220110-WA0011.jpeg
    96.6 KB · Views: 146
  • PXL_20220110_161318317.jpg
    PXL_20220110_161318317.jpg
    125.7 KB · Views: 113
  • PXL_20220110_155438563.jpg
    PXL_20220110_155438563.jpg
    192 KB · Views: 127
Sponsored Links
A very quick glance, and you have a neutral wire that’s not in correctly, if at all on the heat link. Also, the live and switch from T6360 from wiring center, can be taken to T1 and T2 and then use that existing wiring to power the nest thermostat.
 
The L should also be linked to the two Nest common terminals 2 and 5 as per the links on your existing programmer in your photo.

The original programmer backplate looks like it's from a Horstmann a H21XL or H27XL maybe?

If it is as I have guessed, you should also note that the wiring terminals are transposed in that the Horstmann uses terminals 1 to 3 for the Hot Water, and the Nest uses 1 to 3 for Heating. In your photo the Horstmann (if that's what it is) doesn't have a wire in terminal 6 heating off, yet you have one in the Nest heating off (satisfied) terminal 1

HM.JPG


Sorry, but with the limited information you have given, to me it just looks wrong on many levels. To assist further you would have to tell us what is connected to the other end of each of those wires. Unfortunately, when it comes to central heating wire colours don't help, one installer may use a brown wire for a certain functions and another blue or even green/yellow. And when there are several wires of the same colour :confused:

Disconnecting the existing thermostat would stop the heating working, if it's still in situ it needs setting to its maximum temperature.
 
Last edited:
@stem, I thought I could see links L - 2 and 5, red ones?
 
Sponsored Links
OK; maybe just bad wiring, or my bad eyesight. The loops were quite nice in the before shot.

OP the cables should be rear entry, if you use the bottom clamps then the cable sheaths should be secured under them, not the wires, and I can't see an earth connection to the metal back box either...maybe my bad eyes again. ;)

Probably best you get a pro in to sort it, but it may take some time if they have to start tracing wires to find out what they are connected to, unless you know which terminal each one was in at the original programmer.
 
A very quick glance, and you have a neutral wire that’s not incorrectly, if at all on the heat link. Also, the live and switch from T6360 from wiring center, can be taken to T1 and T2 and then use that existing wiring to power the nest thermostat.

That's good to know thank you, I checked the neutral and they had slightly come out, readjusted and tried again but no joy.

The L should also be linked to the two Nest common terminals 2 and 5 as per the links in your existing programmer in your photo.

It is slightly hard to see but there is a link between L and 2 and then into 5 also. I mirrored the existing programmer.

The original programmer backplate looks like it's from a Horstmann a H21XL or H27XL maybe?
From my research online I would say yes, I can't find many details regarding the existing programmer but from what I've seen of the Horstmann ones they do look extremely similar. On further inspection of the backplate, it does say Horstmann so would assume this is just rebadged to Honeywell. It claims it's a '525/425 Series Backplate'

If it is as I have guessed, you should also note that the wiring terminals are transposed in that the Horstmann uses terminals 1 to 3 for the Hot Water, and the Nest uses 1 to 3 for Heating. In your photo the Horstmann doesn't have a wire in terminal 6 heating off, yet you have one in the Nest heating off (satisfied) terminal 1
In which case, I would say you are correct. I couldn't find any documentation online for the Honeywell (matches up with it being a rebadged Hortmann then.)

Sorry, but with the limited information you have given, to me it just looks wrong on many levels. To assist further you would have to tell us what is connected to the other end of each of those wires. Unfortunately, when it comes to central heating wire colours don't help, one installer may use a brown wire for a certain functions and another blue or even green/yellow. And when there are several wires of the same colour

Everything I've seen so far in this house I agree rather frustratingly. From the layout of the house, my assumptions would of the 'groups' from left to right, the left bundle is the existing thermostat, the middle (white) being the boiler and the right being the mains, the fused switch it to the right of the photo of the Heat Link.
 
OK; maybe just bad wiring, or my bad eyesight. The loops were quite nice in the before shot.

I won't say they're intentionally messy but I didn't want to trim them before I was confident that the replacement worked.

OP the cables should be rear entry, if you use the bottom clamps then the cable sheaths should be secured under them, not the wires, and I can't see an earth connection to the metal back box either...maybe my bad eyes again. ;)

Probably best you get a pro in to sort it, but it may take some time if they have to start tracing wires to find out what they are connected to, unless you know which terminal each one was in at the original programmer.

I'll be honest I wasn't expecting the cable slack to be so tight when I removed it, not really sure what the best solution would be really other than like you said to continue attempting to get a pro in.

And one of the Earth's is connected to the box behind - that's just my poor photo taking skills at play. :cool:
 
you would be best advised to buy a small wiring centre an use that with only single wires in the correct terminals at the nest, the nest terminals are tiny and not designed to be used as a wiring centre
 
you would be best advised to buy a small wiring centre an use that with only single wires in the correct terminals at the nest, the nest terminals are tiny and not designed to be used as a wiring centre

That is a very good shout, thank you. I should have thought of that when I saw the amount and length of cables I was dealing with.
 
Just for info, the 'earth' connection on the Nest does not need to be connected to an earth!

The terminal is only there to provide a hardwired link to the thermostat through existing wiring and is actually connected directly to Terminal T1.

Some Nest wiring diagrams make this clear, others don't!

Best to wire all the earth's to the backbox :)
 
Maybe the op have momo valves controlling the heating /hot water, I cant see any other reason to wire the "off" terminals.
 
There wasn't a wire connected to the original programmer 'heating off' [terminal 6.]

PXL_20220110_155438563.jpg


...but now at the Nest there is a wire in 'heating off' (aka satisfied) [terminal 1]

Capture.JPG


From my research online I would say yes, I can't find many details regarding the existing programmer but from what I've seen of the Horstmann ones they do look extremely similar.

It usually gives the model on the front.

hm.jpg


my assumptions would of the 'groups' from left to right, the left bundle is the existing thermostat, the middle (white) being the boiler and the right being the mains, the fused switch it to the right of the photo of the Heat Link.

What you should have done is identified the function of each wire. So for example the wire in terminal 1 of the original programmer is identified from the Horstmann diagram as 'hot water on' that wire should have gone to the Nest terminal that had exactly the same function which is terminal 6 'hot water on' (aka call for heat) and so on for all of the other terminals.

Both programmers simply contain two switches connected to terminals 1 through 6, so the wires simply move from the terminal of the original programmer to the terminal of the Nest that performs exactly the same function, unfortunately their designs are different so the numbers don't match, you have to work it out.
 
Last edited:
Given the cable colours, grouping and the OP's demonstrated logic (...and IF stem's guess for the controller is correct ;) ), I believe that the 'C/H' and 'Hot water' connections have been transposed, but also the 'call to heat' and 'satisfied' connections within the group have again been transposed!

Hence why:
Screenshot_20220111-231456_Gallery.jpg
Equals:
Screenshot_20220111-231436_Gallery.jpg
Except the blue 'Call to heat' becomes a 'hot water satisfied'

(The red and brown do both go into terminal 5)

And:
Screenshot_20220111-231452_Gallery.jpg
Becomes:
Screenshot_20220111-231436_Gallery.jpg
Again yellow 'Hot water off' becomes C/H 'Call for heat'
And pinkish 'Hot water on' becomes C/H 'satisfied'

But it was a good attempt! :)
 
Last edited:
Thank you all for your help on this one - greatly appreciate it!

So by way of an update, I rewired the Heat Link up as discussed yesterday and the boiler successfully powered up and started feeding hot water into the system! Such a huge relief.

Joy didn't last long though, I soon realised that the boiler had only put the hot water on to get up to temperature. It soon sat there on the default '00' waiting for instruction. The Thermostat and the Heat Link claimed that they were requesting heat but no luck.

As I was attempting to troubleshoot it, one of the Plumbers I'd attempted to call and left a voicemail called me back and offered to come round.

Long story short - The Heat Link in the new config was setup correctly, so your advice to swap the wires Stem was correct (cheers!) however after some troubleshooting and tracing some of the cabling he said that due to some "funky wiring" going upstairs to the Immersion Heater, he said that the heating as it stood would never have come on.

So not super clear on what exactly the outcome of the wiring was upstairs was but he got it to successfully fire up and everything is great.

Thanks again for all the help on here, has been absolutely invaluable!
 
Do you have an unvented HW cylinder ? unless you have heard wrong no wires from any immersion heater will connect in any way to the nest, if an unvented cyl, the DHW zone valve will be wired into a safety thermostat , this can not be by-passed
 

DIYnot Local

Staff member

If you need to find a tradesperson to get your job done, please try our local search below, or if you are doing it yourself you can find suppliers local to you.

Select the supplier or trade you require, enter your location to begin your search.


Are you a trade or supplier? You can create your listing free at DIYnot Local

 
Sponsored Links
Back
Top