• Looking for a smarter way to manage your heating this winter? We’ve been testing the new Aqara Radiator Thermostat W600 to see how quiet, accurate and easy it is to use around the home. Click here read our review.

Rubber Roof - problem

Joined
12 Oct 2024
Messages
210
Reaction score
10
Country
United Kingdom
Hi all,

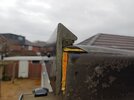
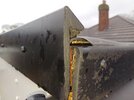
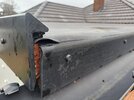
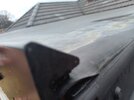
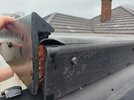
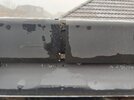
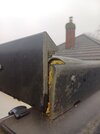
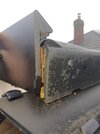
Not a major problem but I need to fix it. At one of the corners, the rubber membrane hasn't been tucked in properly, or has come out somehow. It doesn't seem loose but there is a hole where you can see through to the OSB boards. I would sooner this were closed off.

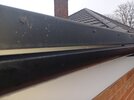
At the other side of the roof, there is a square attachment that seems to solve this. Possible solutions:

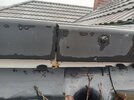
A) just fill the small hole with clear silicone and spread it on the exposed wood. Then no water or bugs can get in. Cheap and easy. Leave the rubber as it is since water falls away from the area in question.

B) remove the black plastic holder strip, pull the rubber membrane down more, then re-attach strip over it.

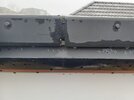
C) get one of those square things and attach.

D) other?

Please see photos.

Many thanks
 

Attachments

  • 20250121_134103.jpg
    20250121_134103.jpg
    191.3 KB · Views: 130
  • 20250121_134108.jpg
    20250121_134108.jpg
    221 KB · Views: 135
  • 20250121_134040.jpg
    20250121_134040.jpg
    194.9 KB · Views: 129
  • 20250121_134038.jpg
    20250121_134038.jpg
    186.8 KB · Views: 116
  • 20250121_134026.jpg
    20250121_134026.jpg
    150.5 KB · Views: 110
  • 20250121_134025.jpg
    20250121_134025.jpg
    190.2 KB · Views: 128
It looks like it was under the strip and has popped out. You may be able to gently lever up the end of the strip, gently persuade the rubber sheet under it then hammer it back down. Perhaps add a couple more plastic topped nails to prevent it popping up again. Or a couple of stainless screws inside black screw caps.

Don't try and fill, now it's popped out it looks like it may just unzip along its length and get worse over time.

It looks like you're missing some sort of corner trim. Is something hanging around on the ground somewhere? If not then buy one, or two if the other end is also exposed. Try a fascia or flat roof company to find the bits. Just glue on.
 
It's been cut far too short, it's supposed to go all the way to the bottom of the trim. Assuming it's similarly short all the way along it needs the trim removing and it extending otherwise water will get behind the trim and rot the decking. Fortunately EPDM can be effectively glued. It looks like it hasn't been glued to the deck very well so hopefully it could be folded back and a new section fitted underneath.
 
How recently was this fitted? Does the EDPM sheet finish at the bottom edge of the gutter trim (That's the edge fixing on the R/H side of your images) anywhere along that side or not. As cdbe comments certainly at the corner it has been cut short - the corner excess should have been folded with the fold glued.
Also there should be a corner cover to finish the corners.
It was done about 2 years ago. It finishes at the bottom of the trim on one side but I'll have to check again tomorrow the side that appears to be short. The guys who did it are not the best, certainly not with flat roofs, but they are good for coming back if I raise an issue. I'll flag it tmw.

So does the rubber have to go to the bottom of the black trim or is it sufficient to make it down as far as the part where the trim presses against it?
 
The EDPM on the roof is expected to go to the bottom as the trim piece is designed hold the EDPM in place. Water will percolate between the EDPM and the Trim so the EDPM should have been trimmed off at the bottom of the R/H trim after the trim is fixed in place- especially as that is the 'gutter' trim.
 
I've checked and it doesn't go to the bottom of the trim along gutter side. There is a gap mid way in the trim so that I can see how far down it goes. See photos.

Having said that, and whilst obviously not ideal, I don't see how the decking or inside the roof can ever get wet along the main length of the roof. Rainwater would run off the rubber and then down the trim and into the gutter. The black 'rail' that the rubber goes over is itself attached to a pink batten and comes down further than the batten. So behind the bottom of the black rail is fascia board. Even if water managed to get up and under the black rail, it could only wet fascia board or pink batten. The batten seems dry.

So this being the case, what should I accept when discussing with the roofer? Obviously the corner I first mentioned needs sorting. That part of the roof incidentally doesn't have any run off into the gutter, not sure why. Boards maybe uneven, slight high point. The main run off is further down.
 

Attachments

  • 20250122_101824.jpg
    20250122_101824.jpg
    240 KB · Views: 71
  • 20250122_101821.jpg
    20250122_101821.jpg
    163.6 KB · Views: 75
  • 20250122_101734.jpg
    20250122_101734.jpg
    145.3 KB · Views: 75
  • 20250122_101732.jpg
    20250122_101732.jpg
    157.4 KB · Views: 74
  • 20250122_101723.jpg
    20250122_101723.jpg
    188.7 KB · Views: 76
If there's something waterproof behind that fascia and not bare wood then I'd say it's near enough adequate. In fact you can see the end of that profile beneath in your first photos.

It would definitely be preferable for it to reach further down, but it wouldn't justify making a mess of it all by adding a potentially troublesome seam along the edge to add the length to it. I doubt your roofer would agree to a free re-roof on the strength of this and I doubt that a court would award a claim against them for you to replace a waterproof roof just because the edging is less than ideal.

Lever the trim up, persuade that edge back in, perhaps with some strong glue beneath then fix the trim firmly down. Stainless screws with black plastic cover caps would be preferable to nails.

Was it hot weather when fitted? I wonder if it had expanded in the heat at the time and has since shrunk.
This is very helpful thanks, as the other posts have been. What you've suggested seems the most expedient approach under the circumstances. Although some additional rubber at the front corner, along with a corner trim piece to cap it off, would seem sensible and not require much work?

I also do not want them to undertake significant work if it isn't really needed because, having got to know these guys quite well, they can be good and they can be bad, and the flat roof aspect hasn't been their forte.

To answer your question: the black plastic trim that the rubber goes over (or should go over) and is pressed against by the outer black fascia - it is pinned to a pink batten. You can see in the photos below, at the end, how the black trim covers the whole of the batten face, and ends about 10mm below the batten. As such, this has to mean that the rubber membrane goes over the top of the pink batten and then down the front of the back trim attached to it. Even though the membrane is short, I cannot see that there is any way for the pink batten to be exposed to significant amounts of moisture. I have examined it in fact and the bottom of it is dry.

Would you say pink batten is sufficient for what exposure it would get? It may get some splashing from underneath when heavy rain hits the gutter.

So with all this in mind:

1) Release the outer black trim near the front corner.
2) see if there is enough membrane to pull it down into the correct position and then tighten the trim back with screws.
3) put corner trim over the corner.

Possible option before 2) would be to add some additional rubber underneath the membrane along a 250mm or so length from the corner for good measure. Assuming existing membrane can then go over the top of it and be clamped down.

??
 

Attachments

  • 20250122_141601.jpg
    20250122_141601.jpg
    195.7 KB · Views: 55
  • 20250122_141622.jpg
    20250122_141622.jpg
    242.4 KB · Views: 55
  • 20250122_141631.jpg
    20250122_141631.jpg
    278.6 KB · Views: 54
  • 20250122_141817.jpg
    20250122_141817.jpg
    181 KB · Views: 55
  • 20250122_141532.jpg
    20250122_141532.jpg
    85.9 KB · Views: 60
I'd worry that additional rubber under it would reduce the amount of pinching it gets between the two bits of plastic so make it easier to slide out again in future.

The plastic inner profile means you don't need to worry about waterproofing, provided it remains clipped in.

If the roofer had tightened up the end with a few screws instead of nails then you'd probably never have an issue. Fix it down well and it should be fine.

Put some strong glue under the rubber. Fix everything down. Put a corner cap over both ends after. Done.
I'm with you. Rubber underneath could end up being a pain... hopefully there is enough rubber to make it to the clamp point.

Thanks for the advice!
 
Has the EDPM been glued down? I hope so.

I think you need a corner patch to ensure continuity of the EDPM on this questionable corner. You will need the 'Primer' to bond it to the EDPM. I accept it does require the removal of the trims to apply

and the Kerb Corner to finish the edges.
 
This is very helpful thanks, as the other posts have been. What you've suggested seems the most expedient approach under the circumstances. Although some additional rubber at the front corner, along with a corner trim piece to cap it off, would seem sensible and not require much work?

I also do not want them to undertake significant work if it isn't really needed because, having got to know these guys quite well, they can be good and they can be bad, and the flat roof aspect hasn't been their forte.

To answer your question: the black plastic trim that the rubber goes over (or should go over) and is pressed against by the outer black fascia - it is pinned to a pink batten. You can see in the photos below, at the end, how the black trim covers the whole of the batten face, and ends about 10mm below the batten. As such, this has to mean that the rubber membrane goes over the top of the pink batten and then down the front of the back trim attached to it. Even though the membrane is short, I cannot see that there is any way for the pink batten to be exposed to significant amounts of moisture. I have examined it in fact and the bottom of it is dry.

Would you say pink batten is sufficient for what exposure it would get? It may get some splashing from underneath when heavy rain hits the gutter.

So with all this in mind:

1) Release the outer black trim near the front corner.
2) see if there is enough membrane to pull it down into the correct position and then tighten the trim back with screws.
3) put corner trim over the corner.

Possible option before 2) would be to add some additional rubber underneath the membrane along a 250mm or so length from the corner for good measure. Assuming existing membrane can then go over the top of it and be clamped down.

??
As said above - remove the trims and remedy the poor quality edge, with a glued-on patch.
 

If you need to find a tradesperson to get your job done, please try our local search below, or if you are doing it yourself you can find suppliers local to you.

Select the supplier or trade you require, enter your location to begin your search.


Are you a trade or supplier? You can create your listing free at DIYnot Local

 
Back
Top