• Looking for a smarter way to manage your heating this winter? We’ve been testing the new Aqara Radiator Thermostat W600 to see how quiet, accurate and easy it is to use around the home. Click here read our review.

Fitting bath/shower screen over siliconed bath.

Joined
31 Dec 2019
Messages
37
Reaction score
2
Country
United Kingdom
Hi all,

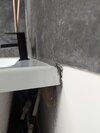
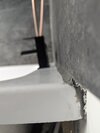
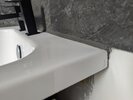
I've siliconed the bath tiles and bath edge already. Decided to go with a shower screen now and to install the wall profile bracket so it can be flush to the wall, is it best to:
A) cut the silicone at the point where screen will go and remove all(as much of) the silicone and re-silicone when installing bracket.

B) cut out just enough silicone (and hope there's still enough to seal tile and bath) so that the bracket can sit (fairly) flush to the wall?

Might be hard to see from photos, but used a tool for the silicone and is quite large (think 10-14mm from memory) as wanted a good solid seal. But because of that, it's hard to put the profile in now
 

Attachments

  • PXL_20250720_124729533.MP.jpg
    PXL_20250720_124729533.MP.jpg
    150.4 KB · Views: 38
  • PXL_20250720_124737412.MP.jpg
    PXL_20250720_124737412.MP.jpg
    115.2 KB · Views: 39
  • PXL_20250720_124746551.MP.jpg
    PXL_20250720_124746551.MP.jpg
    156.7 KB · Views: 41
Just cut a notch in the silicone so the wall profile sits flat to the wall and the bath, when actually fitting the channel, fill the notch with silicone attach the cannel then clean off the excess, so the edge seal is reinstated.

Hopefully there is a seal along the edge of the bath at the all wall contact points so removing that small notch shouldn't really compromise anything underneath it anyway.
Thanks I'm hoping thats the case too.

The only other is is. Manual says not to silicone inside of the screen. But having the nitch and resiliconing up to would mean I am?

I understand not siliconing the inside is so water can escape when water inevitably gets inside the profile. So should I just cut a notch, but just silicone the back of the bath/profile? And avoid any on the side of the profile so water can still escape?
 
No - you don't silicone the inside edge top to bottom, only on the outside but that's why it's important to have a seal at the bottom at the bath edge so any water that runs down the inside edge leeches out and runs into the bath and not into any gap at the bottom.
 
Sorry, just reread my post and grammar was horrendous.

I meant if I was to cut a notch. Then silicone around the notch whilst I put the profile in. Some of it will naturally seal the inside of the screen at that part.

I guess I just be careful and try my best to wipe away silicone so it leaves some unsealed section of the green profile near the notch?

Hope that makes sense
 
Also, might now be a while before I can install it. Manual says drill a hole in the wall profile approx 100mm from the top and bottom.

However, just noticed the wall profiles already got holes drilled but at about 34mm from the top and bottom. Have contacted seller and manufacturer.

Also, the manual says not to drill the screen profile. Does that mean I just screw through the metal section of the screen?
 
Usually with a bath mounted shower screen it would be -

U wall profile/channel gets screwed to the wall, usually 3 or 4 screws internally. Offer up the U profile to the wall to the middle of the bath edge, and checked it's vertical, mark the holes, drill the wall, then plug and screw it on, with the silicone on the bath edged notched and then a fresh little smidging of silicone into that notch and then tighten it all up. (Some put a line of silicone down the back on the wall profile if it needs extra support on the wall). Then the screen slots into that U channel and the screen is levelled to the top of the bath edge. There are usually 3 or 4 screws holes in the inner side edge of the U profile, then take a 2 mm drill and drill through those holes into the screen edge end profile, then take the small screws and tighten into those holes to secure the screen to the wall profile, they usually have chrome caps on them.

Thank you.

ONe I dismantled before had 3 screws. But this one's only got two which is a little worrying especially the screws is like 10mm long.

The manual says not to drill the face of the screen profile. Does that mean I should just drill the wall profile and then screw through the screen profile?
 
How does it expect the screen profile to be secured to the wall profile then without drilling into it? What is the make, is the manual online?
 
Profile the bottom of the wall mount channel with a grinder so it matches the silicone profile, and applies a slight pressure to the existing silicone when installed. New silicone up the back of the channel, touching the wall

The small 10mm screws you refer to sound like they're for attaching the screen hinge to the channel not the channel to the wall - part 9 in the diagram in the manual
 
I'm sorry but I can't disagree more, grinding out the bottom of the wall channel is asking for trouble IMO. Much easier just to notch out the silicone and then add some new in as the wall profile is being fitted.
The manual says not to drill the face of the screen profile. Does that mean I should just drill the wall profile and then screw through the screen profile?

I'm confused, they supply a 3mm drill and tell you, (sorry copy'n'paste is in caps) -

"FROM THE INSIDE OF THE BATH SCREEN MAKE A PENCIL MARK ON THE WALL PROFILE APPROXIMATELY 100mm FROM THE TOP AND BOTTOM. NOTE: WHEN MARKING THE HOLE POSITION ENSURE THAT THE 3mm HOLE DRILLED WILL GO THROUGH BOTH THE WALL AND SCREEN PROFILE, WITH AT LEAST 3mm OF THE PROFILE'S MATERIAL AROUND THE HOLE."

So you are to drill through the wall profile into the screen profile, just use the holes in the wall profile as a guide though, the measurements are mentioned if no holes were already drilled.
 
Profile the bottom of the wall mount channel with a grinder so it matches the silicone profile, and applies a slight pressure to the existing silicone when installed. New silicone up the back of the channel, touching the wall

The small 10mm screws you refer to sound like they're for attaching the screen hinge to the channel not the channel to the wall - part 9 in the diagram in the manual
Thanks.

By profile you mean cutting a small angled section off the wall profile? I would need to do that to the screen profile(metal hinge section) as well I presume. Just seems a little risky to do that.

Yeah, I gathered the smaller screw is for the attach the hinge to the channel and my concern is whether that's enough to do that job? Seems a very small screw and only two of them to hold a heavy screen with swinging force.
 
By profile you mean cutting a small angled section off the wall profile?
I mean applying a tiny 3mm or so radius to the bottom of the wall channel; a smaller radius than the radius of the existing silicone (which is 4mm let's say) so that when fitted, the channel presses on the existing silicone

Very unlikely at that small a radius you'll have to do anything to the hinge attached to the glass; just set it out a mm or two. The entire reason why these things are supplied as a two part "channel on the wall then drill and screw the hinge to the channel" affair is so that the channel can take out any discrepancy introduced by the wall being out of plumb, so the screen hangs straight and doesn't drift open or closed under its own weight. As such, you can radius the channel and not the hinge and just have the adjustment the channel offers take up the difference so the hinge isn't resting on the silicone

Or notch the silicone, if you feel you can do a good neat job and not introduce a hole in it that will then need to be filled; it's either/or and a miniscule adjustment no matter what - I just recommended what I did as I felt it would be faster and neater to tickle the channel with a grinder than adjust the silicone. If you don't have a grinder or wouldn't be confident doing the radius, adjust the silicone

Your house, your choice! :)

Yeah, I gathered the smaller screw is for the attach the hinge to the channel and my concern is whether that's enough to do that job? Seems a very small screw and only two of them to hold a heavy screen with swinging force.
You'd perhaps be amazed At the small size of the rivets that hold sections of cars, ships etc together then.. Bigger screws could potentially be a hindrance here as they would have larger threads; you reach a point where a large screw screwed into a very thin section, will wobble because so few threads (/parts of a thread) effectively grip the metal.

The screen is heavy but it won't shear the screws and the channel sides provide most of the support; the screws just apply a shear force to stop the screen falling out of the channel. If you wanted to improve things slightly you could drill and screw/rivet both sides but I'd recommend you use a fixing of the same type of metal as the channel/hinge on the inside of the enclosure; when two dissimilar metals are in contact in the presence of moisture it causes galvanic corrosion which will start to look unsightly and work the fixing loose over time. Aluminium screw in an aluminium channel/hinge: no problem
 
Last edited:

If you need to find a tradesperson to get your job done, please try our local search below, or if you are doing it yourself you can find suppliers local to you.

Select the supplier or trade you require, enter your location to begin your search.


Are you a trade or supplier? You can create your listing free at DIYnot Local

 
Back
Top