2.5mm SWA as garage lighting

As the plug, we assume, would be at the power source end. There is the matter of how one would Earth the armour of the SWA.

No. SWA is not suitable for direct connection to a 13A plug. As above, via a suitable JB, or glanded into the socket box maybe an option. Unless the socket is already an unfused spur, etc.
 
Sponsored Links
@SimonH2 The sockets are like this.

iu
 
They have 20mm knockouts - the last one on the circuit must have a suitable free one.
 
Sponsored Links
Well actually they are wired such that 3 of the sockets have a single cable coming into them so in effect 3 sockets will have a spare entry point
 
It is quite do-able to terminate a SWA cable into the socket. Use a waterproof gland and an earth ring, linked by a short bit of cable to the socket earth. I am not suggesting the rest of the idea meets regulations.
 
Actually it's not far off the method I was taught - substitute hacksaw for pipe cutter and it's the same process. The trick is to only score (or perhaps go half way through) the wires all the way round, then flex them till they break off

I had always assumed electricians had some automatic stripper!

When I set up my joinery shop, most of the big machines needed connecting with SWA radials, various 4mm up to 25mm. I made the novice error to start of stripping back the sheathing to its finished length then cutting the steel armour with side cutters......big mistake, as soon as the wires are disturbed, they wont fit in the gland. I learnt that using a pipe cutter to cut through sheathing and scored the steel wires works perfectly. Because pipe cutters are only designed for copper, the little wheel doesnt cut through the steel easily but once scored they break off easily.
 
The trick is to only score (or perhaps go half way through) the wires all the way round, then flex them till they break off. If you cut all the way through then it's very easy to go too far
I've found that if you don't go far enough with the scoring then the flexing until they break off leaves you with little hook shaped bends at the ends of the strands, and fitting the gland is hard to impossible because of them.
 
I dont know if thats notifiable or not, but if you are doing it yourself bear in mind terminating SWA is awkward without the correct tools. Ive used a plumbers pipe cutter to score the steel armour wires -Im sure pro electricians would cringe but its worked for me.
That's how I was taught - By Delta cables.
 
There are novelty tools intended for SWA, but a full size hacksaw is quick and easy, and the blades last far longer than the expensive tiny little blades in the rotary type tools.

In the 70's part my job involved terminating thousands of SWA cables, ranging from the very smallest signal cables, to 360mm TP+N. The method was the same for both. Decide where the steel needed to end and saw a ring through the PVC outer at that point, through both PVC and the far enough through the steel to make a good nick in it. Full size hacksaw for the larger ones, with a fine blade, junior hacksaw for the smaller cables.

Once the nick is made all round, remove the PVC outer from the end to the nick. On larger cable you score along the PVC with a Stanley knife. The smaller sizes sometimes allow an entire section of to be slid off. You then carefully check the steel is nicked all the way around and pull the steels out a few at a time, wagging them about to get them to snap at the nick. Then make a second ring through the PVC, a little way up the cable above the steel to allow the steel to be spayed ready for the gland.

Once the gland is fitted, the inner PVC armour can be removed, sometimes this is a moulded PVC, sometimes a tough tape wound around the cores.
 
And that's how I was taught to do it - via two different routes (i.e. told the same thing via different sources).
One of those sources, an "old school" electrician now long retired, also told me how some prefer to saw all the way through the wires with the result ...
... of having a piece of kit (air-con outdoor unit in this case) where in damp weather it would trip the supply MCB. The tell-tale black blast mark near the cable clamp showed where the installing lecky had nicked the inner insulation by cutting too deep, and in damp weather it would flash over (can't remember if it was between cores or to the metal plate behind the cable) :eek:
I have to say, back in the days of learning by trial and error, on the few occasions I did anything with SWA, I found it really easy to go too deep as once through the steel then the saw goes through the remaining plastic very quickly :whistle:
 
There is a decent video on terminating swa


He may mention using 10mm swa but that is only needed in certain circumstances. Otherwise it's sized on the basis of load and length. Any cable used must be BASEC certified swa or otherwise so don't just buy anything make sure it is.

Personally I think more detail from the OP is needed - current size of swa, what feeds it and maybe even more as the detail emerges.

Using the armour for the earth connection isn't that unusual and is ok providing the sums work out and it is terminated correctly.
 
Why was this bumped? Thought B-A-S was back for a moment!

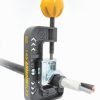
Anyway a CK Armour slice is a perfect tool for small SWA 25mm and smaller. I used one for Two years terminating mainly 6mm and hardly ever needed to replace the blades. You have to make sure you turn it in the correct direction. The Yellow Ball fell off mine until I got my father inlaw to drill it & put a pin to stop it coming off

T2250-100x100.jpg
 
Why was this bumped? Thought B-A-S was back for a moment!
You're not alone :whistle:
There is a decent video on terminating swa
Except for the incorrect advice on connecting the earth. As he's done it, the integrity of the earth is dependent on the clamping pressure with a piece of plastic in the "sandwich" - and given that plastic will creep under pressure, it is "most likely" that the clamping pressure of the connections will be lost over time. Add a bit of tarnishing to the brass, and you've an unreliable earth.
Needs either two nuts on the gland (one to clamp it into the box, the second to clamp the banjo down onto the first*), or there are clamps (who's name escapes me at the moment, but I'm sure someone will remember for me) specifically for doing it in a more reliable way.
* Even this isn't reliable if not done right. There's play in the threads, so if you do the first nut up to "T A F" and then put the second nut on, as the plastic creeps, the first nut will be free to move by however much play there is in the threads - and the clamping pressure of the second nut will be relieved.
Instead, don't fully tighten the first nut, so that when you tighten the second one, it pushes the first nut down a bit harder, taking up the play in the threads - if you imagine how the nuts would be if the plastic panel weren't there, that's how you want them when the plastic is there.
A bit like doing the wheel bearings on the Land Rover. Takes a bit of judgement to get the first nut about right, so that when the second nut is screwed down, the bearing has the right amount of free play in it.
 

DIYnot Local

Staff member

If you need to find a tradesperson to get your job done, please try our local search below, or if you are doing it yourself you can find suppliers local to you.

Select the supplier or trade you require, enter your location to begin your search.


Are you a trade or supplier? You can create your listing free at DIYnot Local

 
Sponsored Links
Back
Top