Attaching Shower Enclosure Channel / Bracket To Wall

Joined
20 Feb 2009
Messages
87
Reaction score
0
Country
United Kingdom
I have a Lakes Offset Shower Enclosure.

I have installed the shower tray base, tanked the walls, tiled the walls down to the tray and siliconed the tiles where they meet the tray.

I am now looking to secure the enclosure channel / bracket to the wall. This is probably a stupid question but I shall ask it nevertheless.

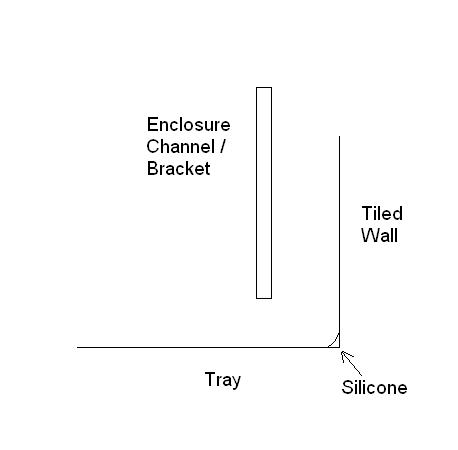
Do I put the channel / bracket down fully on to the tray and fix it to the wall or slightly raise the bottom of the bracket (a couple of mm) off the tray? I ask this because it would mean the bracket would have to be pushed slightly into the silicone. I'm not sure how to explain this easily but because the silicone is filling the gap where the tray meets the tiles it means that there is not a 90 degree angle for the bottom of the bracket to fit into. I am concerned that the bracket would damage the seal the silicone is making if it were sitting on the bottom of the tray.

I have attached a very basic drawing to explain what I mean.

Thanks in advance,

Daz

 
Sponsored Links
Put the channel exactly in place, resting on your silicone bead, then use a sharp pencil or fine-nibbed marker pen to mark the silicone where the channel touches it. Put the channel to one side and use a stanley knife to cut the silicone away between the lines you've marked.

Place the channel in the resultant slot and mark and drill your holes. Clear away dust, put fresh silicone in the bit you've cut out, and also a line up the wall where the channel will go, then immediately fit the channel, tight to the tray.

Normally you'd silicone where the tiles meet the tray after you've fitted the screen, not before, so the above is a way of dealing with your little cockup!!

2nd'd
 
Normally you'd silicone where the tiles meet the tray after you've fitted the screen, not before, so the above is a way of dealing with your little cockup!!

Interesting, but I was actually following the manufacturer's instructions that clearly states that the tiles to tray MUST be siliconed prior to fitment of the enclosure. So not my cock up!

Incidentally I have never heard of sealing the tiles to the tray after the enclosure is fitted. I have always read and been told by colleagues that it should always be done prior to enclosure installation.

Which is correct?
 
Sponsored Links
You're missing a bit out, probably. The OUTside of the tray will usually be sloping, so there's big gap down there which MUST be sealed. You cannot rely on one bead of silicone.
Here the tile's dark blue, tile cement ( should be solid bed) light blue, your silicone bead is green and the gap which must be sealed ( generally with silicone near the top at least) is red. So if the red stuff is in place the precise position of the green doesn't matter.
unledwf.jpg
 
Thanks for the comments ChrisR.

I did silicone the tray to the wall first, then I tiled down to the tray and then I have siliconed again (tile to tray).

The manufacturer's instructions, I quote, say:

Ensure tray is correctly levelled & that tray / wall (tile) joints are sealed & cured over entire length of tray sides (See Fig A) prior to fitting enclosure .
DO NOT SEAL TRAY EDGES UPTO A FITTED ENCLOSURE

That's fairly conclusive, surely. Maybe the instructions are being a little misleading.

Anyone have any further comments.

Thanks,

Daz
 
I always put a bead of silicone behind screen rail, when wet.

Fit the screen then silicone the shower tray after.
 
As ChrisR said, the functional seal is where he has shown it in red.
The neatly finished corner fillet he has shown in green is purely cosmetic, and usually applied to tidy everything up at the end of the job. That way, the same fillet can easily be continued around the screen etc. as necessary.

The functional seal needs to continue behind the uprights to direct any water that finds it's way past the upright to wall joint back into the shower tray, hence the instruction to install that prior to fitting the uprights.

I prefer to concentrate on packing all the gaps when applying the functional sealant, with little regard to the cosmetic finish. Trying to mould the functional sealant to shape may drag it away from the walls or tray, stopping it from doing it's job.

It is common not to completely seal the inside of the enclosure to tray joint so there is a route for any stray water to drain back into the tray instead of remaining trapped in the channel and box sections of the enclosure, or building up until it finds a route past the functional seal somewhere.
 

DIYnot Local

Staff member

If you need to find a tradesperson to get your job done, please try our local search below, or if you are doing it yourself you can find suppliers local to you.

Select the supplier or trade you require, enter your location to begin your search.


Are you a trade or supplier? You can create your listing free at DIYnot Local

 
Sponsored Links
Back
Top