Awkward tiling around shower mixer pipes

Joined
27 Jan 2009
Messages
1
Reaction score
0
Location
Devon
Country
United Kingdom
Hi all!

New to the forum, so apologies if I put this in the wrong place!

However, we are halfway through a bathroom refit (not me doing it, I hasten to add) and we've come up against a small problem.

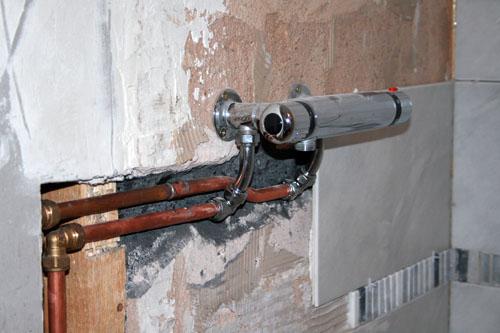
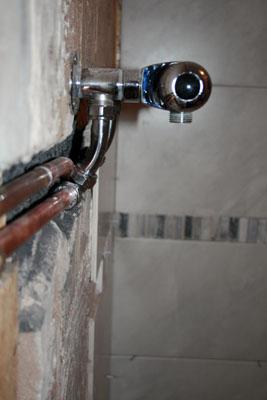
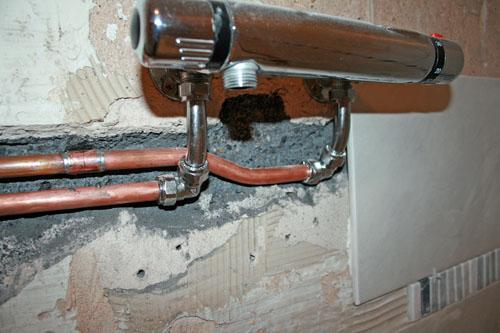
The shower mixer we have already we are keeping, but the pipework is protruding from the wall (rather than a mixer that takes the pipes in from behind the wall seamlessly. The problem we now have is how to tile around these pipes to leave it looking tidy.

Our builder said he's seen it before where you can have a kind of chrome plate which can be fixed over the pipes and you simply cut out the sections for the pipes to poke through. Or he said you can add extra tiles to build up around the pipes. Not entirely sure how that would all work in my mind's eye, so I'm hoping you guys would have some brilliant idea!

Photos of the problem below:


Hoping you guys can help! :)

Edit: I should have said... the pipes have been chased into the wall - previously, they were just left open in the bathroom - very ugly, girlfriend hated it. Hoping there's a solution!
 
Sponsored Links
Doesn't look like its been fitted correctly to me,post it in the plumbing forum and let them take a look.
 
Now i'm no expert but it looks like they've been incorrectly piped/plumbed. You'll have problems covering them with that bend in them. It would have been better if they went up into the shower mixer and with neat 90 degree bends chased into the wall, if that is the only way of doing it.

Might need a quick re-plumb but not a big deal really.
 
milk - the whole lots got to go further back into the wall. Deeper chasing so pipework (including the elbows) is well below wall surface so all that should be sticking out are the threaded connectors. You then position your tile (remember the mixer bar has been taken off the elbows), mark the holes for the threaded connectors, diamond drill the 2 holes, slip the tile over the threaded connectors and stick in position when doing that row of tiles, when adhesive has set, slip over the treaded connector tails a couple of chrome (or white) pipe collars* (probably 22mm judging from the photos), attach the mixer bar onto the threaded connector tails by tightening the 'loose' chrome nuts on the rear of the mixer.

Just an observation on the pipework - had the top pipe been below the bottom one it would have made for a neater installation, if you see what I mean.

*there was probably a couple of these collars that came with the original mixer but weren't fitted ... maybe see if you can find them in 'the shed' or in 'the garage' ... if not then you can buy them in your local plumbers merchant.
 
Sponsored Links
Just an observation on the pipework - had the top pipe been below the bottom one it would have made for a neater installation, if you see what I mean

Bottom pipe should techniclly be cold, but this contradicts the fact that the mixer inlets will be hot on the left, cold on the right.

A curious bit of plumbing, has to be said. Pipework needs to be fully embedded in brickwork and covered to allow for full spread of tile adhesive. As it is, movement in the pipework (which will happen since not firmly clipped) will knock against tiles, loosen them and open grout lines. Hey presto, you'll have water seeping down behind them and away you go.

If you don't want the hassle of repiping (what's on the other side of that brick wall?), then you could have pipework coming straight out from compression elbows, which will be easy to tile around (see previous post on cutting circular hole through tiles) and run to shower mixer valve using chrome bent in an attractive manner by someone who knows what they're doing, without any compression elbows beyond the tails sticking from the wall.[/quote]
 
hi ,i know it might be late now to reply,but have you thought of building a false wall
 
spoonofmilk never replied to any of the other replies either (look at the post count, its still 1) so it looks like we will never know what the outcome was
 

DIYnot Local

Staff member

If you need to find a tradesperson to get your job done, please try our local search below, or if you are doing it yourself you can find suppliers local to you.

Select the supplier or trade you require, enter your location to begin your search.


Are you a trade or supplier? You can create your listing free at DIYnot Local

 
Back
Top