Best way to render in preparation for tiles

Joined
17 Feb 2006
Messages
373
Reaction score
1
Country
United Kingdom
Don't know what the etiquette is but this continues from:

//www.diynot.com/forums/viewtopic.php?t=230158

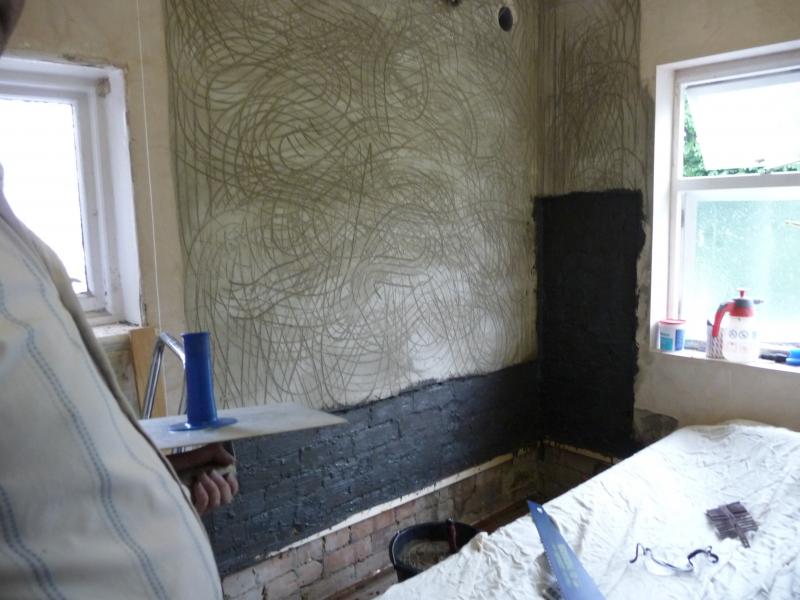
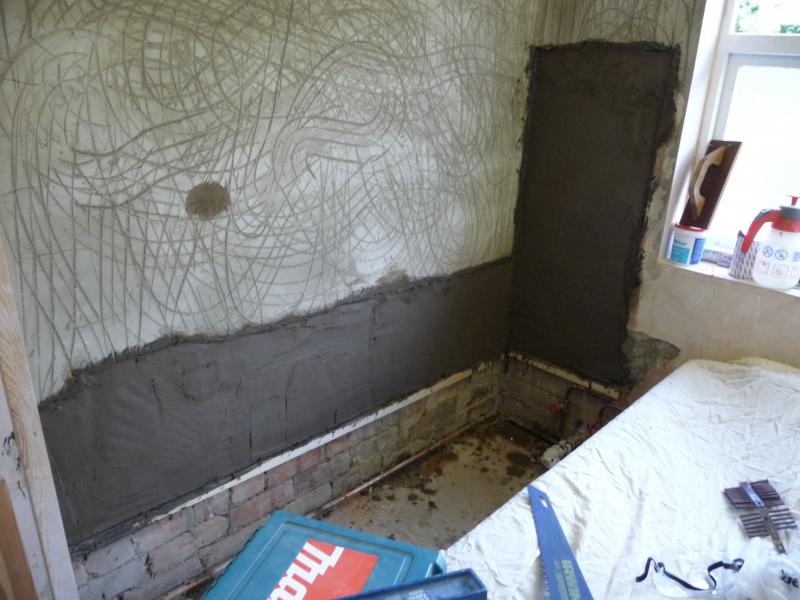
A newly s/c rendering job, by someone else that I wasn't happy with. 9 days old now, the render, not the topic.

I just took a bit off where the cracks were. One of the sections that sounded hollow. Sure enough it came off with hardly a whisper. A 3lb lump hammer and 1 inch chisel. I'm not a muscular build.

Stuff round it came off easily. I tried a section with no cracks whatsoever. If I started a couple of inches above a lower edge, then as 2 or 3 blows with the hammer and it would fall away.

There is the slightest trace of grey left on the bricks (except where the hollow section is, which is squeeky clean). But my memories of working for builders was that often if you did this sort of thing you'd get patches left all over the place. This is falling away in lumps.

So, not looking like there's very good adhesion.

I like the idea of sand and cement as a background for tiles. Disagree if you like, but I'm joining to existing plaster, so board type stuff is going to be awkward.

To get the best possible bond, and the least cracking etc. I'm imagining something like this:

1. PVA (or sealant of your choice, reccomendations please) on the bare brickwork the day before. To reduce suction.

2. Battens on to get everything square etc.

3. PVA on. Let it go tacky then:

4. Scratch coat, 4-1 mix with waterproofer (reccomendations please). Scratch coat on thin. Scratch it lightly when it's started to go off.

5. Next day PVA again (do I need this?)

6. Another coat 5-1 with waterproofer.

7. Repeat if necessary. One wall looks like it might take 3 coats to get it out to square. Funnily enough where the original 'plasterer' got all his cracks.

8. Remove battens and fill.

I'm a real belt and braces man, and as I'm doing it myself can afford to take my time. In fact my work patterns at the moment mean I've often got a morning/afternoon free on consecutive days.

Comments/advice please gratefully received.
 
Sponsored Links
Okay-

Sand and cement is ideal for tiling on to . You will not get better!

First make sure all is dust free, cleaning with a wet brush.

If you have a physical key - brick joints, rough surface etc, you don't need a chemical key. A tight scratch coat onto the damp surface will do. Scratch coats as many as you like until final float coat.


However ---

If you are not happy with the physical key - don't use PVA in this case. Use SBR:OPC:SAND 1:1:1 brushed on as a slurry. SBR is designed to be used with cement (and for tanking).

Let this set and the next day, if you have left it rough enough for a key, you can coat straight onto this. If you think the key is not enough, you can then just give it a coat of SBR;OPC 1:1 and a then tight scratch coat onto that while it is still tacky. That is belt braces, buckles and harness!

This will not come off ever. To remove this, you will have to hack off the lot and the brick behind will come away, the surface of the bricks being bonded to the slurry, rahter than the render being taken off the brick.

Once you have a scratch coat on (scratched on the surface and not through the coat so that you are cutting it into strips) you don't need any more bonding agents. You will also have very little suction due to the SBR making it waterproof, although if you have a couple of coats on you may get some 'green' suction.

In the small area you are on about, you will have no trouble. You can put profiles up(as suggested ) after the slurry and fill the spaces in after removing them, or rule off and check with a level as you go.

Any brand of waterproofer will be good. SBR can be used but it is not good for giving body to the mix. I like Sovereign or Remtox, but there are others . Look at your thickness and if you want to finish with a 5:1 or 4:1 coat, work back from there in mix design -ie three coats needed 5:1, 4:1, 3:1 slurry, or 4:1, 3.5/1, slurry - as long as you are slightly weaker with each coat that goes on you're fine. I would not want any weaker than 5:1 as last coat and preferably 4.5 /1 if you can.
 
Thanks

Really in 2 minds about this. Just saying to wife that I remember having to hack away at old render like nothing to get it off when I used to work for builders. This is stuck to the wall, and usually leaves some sort of trace of itself, but nowhere near as hard to take off as I think it should be. Cement has 75% of it's strength after 7 days, IIRC

Anyway, your reccomendations.

The slurry. How do I do the 1:1:1? What I mean is, by weight?
 
Undercoat plasters like browning are dead soft but still take tiles. You are just making a job for yourself.
 
Sponsored Links
Undercoat plasters like browning are dead soft but still take tiles. You are just making a job for yourself.

Thanks. Do you mean redoing it in s/c (as opposed to browning) or redoing it all?
 
I'd do as little as you have to. Old lime mortar in terrace houses is like crumbly sand - but it still takes tiles. Each tile area only has the weight of one tile to contend with. I've honestly never seen a tiled wall that has fallen apart.
 
Thanks

Really in 2 minds about this. Just saying to wife that I remember having to hack away at old render like nothing to get it off when I used to work for builders. This is stuck to the wall, and usually leaves some sort of trace of itself, but nowhere near as hard to take off as I think it should be. Cement has 75% of it's strength after 7 days, IIRC

Anyway, your reccomendations.

The slurry. How do I do the 1:1:1? What I mean is, by weight?

You only need to take off what is loose or weak. If you can't take it off easily, it won't fall off, regardless of what material it is.

If there is a bit left on that you need to go over, the slurry will do the job.

Don't put s/c over browning etc

Slurry by volume (I doubt if it makes a great deal of difference either way, and you don't have to be too exact!)
 
I'd do as little as you have to. Old lime mortar in terrace houses is like crumbly sand - but it still takes tiles. Each tile area only has the weight of one tile to contend with. I've honestly never seen a tiled wall that has fallen apart.

Thanks. It's very tempting, just that the perfectionist side of my personality is getting in the way. Which isn't a good thing. I know it's a couple of hours of filthy dirty work getting the existing off, trip to tip with the spoil. Then battens, then doing a job I've not really done before (and probably won't need to do again - that's part of the problem). Buying stuff I'll use once and have around the place (SBR etc). And I'm not certain I'll end up with anything much better.

The area that is really badly cracked is going to come off whatever happens. And I'll tap around for obvious hollows. But although the render is coming off 'easily', it does actually have a fix to the wall. Except where there are audible hollows (there aren't a lot, and they seem to be always near the largest cracks) it always leaves a thin layer of cement behind over all the surface of the bricks, and has an impression of the joints if there are any.

So I'm heading this way:

1. Take off obvious hollows/large cracks.

2. Redo those, more carefully than previous plasterer.

3. Fill remaining hairline cracks with whatever.

4. Tank with either paint-on or membrane.

So I'm left with a pretty sound substrate that water can't get to anyway. And I'm only going to put 'ordinary' ceramic tiles on. 6"x6" probably. Not huge great marble things or nuffink.
 
Sounds good to me. See what the other guys think.
 
Ok. Just taken the worst looking section off. Not difficult. One largish area (foot square?) came off more or less in one lump, with hardly anything left behind. I don't think this had any adhesion worth speaking of.

Other areas needed a bit more effort, at one point the s/c even pulled a bit of the old bedding and some brick with it, gasp! Elsewhere the top coat came off leaving a bit of the scratch coat behind. But that was the exception.

Another area on the long wall where there was a long horizontal crack came of v. easily. I think that was an afterthought on his part. It was a section all the way down to the floor where the end of the bath will be, so I guess he was thinking that I might want to tile behind the bath panel.

The short end wall was done last I think. I've taken the bottom half off, and where it met the long wall it fell away very easily. There was no adhesion between the two sections atall, and the scratches are on the long wall, so looks like he did that first.

So I'm hoping that he did the end wall last, in a hurry. He was going on his holidays that night!!

I'm still flirting with the idea of taking it all off. It isn't anywhere as messy as the earlier stuff, half of which was old plaster (i.e. very dusty). And a chisel bit in the SDS would make light work of it.

Just that I'm a bit un-nerved by that large section that came off, which wasn't hollow sounding, and didn't seem to be stuck to the wall atall.
 
You sir are a fussy bu**er, and that is not a bad thing and I don't mean it in a derogatory way :) If you don't take it off and redo it yourself it will bug you and play on your mind for time and memorium. Get it all off, buy a bottle of SBR and do as micilin said, it will be the finest job you can do and you will know it, you wan sit in the tub soaking away, admiring your work and not worrying about it.
 
You sir are a fussy bu**er, and that is not a bad thing and I don't mean it in a derogatory way :) If you don't take it off and redo it yourself it will bug you and play on your mind for time and memorium. Get it all off, buy a bottle of SBR and do as micilin said, it will be the finest job you can do and you will know it, you wan sit in the tub soaking away, admiring your work and not worrying about it.
Good advice ;)
I'd take the lot off.

Personally I would reconsider using a cement based tile backer board; you can dot & dab these providing you also fix mechanically which should be within your capabilities & will support much higher tile weights. If you still want the belt & braces of your Tiling post you can tank it as well, using either matting or liquid membrane but, as on your tiling post, is a little OTT for a domestic bath installation IMO.
 
In the end I've chickened out.

I took the render off the end wall, where the worst cracks were. I started to take the render off the long wall, as much as anything to give myself a straight edge to start from, and to be honest, most of it was pretty firmly attached. There was a section on that long wall which looked like he'd done it last, which came off easy, and there were a couple of patches at the top which sounded hollow, next to cracks where I think the edge of the old plaster had sucked the water out of it.

But I think the body of it, where there aren't big cracks, is probably ok. It's certainly more solid than the old plaster that was on half the wall, and I was thinking of leaving that on.

I just can't face the mess of getting it all off, then doing it all on my tod. Remember I'll be mixing for myself.

So what I did was this.

1. Stripped off the areas which sounded hollow.

2. Prepared SBR slurry as per instructions on the tin (2 OPC to 1 SBR by volume). I'll be honest, it was a bit lumpy.

3. SBR slurry onto the wall:


Which was fun. Not. Slurry is right. Exactly half way between a liquid and something like plaster. Yuck. Still, old stiff brush, spread it on all over, work it well in.

4. Now, it says on the SBR bottle to apply render while the slurry is still tacky. I didn't get there in time. So we'll see.

5. One coat of render on:


Rough I know, but I think this will probably be 3 coats. Waterproofer in the render, by the way. Notice the devilling float waiting to do some work. It's been on about 3 hours now and still too soft to scratch. No cracks. The 2 battens aren't really to support the render, they're set at exactly 90 degrees, so the bath will be dead square, and I'll level off with a straight edge (vertically, rather than horizontally) between the battens and the old render.

Apart from scratching, is there anything else I need to do between coats?
 
Just make sure that you are allowing enough room for the next coat, you don't want a lump of scratch coat coming thru and making a bump.
 
I've run a straight edge between the existing and the batten, and the gap is fairly consistent. The long wall may do in 2 coats, the short wall will probably need 3, altogether.

Thinking about it I was a bit cavalier with the mix (apart from doing way way too much). I did roughly 3 shovels of cement and 12 of sand. But probably a bit less sand than that, and it was wet sand, if that makes any difference. Maybe a little weak for the first of 3 coats?

What's the idea of this every coat has to be weaker than the one before thing?

I'm a bit nervous now, just because it seems to be taking so long to set. Then again, maybe a good sign. Presumably the SBR has stopped suction and I think the waterproofer slows down drying. Hopefully it's a sign that the chemical reaction is happening slowly, therefore better, rather than a sign that it's a really sandy mix and it'll all fall off!
 

DIYnot Local

Staff member

If you need to find a tradesperson to get your job done, please try our local search below, or if you are doing it yourself you can find suppliers local to you.

Select the supplier or trade you require, enter your location to begin your search.


Are you a trade or supplier? You can create your listing free at DIYnot Local

 
Sponsored Links
Back
Top