net]173261/56368_30116406.jpg[/net]
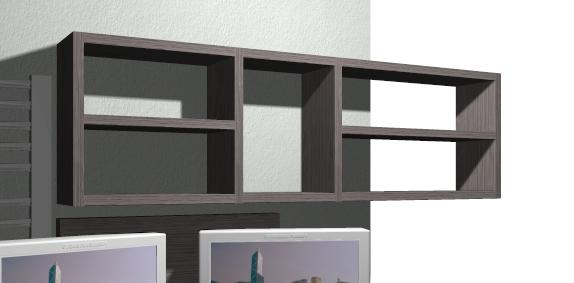
I am looking at creating the Wall Unit above out of 20mm laminated chipboard (worktop style).
Could I correct you? The material you are referring to is MFC (melamine faced chipboard) and comes in 18mm not 20mm. Secondly laminate, as used in kitchens is about 1mm thick rather than the 0.3 to 0.5mm coating that MFC has. This is significant because MFC is not the most rigid of materials and that fact needs to be taken into consideration in your design
If you want invisible joints I think you may have to dump the idea of screwing the carcase together. Both biscuits and dowels will make the invisible joints you require - dowels can be drilled using a very basic bought-in jig (even
this cheapie by Silverline) which is so cheap that I, personally, wouldn't bother making a jig. Fluted beech dowels can be had from lots of places (there's even a stall on our local market which sells bags of 50 for about £2.00 although
Toolstation are cheaper. I'd suggest 8mm for 18mm board). The glue to use is PVA.
The other "invisible" technique is biscuit jointing. To do this you need either a biscuit jointer (and
they start around £50 - a trade-rated one like we use for site work is circa £250 to £300 to put that in perspective) or, if you own a router, it is possible to buy a cutter with a bearing, like
this (circa £7 + postage). Again, biscuits are available in small bags (and once more
Toolstation are pretty cheap - go for #20s). Again these are glued-up using PVA glue. Do not be tempted to use PU ("Gorilla") glue with dowels or biscuits because it doesn't work properly with biscuits and can be a bit iffy with dowels. It also costs more
There are several other techniques, but I'm guessing that you want to work with minimal outlay, so hence these suggestions
In order to assemble this you will need to cramp-up the carcass whilst the glue sets, so a minimum of four cramps is required, however these can be made up cheaply using 2 x 1in PAR softwood and screws. Ask if you need to know
Also, what is the best way to hang it invisibly on a wall?
If you can disguise them with a spot of paint something like
mirror plates can be made fairly unobtrusive and are widely available. These screw onto the rear edges of the shelf and leave only a small "ear" protruding. By positioning those judiciously, e.g. the "ears" at the top above the top edge of the carcase where they normally won't be seen, they can be almost invisible. There are completely invisible fixings used for "flying" shelves, but they aren't cheap and I doubt that an 18mm MFC carcase would be strong enough to be useable with them
BTW if you want to check how much your shelves are likely to sag under load, use
The Sagulator. Please note this is an American site so they call MFC "melamine"


") . Not to worry, though, it's possible to make up really cheap one-time cramps from 2 x 1in PAR softwood
. Not to worry, though, it's possible to make up really cheap one-time cramps from 2 x 1in PAR softwood