Chrome Sockets - how to earth them?

Joined
20 May 2008
Messages
13
Reaction score
0
Location
Northamptonshire
Country
United Kingdom
Hi

I am replacing old plastic plug and light sockets with chrome ones.

The instructions for the chrome ones say they must be earthed, obviously as they are metal.

I don't fully understand this though.

In all of the wiring there are three wires, live, neutral and earth which I wire into the appropriate terminals on the light.

However there is an EXTRA earth terminal on the side of the light socket. Should I also be getting an extra piece of copper wire (sleeving it yellow/green) and wiring this from the spare earth terminal on the side of the socket to the other earths?

Just not sure why there is this extra earth bit on the side of the socket. Some of the sockets I'm replacing are the gold/brass metal ones and these do not have any extra bit of wiring.

Very grateful for any advice on this.
 
Sponsored Links
This may be for "Earthing requirements for the installation of equipment having high protective conductor currents" as shown in 543.7 of wiring regulations. But not sure what you mean by "light socket" do you mean something like this
p1416761_l.jpg
? I expect you don't need to fit any earth links but without being 100% sure on what you are referring to I think to be on safe side I would say link the two earths. If it is like this
p4768959_l.jpg
then only one earth wire is required the link can be plainly seen unless you are supplying items with high earth leakage i.e. over 10ma as shown in regulation 543.7.2 Socket-outlet final circuits.
 
While Eric is tech correct, his post will confuse you.


In simple terms each socket and l/switch has an earthing point. The old sockets will have earths and it's a simple matter of replacing like for like.

Old metal l/switches didn't always have earthing posts and frequently the earth from the cable was terminated on the back box earth stud. This then gives an earth to the l/switch via the metal to metal contact when the l/switch is screwed to the back box lugs.

Remove the earth from the back box for the lights and fit to the l/switch earth AND then run a strapper ( a bit of earth 1.0mm +) between the back box earth and the l/switch earth.
 
Hmmm - I think it worth making sure that none of us are confused because of possible misuse of terminology by the OP - apologies, floorwoes, if you were in fact being accurate.


I am replacing old plastic plug and light sockets with chrome ones.
Do you really mean light sockets, or do you mean light switches?


In all of the wiring there are three wires, live, neutral and earth which I wire into the appropriate terminals on the light.
Do you mean the light, or do you mean the light switch? Or a round-pin socket that a light plugs into?


However there is an EXTRA earth terminal on the side of the light socket.
You have sockets with an extra earth terminal? Or switches?
 
Sponsored Links
Hi

Many thanks for the replies.

Ban All Sheds - you are right, sorry for my confusing terminology!! I mean switches of course - doh!!

Chri5 has sussed me out in spite of my terminology!

It is the sockets which have the earth terminal in them because they are metal whereas the old ones I'm taking off are plastic.

I just wasn't sure if the earth from the cable in the wall should be going directly to the earth terminal in the metal box in the wall (socket?!) only or if it had to be continued with an extra length of copper wire to the terminal in the switch itself. It seems it does so this is what I will do.

It just worries me that the guy who lived in the house before I was told was an electrican but none of the gold colour metal switches he put on had this extra "strapper" earth running from the socket box to the switch.

As a separate question if I may....

I have one plug socket where the lug in the socket snapped off. It is the fixed lug not the detachable one which can be replaced. Having just tiled the area I cannot dig the old socket out of the wall and replace it. What I've had to do is drill into the brick work behind, put in wall plug and use a very long screw through the front of the switch into the wall plug. This particular socket is a plastic casing with a chrome metal front that clips on to it. Is this safe/okay? It seems the best I can do in the circumstances as to have to dig out the socket will take half the wall tiles with it...

Many thx for all the help and advice.
 
It just worries me that the guy who lived in the house before I was told was an electrican but none of the gold colour metal switches he put on had this extra "strapper" earth running from the socket box to the switch.
Cobblers shoes springs to mind. But it is common to rely on fixing screws. I don't but my son does.
As a separate question if I may....

I have one plug socket where the lug in the socket snapped off. It is the fixed lug not the detachable one which can be replaced.
If the socket is damaged in this way and you could at some time see the fault then replace it. Or do you mean the backing box?
Having just tiled the area I cannot dig the old socket out of the wall and replace it.
If you have only just tiled the tiles should come off again OK and although I have seem it done it is of course against the regulations to tile in such a way as the socket can't be inspected.
What I've had to do is drill into the brick work behind, put in wall plug and use a very long screw through the front of the switch into the wall plug. This particular socket is a plastic casing with a chrome metal front that clips on to it. Is this safe/okay? It seems the best I can do in the circumstances as to have to dig out the socket will take half the wall tiles with it...

Many thx for all the help and advice.
The more I read the more it seems that you have damaged the backing box I would consider using a speed nut
Buff_U___J_type_nuts.jpg
 
Hi

Yes, thank you the backing box is what I mean - the metal box thing that's plastered into the wall through which the cables from the mains come.

There are two "lugs" (that's what I call them anyway). One is designed to be replaceable. The other one isn't. As my luck would have it, it is the other one which has sheared off.

Can I use one of the "speed nuts" to which you refer to replace the bit that's sheared off Just not sure how it would be fixed to the backing box? I haven't seen these in the DIY places so expect I'll need to go to a specialist electrical place.

Is what I have done unsafe or will it do though as I'd rather not have to take it off again unless of course it is unsafe and therefore necessary?

Basically because the lug has sheared off the only way to secure the screw for the switch was to drill a hole in the wall (behind the backing box) but a rawl plug in and then use a very long screw to go through the switch and into the hole in the wall behind the backing box.

Sorry for the detail..... yawn, what a bore! Things that you think should be simple never are....
 
speed nut won't work, it clips onto the lug and can be used where the thread is stripped completely..

if there is no lug there, then it's time to get a gringer with a diamond blade and trim the tiles so you can get the backbox out..
 
Ban All Sheds - you are right, sorry for my confusing terminology!! I mean switches of course - doh!!
OK - I wanted to clear it up because I had a nagging worry from what you wrote about terminals and wires that you might have had the earth being used as a live in some 2-way switching circuit.


I just wasn't sure if the earth from the cable in the wall should be going directly to the earth terminal in the metal box in the wall (socket?!) only or if it had to be continued with an extra length of copper wire to the terminal in the switch itself. It seems it does so this is what I will do.
Connect the earth conductors in the circuit cables to the switch earth terminal. From that terminal you run a connection to the back box.


I have one plug socket where the lug in the socket snapped off. It is the fixed lug not the detachable one which can be replaced.
Can be, but they aren't designed loose in order for this to be possible, they're loose to provide adjustment to get the accessory level.


What I've had to do is drill into the brick work behind, put in wall plug and use a very long screw through the front of the switch into the wall plug. This particular socket is a plastic casing with a chrome metal front that clips on to it. Is this safe/okay? It seems the best I can do in the circumstances as to have to dig out the socket will take half the wall tiles with it...
As long as it's mechanically secure, and that any earthing of metal parts is done via wires, and not via the screw into the back box that should be OK, but I'd be worried that the screw might chafe/cut/pinch some of the cables. It might be better to put one of these into the wall:


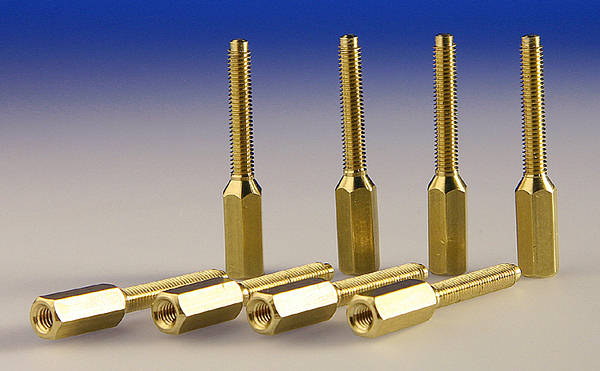
(or 2 stacked, if it's a deep box) so that the faceplate screw doesn't travel through the wiring.
 
Hi Ban All Sheds

I am really indebted to you for your crystal clear advice in the face of my confusion!

The picture of the screws you have provided is just what I think will do the job perfectly - I didn't know such things existed. The screw in the wall at the moment is quite secure but it would give me peace of mind to replace with the screws you have suggested. I spent ages in B&Q and Wickes the other day trying to find a solution to this - what I need is an electrical specialist to find these useful gubbings!

Thank you once again for all your help.
 
You can get the studs from any good electrical supplier.

B&Q and Wickes do not count as good electrical supplier. Try City Electrical Factors, Edmunsons, Ryness, etc
 
They are usually referred to as "Extension Pillars".

B+ Q might stock them as they are quite common.

They have a 3.5 mm internal thread, same as what the lug had and also a 3.5 external thread.

As you have drilled a bigger hole for the rawlplug and screw, you may need to fit a new rawlplug and perhaps no- nails the pillar in, as the pillar only has a machine thread and may be a bit loose in a rawlplug.
 

DIYnot Local

Staff member

If you need to find a tradesperson to get your job done, please try our local search below, or if you are doing it yourself you can find suppliers local to you.

Select the supplier or trade you require, enter your location to begin your search.


Are you a trade or supplier? You can create your listing free at DIYnot Local

 
Sponsored Links
Back
Top