Corner beads

Joined
25 Oct 2008
Messages
1,185
Reaction score
145
Location
Cheshire
Country
United Kingdom
Hello all and a Happy New Year.

I'm struggling with choosing the correct corner beads :confused:

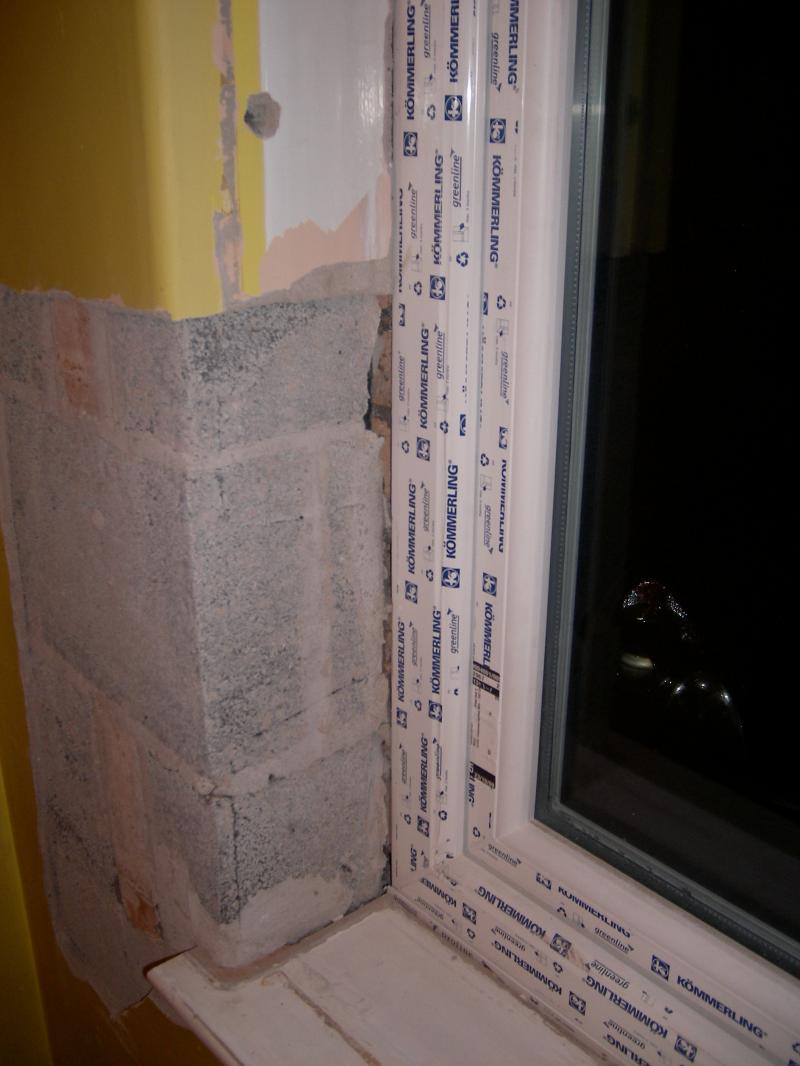
From the pic, I need to fill in the missing plaster (bonding after application of PVA/water mix) and then skim Wall and Reveal to leave a right angle corner. The existing corner is rounded (which from a previous post - a bead will give a better result due to the significant plaster damage).


The question I have, is which type of corner bead to use??

Some beads are for skim with just a thin coat, others for full plastering etc. I seem to have a bit of both here. :confused:

An appropriate Web link would be excellent and ideally for an easily available supplier! :)

Thanks!
 
Sponsored Links
Happy New Year to you too.
What is your plan for the other sets of "bull- nosed" reveals in the room? If you square up the reveal/s in the photo, will you make the others all the same, (square) ? also, is the soffit edge, square/ish?

Roughcaster.
 
What is your plan for the other sets of "bull- nosed" reveals in the room? If you square up the reveal/s in the photo, will you make the others all the same, (square) ? also, is the soffit edge, square/ish?

This room has only one window and the other reveal is in the same poor state as this, so was planning to make square also. The soffit edge on this window is square (due to the large concrete beam/lintel over the window). A square soffit edge is the same for all windows throughout the house.

For the reveals there seems to be a mixture throughout the house. The kitchen and dining room both have square edged reveals, but the other rooms are 'bull nosed'. Was planning on keeping them bull nosed if there's only minimal damage to the reveal - but square otherwise. There are wall corners through the house that are bull nosed also, so only wanted to change where absolutely necessary.
 
If it was me, I would use (thick plastering coat) an 8 ft length/s of Expamet (trade name) corner beading on your reveals,,,, readily available from most sheds and builders merchants..... Seeing as how a lot of the old plaster on the wall face/reveals on this particular window has already been removed back to the blockwork, I would remove the rest (identically),,, on both sides. "The soffit does "not" need to be touched"..... Ok,,,,method,,,,, you are now starting off with bare blockwork on both reveals, returning round onto the blockwork face of the wall some 200--300 mm or so... Cut your corner beading to length, with tin snips, for the left and right hand side window reveals.... Clean off the wall and give it a damp down, just on the reveal corners for now. Mix up some stiff but workable multi finish, and put on say 4 dabs of the stiff mix with your gauger on each reveal, one at the top/bottom,, two in between,(do one reveal at a time). Make sure when you put the plaster dabs on, they go onto the "corner edge" of the reveal, half on the wall face,, half round onto the reveal. Put on more than you need. Get your length of bead and then bed it, tapping gently, into the plaster dabs, but don't push on it too hard, or it will go in too far. Keep a plumb thickness/margin up the window reveals,, and make sure the bead is out to the thickness of the original plane of the wall surface. Once you have them alligned plumb both ways using the spirit level, tidy up the excess dabs carefully with the gauger, keeping the plaster below the flush and clear of the bead's spine,,, check the plumb once more,, and if they'e ok,, leave them to set,,,, don't fiddle with them. After preping as you said earlier (water/pva), you can now bonding coat the wall and reveals, using the bead as your guide...This would be by far the strongest way to do the job.... I think you would have a good idea what I'm on about Newbee99. ;)

Roughcaster.
 
Sponsored Links
Posted: Mon Dec 15, 2008 10:15 pm Post Subject:


A post I put up on another "corner" question, might help you.... ;)
--------------------------------------------------------------------------------

A little trick to rounding off corners if you are matching in is to skim them and let the skim form abit of an angle where the curve is going to be, then get yourself a strip of viscreen about12" long by2" and when the skim has firmed up a bit wet the viscreen and put your hands either side of the corner and pull the viscreen up and down holding it on with light pressure and form your curve to match the existing one.This will take a bit of getting used to but take your time and it will match in eventually. Saves putting an angle bead on if you dont want to knock the old rounded piece off!! Good Luck.. You can build it up in a few coats if you want....
 
If it was me, I would use (thick plastering coat) an 8 ft length/s of Expamet (trade name) corner beading on your reveals.............After preping as you said earlier (water/pva), you can now bonding coat the wall and reveals, using the bead as your guide...

Thanks Roughcaster, given me a much clearer picture what is necessary for these damaged reveals. The only remaing question I have is how to get the level right for the bonding? I'm guessing I need to keep the bonding below the height of the bead's spine by 2-3 mm. Then this will allow for multi-finish skim to be applied nicely flush (after the bonding is set - of course!). Any tips to get the bonding level right or is it nothing to worry about? I've only ever used skim beads with p/b previously. :oops:

A post I put up on another "corner" question, might help you....

Thanks Roy, will have a go at this with some of the other windows that have small damage on the corner.
 
Once you have the corner bead on, you would coat the wall out to the thickness you need, (bring it out in two coats of bonding). Then,,using a small straight edge,, work off of the existing edge of original plaster, and the spine of the bead, and screed the s/edge horizontaly up the wall to remove excess plaster,, filling in any hollows as you go,, repeat that until you are out to the flush, let it set up a bit, rub it over with the float and you're ready for the multi. For the inside of the reveal, make yourself a gauge,,, a piece of wood with a small nail ( a thin 30 mm panel pin type, or similar,,, very small head),, half in the wood, half sticking out. Put your bonding coat onto the reveal, then run the gauge up the reveal, using the beading,,, and the "small gauge nail" on your "window frame" (carefully) as a guide, to give you a 90 deg angle...... I bring the bonding coat more or less out to flush, then when it's nearly set,, scrape it back slightly if I need to,,,, more at the edges, or where it meets the bead. It feathers in no problem at all, to give a neat flush finish...... Sounds like you might need someone on hand to help you along the way, but give it a go on one side of the window at least, and see how you get on..... We'll be hearing from you. ;)

Roughcaster.
 
but give it a go on one side of the window at least, and see how you get on..... We'll be hearing from you. ;)

Thanks Roughcaster, knowledgable as always. Had not thought of the gauge with the nail in - the benefit of experience! :)
I'm sure I will be posting again before long (though hopefully should get these reveals sorted first and present the forum a different problem!)
May even add a pic to show the damage I've caused to the reveals! ;)
 
You can make a simple "reveal" gauge out of say, a small piece of 9mm/12mm wood/ply, or similar,,,,, size,,6"x 2" ish,, depending on the size needed for the width of the reveal,,, just tap the "thin, small-headed pin/nail" into the end of the "ply",,, where it suits the inside edge of the window frame you'll work/guide it from,,,,, to get the reveal bonding plaster square.....Running the window-gauge/nail up the window frame is the only thing you need to be careful with...... Wrap a little bit of insulation tape around the nail though, and it'll cushion and protect the pvc frame,,,,, then Bob's your uncle,,, go on,,,,,,give it a go. ;)

Roughcaster.
 
hack off all the reveal and head, dab a strip of plasterboard all the way around making sure the margin is the same and they are square then fill the wall out to it, nail skim beads on and skim, happy days
 
Ohhh,,,, JB,
That's enough to make us older plasterers cry. :cry:
Dot and Dab, bead and skim :rolleyes: .....It'll work of course,, but a quick fix,,, it's a bit like patching up a chip in a rare Ming vase,,,, using pollyfilla. :eek: :LOL: By repairing the reveals/wall,,, more or less like for like, using traditional wet plastering methods, it teaches new, real plastering skills to others who want to learn more,,,,,,, and more importantly,, it keeps our trade alive. ;)

Roughcaster.
 
lol...........you will have the horsehair and lime out next..;)
A reveal guage, well ive not used one of them in a while i think the last time was on a bullseye window but they do have their place........:)
 
If ever I need to make a quick reveal gauge, I put a thin nail into the end of my wooden "yellow pine float", (oooohhh), and run that up the reveal,,, :LOL: ,, and it's normally "lager" with lime for me JB. cheers..;)

Roughcaster.
 
I'm with you on the revel gaugeR.C.. have been using them for years and still do makes life easy. And as for Lasers its lines and levels all the time and the old "Hose pipe" trick for floor level datums.....and there is such a thing as "Rising Damp" :LOL: :LOL: ;) jb.. ;)
 
I'm with you on the revel gaugeR.C.. have been using them for years and still do makes life easy. And as for Lasers its lines and levels all the time and the old "Hose pipe" trick for floor level datums.....and there is such a thing as "Rising Damp" :LOL: :LOL: ;) jb.. ;)


prove it :LOL: :LOL: :LOL:
 

DIYnot Local

Staff member

If you need to find a tradesperson to get your job done, please try our local search below, or if you are doing it yourself you can find suppliers local to you.

Select the supplier or trade you require, enter your location to begin your search.


Are you a trade or supplier? You can create your listing free at DIYnot Local

 
Sponsored Links
Back
Top