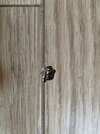
So long as they don't interlock with the tiles surrounding them it should be pretty easy to replace it with a new one.
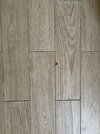
You will need to break out the rest of that tile by opening up around the damaged area using a hammer and small chisel. Take care not to damage adjacent tiles. Once you broken up the area by the current break remove the broken bits until you can see the solid floor beneath. It's not a 'quick' job where you go hammer crazy. Patience is the key! Keep chipping away at small areas a bit at a time, (you may get the occasional large piece which cracks but stays firmly stuck. Again, patience and chipping will free it). Once all the tile is removed you need to scrape the underfloor so it is smooth and level. It will also probably be better to remove any surrounding grout to give you the maximum area to lay the new tile. Spread your tile adhesive evenly over the exposed area and then draw a comb through it to produce ridges. Carefully lay the new tile into position ensuring you have an equal gap around all sides. Press down gently, but firmly, all over ensuring it is level with the surrounding tiles. Allow to set for the prescribed time in the adhesive instructions, (usually about 24 hours). Do NOT walk on it during this time.
Once set you will need to re-grout around the edges with a matching grout to the original and then polish off any residue.
PS If they do interlock with the surrounding tiles by little 'nibs', you will probably need to break these off before laying the new one.