Damaged plaster after removing tiles

Joined
17 Apr 2017
Messages
3
Reaction score
0
Country
United Kingdom
Hi everyone,

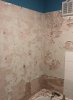
Thanks for reading my post. I started removing tiles in our bathroom to replace with new ones. The first lot on the wall came off pretty easy with minimal damage to plaster. However on the other two walls, chunks of plaster came off and I'm now down to a very rough surface which I'm guessing is the render on top of the brickwork? The plaster in the photo on the wall behind the taps is now off completely as it was very loose. The plaster on the larger wall is still intact.

What's the best way for me to get this wall finished? Most of the wall will be retiled. But I need a level surface to work on.

I'm not afraid to give it a go myself, I can be patient or would it be best left to an experienced professional?

Any advice would be appreciated.

kNyVAk
 
Sponsored Links
Here's a photo
 

Attachments

  • IMG_0975.jpg
    IMG_0975.jpg
    94.1 KB · Views: 2,588
I'd just bring that back to level using tile adhesive as I was re-tiling, only looks to be a couple of mm ?
 
Get a bag of Gyproc one coat plaster and a 14" trowel. Pva holes with 3:1 and let it dry, then do it again, and plaster as it starts to go tacky.
 
Sponsored Links
OP,
The original plastering and tiling job was a bit amateurish.
Your background, from what I can make out, is not render its gypsum plaster - which is always wrong in wet areas.
Best background for tiling in wet areas is sand & lime or sand & cement render, or backer board - skim finish should not be used.

Your background was not scratched properly, neither was the suction taken out of it, hence its not providing a key for the skim plaster - you scratch with tight horizontal lines.
Tile adhesive should also be combed in horizontal lines using, in your case, a 6mm notched trowel.
Your mixture of skim & adhesive has not taken to the background & will be fragile, and possibly pull away with any new tile being fixed to it. It might "shell".

Carefully check both wall surfaces for soundness & if in doubt remove all the skim and adhesive back to raw background.
The wall surface behind the taps looks very loose.

What I'm suggesting might seem like overkill but given the modern preference for very large tiles you cannot take the risk of a large tile dropping off an insecure background.

FWIW: the air brick wall vent could be replaced with an extractor.
The plastic seal on the bath tub rim is probably useless except as a collector of slime & mould.
Hopefully, you have a plug in the waste to prevent debris going down?
 
I appreciate your replies, thank you for your advice and time.

I decided to remove all loose plaster and old adhesive and I gave a coat of PVA water mix. I then thought I'd see how I go with just applying new tile adhesive and levelling out. Tiles so far are even, and appear solid.

The plastic trim was pretty grim and disgusting as I pulled it up. I didn't know what I could use as an alternative so I replaced the plastic trims with new ones and applied new silicon. What other alternatives would you suggest?

I like the idea of an extractor fan. Didn't think of that.

I do have a plug in the waste. I was nervous of having a tidy up halfway through the job tonight, but surprised at how well it's cleaned up.
 

DIYnot Local

Staff member

If you need to find a tradesperson to get your job done, please try our local search below, or if you are doing it yourself you can find suppliers local to you.

Select the supplier or trade you require, enter your location to begin your search.


Are you a trade or supplier? You can create your listing free at DIYnot Local

 
Back
Top