- Joined
- 4 Mar 2025
- Messages
- 7
- Reaction score
- 0
- Country

Hi, we're currently reaching the final stretch of a home renovation. We've had wet underfloor heating put in on the ground floor which was left on for a couple of months at around 20 degrees. Below the UFH the builders put black sheeting and insulation before covering it all with a concrete looking screed... you'll have noticed so far I'm not completely up on terminology/names of things... but here's a couple of photos:


We then had our new kitchen go in:

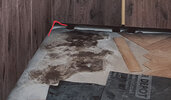
A separate business (not associated with our builders) then came in to fit LVT herringbone style flooring. They asked for the UFH to be switched off so they could put down a self-levelling screed and then left it for a couple of days to dry before they laid the flooring. At some point on the first/second day, a damp area started to appear in the corner of the room after they were about 70% of the way through laying the flooring:

We were wondering what may have caused this? We don't believe that the underfloor heating pipes are damaged as it's a pressurised system and the boiler is showing no drop ion pressure. The builders are blaming the flooring company, who have admittedly done a bad job of laying and finishing the flooring, however I can't see how they might've caused this damp patch?
Has anyone else had experience of something similar happen and do you know how it might be resolved? We'd like to stay away from painting on a damp proofing sealant if possible as to us, that would just mask over the problem.
The damp patch has dried a little over the last week, but probably because we've had the UFH turned back on, now looks like this:

See the original pencil line from where it used to be... also, if we lay one of the LVT planks over it, after a while it forms a damp patch underneath in the shape of the plank.
So any ideas of the cause, how to fix and who might be responsible for fixing it?
Many thanks!
We then had our new kitchen go in:
A separate business (not associated with our builders) then came in to fit LVT herringbone style flooring. They asked for the UFH to be switched off so they could put down a self-levelling screed and then left it for a couple of days to dry before they laid the flooring. At some point on the first/second day, a damp area started to appear in the corner of the room after they were about 70% of the way through laying the flooring:
We were wondering what may have caused this? We don't believe that the underfloor heating pipes are damaged as it's a pressurised system and the boiler is showing no drop ion pressure. The builders are blaming the flooring company, who have admittedly done a bad job of laying and finishing the flooring, however I can't see how they might've caused this damp patch?
Has anyone else had experience of something similar happen and do you know how it might be resolved? We'd like to stay away from painting on a damp proofing sealant if possible as to us, that would just mask over the problem.
The damp patch has dried a little over the last week, but probably because we've had the UFH turned back on, now looks like this:
See the original pencil line from where it used to be... also, if we lay one of the LVT planks over it, after a while it forms a damp patch underneath in the shape of the plank.
So any ideas of the cause, how to fix and who might be responsible for fixing it?
Many thanks!