• Looking for a smarter way to manage your heating this winter? We’ve been testing the new Aqara Radiator Thermostat W600 to see how quiet, accurate and easy it is to use around the home. Click here read our review.

danfoss 4033 replacement

Joined
22 May 2024
Messages
5
Reaction score
0
Country
United Kingdom
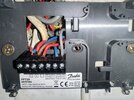
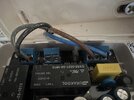
hi everyone -danfoss 4033 -packed in -want to replace with a danfoss fp 720 -the 4033 controls a 3 way mid position valve -(the valve is new)-the wiring is as the danfoss website wiring diagram -as follows -one red wire to terminal1 one red to terminal2 terminal 3 is unused one yellow wire to terminal4 one blue wire to terminal 5 three red wires to terminal 6 two terminal wires to terminal 7 -two earth wires to terminal 8 -the 720 only has 6 terminals -any ideas of how to wire up the 720 -i have heard the 720 will work but not quite in the same way as the old unit -best regards -graybold
 
Last edited:
The existing wires will move from the terminals of the 4033 to the terminals of the FP720 that have exactly the same function. In this instance, it's quite easy as they are labelled exactly the same.

4033.JPG


FP720.jpg


So from the diagrams above:

The 4033 has a permanent live to be made to terminal 1. The FP720 already has this connection made internally so doesn't require this connection.

4033 2 HTG ON = FP720 HTG ON
4033 3 HTG OFF = FP720 HTG OFF [this terminal probably won't be used]
4033 4 DHW ON = FP720 DHW ON
4033 5 DHW OFF = FP720 DHW OFF
4033 6 L = FP720 L
4033 7 N= FP720 N

Whilst the FP720 doesn't have an earth terminal, if there are wires in the 4033 earth terminal they should remain connected together. You might need to add a separate new connector to do that.
 
hi sorry to bother you again but does this mean -the red wire to terminal 1on rhe 4033 -just dont connect to any terminal on the 720
 
There isn't anywhere on the FP70 for you to put it, because the FP70 doesn't have a 'DHW COM' terminal.

And that's because the connection between terminal 1 on the 4033 and the internal switch shown here in the red circles....

1.JPG


....is already internally connected to the L terminal for you on the FP70

2.jpg


I would expect to find now that other end the wire in the 4033 DWH COM (1) is connected to L (6). If so, just get rid of this link when you move to the FP720.
 
Hi, sorry for piggybacking on this thread but stem seems a good person, if around, to ask my question. Currently using a fp720 programmer with a geo cosy smart thermostat. Need to replace the cosy as being disbanded. Just wondering as the fp720 has internal live links to terminals 1 and 2 why term 1 (dhwoff) would currently need a connection? Nothing in htgoff, wire in dhwon and wire in htgon which believe goes to the cosy switch and then onto the old room thermostat, whcih currently runs in parallel.

thinking of switching to a Drayton wiser 2 channel smart thermostat to replace the fp720. Which would mean moving the black wire from the cosy to htgon.

P.s. ok think I’ve answered it myself, the dhwoff wire is related to the mid position valve. So replacing the fp720 should be a straight swap of wires other than htgon wire, ie the black in cosy into the fp720 instead.
 

Attachments

  • IMG_1630.jpeg
    IMG_1630.jpeg
    366.3 KB · Views: 12
  • IMG_1624.jpeg
    IMG_1624.jpeg
    204.2 KB · Views: 11
Last edited:
the dhwoff wire is related to the mid position valve.
Correct. Mid Position Valves require a 'Hot Water Off' signal to move them across to the Central Heating only position when Central Heating is required and Hot Water isn't.

The Danfoss and Drayton as you have figured provide the same wiring functions. But the Drayton software also includes a room thermostat function, so the old wired thermostat needs to be decommissioned to prevent it overriding the Drayton. It can't simply be disconnected as this would leave the heating wiring 'open circuit' and it will not operate. The thermostat can be decommissioned in three ways, unfortunately I don't have details of the Geo Cosy to be more specific, but generally in order of preference (or professionalism), the methods for thermostat removal are:

1. Find the origin of the thermostat cable. Note where the wires are connected and disconnect the cable. Then link the terminals where the two ‘live’ switching wires came from together.

2. Remove the existing thermostat and replace it with a junction box, connect the two ‘live’ switching wires together and isolate the neutral (if there is one)

3. Leave the existing room thermostat in place and join the ‘live’ switching wires together in a separate connector that you can tuck away in the corner of it.
 
Ta, yep done stage 1 today. Got the cosy disconnected and running off the fp720 and old room thermostat. Just had to connect the wire going off to the cosy into htgon, and remove the wire coming back from cosy. So wiser now should just be straight wire swaps. For now will probably just leave old room thermostat set high. Just leaves a bit of diy to secure new bracket to wall and bit of tiling fixing to conceal the mess of cables! I suspect could be made neater but don’t have a full wiring centre box.
 

If you need to find a tradesperson to get your job done, please try our local search below, or if you are doing it yourself you can find suppliers local to you.

Select the supplier or trade you require, enter your location to begin your search.


Are you a trade or supplier? You can create your listing free at DIYnot Local

 
Back
Top