
- Joined
- 27 Jan 2019
- Messages
- 2
- Reaction score
- 0
- Country

Hi All,
I have a Hive thermostat installed at home. This replaced a Honeywell timer and there is also a Honeywell DT-90e wired wall thermostat in place.
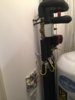
I have been unsure of how to completely decommission the wall thermostat. See picture of the initial wiring. Currently have put the live and live switch (wire A (brown) and wire B (grey with brown sleeve) together with a block and left it behind the non functioning thermostat, and the system is working as it should be - but not sure how safe this is?
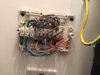
I have attached the picture of the wiring centre and wondered if anyone would be able to suggest how to disconnect the old wall stat from here - the system has seperate hot water/heating valves, with a kingspan hot water cyclinder and the house has a district heating unit which supplies this. I think it was wired as a Y-plan. sorry I don’t currently have pictures of the current Hive receiver set up - but will add this in when I get a chance.
Thanks in advance
Bhavesh
I have a Hive thermostat installed at home. This replaced a Honeywell timer and there is also a Honeywell DT-90e wired wall thermostat in place.
I have been unsure of how to completely decommission the wall thermostat. See picture of the initial wiring. Currently have put the live and live switch (wire A (brown) and wire B (grey with brown sleeve) together with a block and left it behind the non functioning thermostat, and the system is working as it should be - but not sure how safe this is?
I have attached the picture of the wiring centre and wondered if anyone would be able to suggest how to disconnect the old wall stat from here - the system has seperate hot water/heating valves, with a kingspan hot water cyclinder and the house has a district heating unit which supplies this. I think it was wired as a Y-plan. sorry I don’t currently have pictures of the current Hive receiver set up - but will add this in when I get a chance.
Thanks in advance
Bhavesh
Attachments

Last edited:
