Desk lamp repair advice

Joined
25 May 2012
Messages
69
Reaction score
1
Location
Wolverhampton
Country
United Kingdom
Recently bought a secondhand vintage desk lamp. Very attractive, and bonus was that it had supposedly been PAT tested. Got back from the antique shop to find the thread of the lampholder had stripped leaving the lamp (with bare live prong) sticking up in one hand and the lampshade and lampholder in the other hand! Thankfully I hadn't plugged it in yet.

Lamp1.jpg


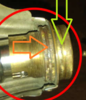
I'm guessing that it's the inside thread of the lampholder (right edge of red circle) that's stripped but I'm struggling to find anything resembling that design in lamp spare suppliers. Can anyone shed light (sorry!) on what I'd need to get to replace it?

Also, the brass shell like lampshade spins on the lampholder but there's no obvious way of unscrewing the top and bottom parts out to get the lampshade off either - is it just brute force that's needed to unscrew it apart?
 
Sponsored Links
If it really is stripped, then a whole new lampholder is required, such as these: https://www.abitofbrass.co.uk/lampholders-33-c.asp
The thread which secures the whole thing to the narrow stem is available in various sizes, usually 10mm or 1/2 inch, but sometimes 3/8 inch.

The shade is held on by a threaded ring, which is a separate item to the threaded part which secures the top of the lampholder to the lower half.
 
I would take that PA Test with a large pinch of salt. Get it checked and rewired, if necessary.
 
I would be taking it back and querying the PA test. If I didn’t get a satisfactory result it would be trading standards next.
 
Sponsored Links
could be that the bulbholder part wasnt aligned properly with the bottom part as it was screwed back together. i seem to recall that some holders had lugs that fitted into the gap just above the switch bar which held the top and bottom in correct position so that the bulb contacts mated correctly with the pins. should be two "dimples" in the threaded top half. take the bulb out then the shade ring off and shade and then see if it will go back together properly
 
Remove the bulb.

There are 2 rings involved.

The orange ring is the one which holds the shade in place and needs to be turned in the direction shown, remove it completely then the shade will slip off.

The green ring will then also slip off. At that point I'd try screwing the green ring in the direction shown onto the fitting [by the switch] to check to feel what condition the threads are in. If ok remove the green ring.

Inspect the main part [with the bayonet slots] and there are 2 dimples [as 'Sureitsoff' mentioned & currently hidden by the rings] which will slide onto the black fitting in only 2 positions where they engage with the indents shown yellow. Either way is fine.

The green ring can then be fitted to hold the 2 brass parts together.

upload_2020-1-4_13-52-56.png


Sounds simple :D
In practice the rings can be very hard to move and may need a fair bit of force to release them. be careful as these fittings are easily squashed and then very hard to reshape. I see some damage to the knurling already so this fitting may have problems.

The threads are very fine and easily cross threaded, make sure you spot that quickly before causing any further wear.

Good luck and let us know the outcome
 

Attachments

  • upload_2020-1-4_13-47-51.png
    upload_2020-1-4_13-47-51.png
    161.6 KB · Views: 221
  • upload_2020-1-4_13-50-30.png
    upload_2020-1-4_13-50-30.png
    150.2 KB · Views: 228
You need to get the ring undone and remove the shade because otherwise it can restrict the screwing of the other part onto the base.
Check that the bit with the 2 prongs is fully pressed into the base, and not sitting on a bundle of wires.
Fit the upper part into the two notches correctly, and hold it firmly in position while carefully starting the green ring. Tighten the green ring fully, being careful to stop the brass sleeve from turning and jamming in the notches. It can often turn a litle leaving it apparently tight but it then loosens and comes apart.
Then fit the shade and clamp with the orange ring.

As a precaution against shocks in case it ever comes apart again you can check that the switch is operating on the live prong, so neither prong will be live when the switch is off.
 
Thanks for advice so far. Not getting on terribly well unfortunately.

Sunray - the "top" and "bottom" rings in between which the shade is clamped that you kindly marked with red and green arrows are simply spinning past each other. No matter how many turns I make, they won't unscrew from one another or give any indication that they are getting any further apart. Nor will they pull apart, at least not without squashing them. Unless I can separate them I won't be able to get the brass lampshade off, in which case unless the lowest (external) thread is the one that's stripped, getting a new lampholder won't help me.

Flameport - is this the type of lampholder I'd need? The internal diameter at the point the base of the lampholder attaches to the gooseneck stem is 1/2 inch diameter and the internal diameter of the brass rings looks like 29mm or 1 1/8 inches. https://www.abitofbrass.co.uk/12-x-26tpi-entry-solid-brass-finish-bc-shade-ring-lampholder-46-p.asp

One other question - the lamp is brass yet is only twin cable wired - surely it should be earthed too? In which case I'll need to order new flex as well as a new lampholder. Goodness knows how that got past PAT testing last month prior to me buying it!
 
The internal diameter at the point the base of the lampholder attaches to the gooseneck stem is 1/2 inch diameter and the internal diameter of the brass rings looks like 29mm or 1 1/8 inches
The only thing that matters is the thread in the base, so if it's 1/2 inch then that one is suitable.
Diameter of shades and rings have been the same for ever.
It will require 3 core flex.

Goodness knows how that got past PAT testing last month prior to me buying it!
Probably because most appliance testing just involves someone slapping a sticker on it and charging 15p for doing so.
 
try holding the shade and turning the "red" ring. the "green ring is meant to spin as it it that that screws on to the bottom part
 
Goodness knows how that got past PAT testing last month prior to me buying it!

Ask Trading Standards. Let them take it up with the shop and PA tester. If these people are not stopped someone will get killed.
 
"Dear Person,
Your recent enquiry is important to us.
We receive a lot of enquiries and therefore are not able to respond to individual cases.
However rest assured that your complaint has been taken on board and may influence future investigations."
 
Sunray - the "top" and "bottom" rings in between which the shade is clamped that you kindly marked with red and green arrows are simply spinning past each other. No matter how many turns I make, they won't unscrew from one another or give any indication that they are getting any further apart. Nor will they pull apart, at least not without squashing them. Unless I can separate them I won't be able to get the brass lampshade off, in which case unless the lowest (external) thread is the one that's stripped, getting a new lampholder won't help me.
!
That's not actually bad news, as another has said the green ring should not be locked at this point.
You need to hold the item with the bayonet slots still [this can often be done by a long thin screwdriver through the bayonet slots Be careful not to bend anything.] and turn the orange ring, possibly with long nose pliers or pump pliers.
 
Last edited:
The old ones a switched lampholder, the one you linked to does not have a switch
If you do want a switch then you need a PUSH BAR brass lampholder
 
Many thanks for everyone's advice - I tried Sunray's approach and eventually the inner ring started to move. Must have taken me an hour to get the ring off as it was almost toally seized throughout the length of thread but now it's off I can see it's going to be a simple matter to fit a new switched lampholder and I've found a shop nearby that supplies the old brass style. Fortunately the gooseneck stem's thread is sound so only the lampholder and flex need replacing.
 

DIYnot Local

Staff member

If you need to find a tradesperson to get your job done, please try our local search below, or if you are doing it yourself you can find suppliers local to you.

Select the supplier or trade you require, enter your location to begin your search.


Are you a trade or supplier? You can create your listing free at DIYnot Local

 
Sponsored Links
Back
Top