Hi
I've just bought a Drayton wiser to replace my Lifestyle LP241. The old controller had a universal backplate and the central heating is controlled by a wall thermostat.
Can people just help me make sure I get the new wiring correct? Want to disconnect the thermostat as suggested in the wiser instructions.
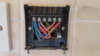
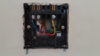
Currently the thermostat has a yellow wire going from the call terminal. There is a yellow wire to no 4 on the back plate for HW on which I guess is the other end of this wire. If I disconnect this from the back plate do I need something else going to no 4? There is mention in the instructions of a bridge between the thermostat common and call. They also state all wires for the thermostat should be removed from the wall plate. So where should this bridge go and will any of the other wires in the backplate relate to the thermostat? E.g. do the L and N go to the L and N of the thermostat?
Pictures of current setup attached
Thanks for any help!
I've just bought a Drayton wiser to replace my Lifestyle LP241. The old controller had a universal backplate and the central heating is controlled by a wall thermostat.
Can people just help me make sure I get the new wiring correct? Want to disconnect the thermostat as suggested in the wiser instructions.
Currently the thermostat has a yellow wire going from the call terminal. There is a yellow wire to no 4 on the back plate for HW on which I guess is the other end of this wire. If I disconnect this from the back plate do I need something else going to no 4? There is mention in the instructions of a bridge between the thermostat common and call. They also state all wires for the thermostat should be removed from the wall plate. So where should this bridge go and will any of the other wires in the backplate relate to the thermostat? E.g. do the L and N go to the L and N of the thermostat?
Pictures of current setup attached
Thanks for any help!