
I feel awful if i get anyone in to do something. I tend to stalk them for the whole time that they are here. It's a shame that you pay a pro to do something and they shatter your confidence in everyone.

You are using an out of date browser. It may not display this or other websites correctly.
You should upgrade or use an alternative browser.
You should upgrade or use an alternative browser.
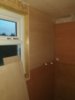
En-suite in new loft conversion
- Thread starter datadiyer
- Start date
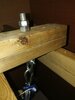
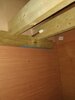
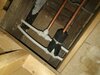
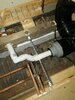
It was a bit strange really, because the offending plumber came back to finish the en-suite and I told him about the structural 'flaw' that he caused be chomping through the joist, and he didn't seem to bat an eyelid and carried on moving hardibackers about ready to screw to the wall. I'd already paid him to run the pipework for the rads so got him to finish that instead and haven't called him back since.
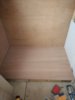
Looks like it’s cut out of a seperate piece of 3x2 ontop of the joist to me.
Yeah, see what you mean. It's at least a 6 x 2 so not as bothered about that one as there'll be another mending plate going in, it's also close to the inner leaf of blockwork which should help. There's no real weight going by the cut out either, the shower tray is further down the line.....I'm no structural engineer tho
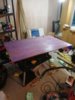
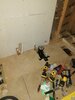
Bit more progress, cut 12mm marine ply for shower tray base (probably an overkill) and layered it down dry (not sure whether to screw, glue and screw or both the marine ply base. Both probably.
Attachments
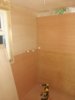


Morning all, so wifey says I need to crack on with the En-suite so have a question please. It's time to put the shower base down (stone resin) and I've layed a base of 12mm marine ply. I'm happy with this as it's pretty solid underneath also.
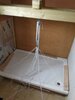
I have this SBR to paint onto marine ply to bond it before I lay the tile adhesive. Do I 'key' the marine ply before painting SBR on It?
By this I mean scratching a few lines in it with a multi-tool?
Many thanks in advance.

I have this SBR to paint onto marine ply to bond it before I lay the tile adhesive. Do I 'key' the marine ply before painting SBR on It?
By this I mean scratching a few lines in it with a multi-tool?
Many thanks in advance.
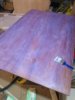
I took the safe option and gave it a good sanding with 60 grit and it was a lot rougher than a baby's bottom, so slapped the BAR on neat. Prior to this, I'd also painted the edges with a lacquer varnish I had lying about. Don't know if I have to SBR it again just before the tile adhesive goes on.
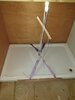
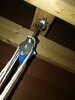
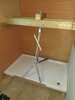
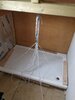
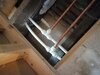
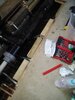
So, I setup a hoist jig thing to lift this 60kg shower tray. It was a dry run for when I need to lift it properly to butter the underside of tray and lower it down onto a bed of tile adhesive.
Not too impressed with pulley. It says max weight 180kg so this should have been a breeze! I managed to lift it a few inches but it wasn't centered (I used cargo slings as a temporary measure).
So, I'm gonna have to either get a better pulley as the string has freyed already so I'm not confident spreading adhesive while laying under it.
Attachments

Can't you lay two strips of the 2 by 1 down ( and oil the tops of them ) so it looks like you have 3 equal sections and spread the adhesive. then slide the tray over the base and with a little help pull out the two strips. then tap down to level off
Can't you lay two strips of the 2 by 1 down ( and oil the tops of them ) so it looks like you have 3 equal sections and spread the adhesive. then slide the tray over the base and with a little help pull out the two strips. then tap down to level off
Thanks Martin,
That's a great idea I hadn't thought of TBH, this is a first time for me. I had all the gear here so thought I'd try and be too clever i suppose. I'm gonna give it one more try with this. It's quite a tight fit which doesn't help, so I've ordered some decent 6mm cord, and I may take a bit of ply off on the left hand side. Failing this, I'll give your helpful idea a go, many thanks.
Well be careful. Would a couple of these not grip the tray ??
https://www.screwfix.com/p/double-c...rc=aw.ds#product_additional_details_container
https://www.screwfix.com/p/double-c...rc=aw.ds#product_additional_details_container
Well be careful. Would a couple of these not grip the tray ??
https://www.screwfix.com/p/double-c...rc=aw.ds#product_additional_details_container
We on the same wavelength I think, bought 2 of these the other day just in case, never used them before but great reviews and info but hopefully I won't need to use them.
Lol. I remember as i was looking at them for laying down my porcelain tiles in the garden.
So after my trial lift of shower tray with cargo slings, I took down the left hand side of ply wall for extra room for shower tray lift. I needed to strengthen the floor a bit and change a few things then I decided on a stable lift of shower tray with different stronger cord. Well I'm in a right pickle now. Does anyone know any websites on doing this? It's because I have 4 different cords (2 on the length and 2 on the width end). They are all at different tensions. I wish I paid more attention in cubs!
Attachments
-
 IMG_20200613_191007.jpg202.1 KB · Views: 275
 -
 IMG_20200612_210306.jpg304.9 KB · Views: 279
 -
 IMG_20200612_211947.jpg208 KB · Views: 289
 -
 IMG_20200612_210211.jpg267.8 KB · Views: 304
 -
 IMG_20200613_191015.jpg183.3 KB · Views: 293
 -
 IMG_20200612_205327.jpg341.5 KB · Views: 269
 -
 IMG_20200612_205338.jpg266.4 KB · Views: 294
DIYnot Local
Staff member
If you need to find a tradesperson to get your job done, please try our local search below, or if you are doing it yourself you can find suppliers local to you.
Select the supplier or trade you require, enter your location to begin your search.
Please select a service and enter a location to continue...
Are you a trade or supplier? You can create your listing free at DIYnot Local
Similar threads
- Replies
- 80
- Views
- 54K
- Replies
- 3
- Views
- 930