
I have a new sit on sink which I wish to install in my kitchen. How do I fit this to the base cabinet & seal to adjoining worktop & tiles?

You are using an out of date browser. It may not display this or other websites correctly.
You should upgrade or use an alternative browser.
You should upgrade or use an alternative browser.
fitting a sit on sink
- Thread starter dazed n confused
- Start date
Sponsored Links
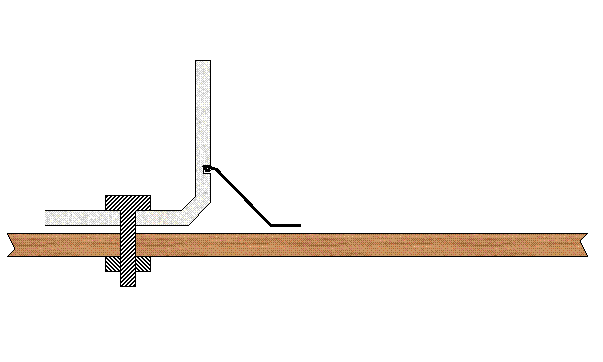
You need to drill holes through the sink for big bolts, and grind a groove round it for lead flashing fitted with lead wedges.
Why trust silicone, eh? It'll never catch on.
Sorry I forgot to draw the fillet of wood under the flashing...
+++++++++++
Moderator's note:
This is a joke, don't do it
M R
+++++++++++

Why trust silicone, eh? It'll never catch on.
Sorry I forgot to draw the fillet of wood under the flashing...
+++++++++++
Moderator's note:
This is a joke, don't do it
M R
+++++++++++
+++++++++++
Moderator's note:
This is a joke, don't do it
M R
+++++++++++
So what's the serious answer? I need to fit one of these and can't see an obvious way of securing the sink to the base unit without drilling right through the surface of the sink!
The sink is just one piece of sheet metal, there are no apparent brackets, holes or other features that might have been intended to be used in fitting.
L
longdogs
He did actually give the answer ; silicon. A pic might be useful though.
Sponsored Links
D
Dean744PiN5
Silicone and use a couple of lengths of timber to support it until it cures.
Silicone and use a couple of lengths of timber to support it until it cures.
How, where do I put the silicone and what do the lengths of timber do? I can't see the idea you have in your mind...
The points of contact between the metal and the wood are relatively small, is it meant to just be siliconed down to the top rim of the base unit wherever it will touch?
The sink is of course not perfectly flat, either - it's slightly warped and will need to be held down by something quite firm, I think. I imagined mechanical fixing to be involved somehow or another, no?
EDIT: one idea I just found:
"...there is no means of fixing this sink down - the packaging just says to use silicone. That might work for a while, but the best chance of a permanent seal around the sink comes from having minimal movement at joints.
I reinforced my sink by gluing wooden framing inside the rolled edge, both ends, and under the drainer area; this gives a robust and practical sink which can be positively secured with screws into the wood from below, ..."
N
Newboy
Cut the hole for the sink in the worktop.
Apply waterproof (silicone/varnish etc) to the cut edge
Run a thick bead of silicone around the hole (on the worktop surface)
Position sink
Place cut out section of worktop on top of sink (along with anything else heavy to hand!)
Clear excess silicone from around edge of sink
Wait at least 24 hours before removing weights
N
Newboy
Apologies - didn't read your post properly.
If it's sit on with no fixings then silicone will do perfectly well - on the base unit front rail and top edge of the carcass sides.
I assume you're fitting the worktop either side - if so then leave a 2mm gap to allow for a decent seal when you silicone the butt joint.
If it's sit on with no fixings then silicone will do perfectly well - on the base unit front rail and top edge of the carcass sides.
I assume you're fitting the worktop either side - if so then leave a 2mm gap to allow for a decent seal when you silicone the butt joint.
Apologies - didn't read your post properly.
If it's sit on with no fixings then silicone will do perfectly well - on the base unit front rail and top edge of the carcass sides.
I assume you're fitting the worktop either side - if so then leave a 2mm gap to allow for a decent seal when you silicone the butt joint.
Hmm, well if you say so! I just can't imagine the slight warp being held flat with silicone.
I will try it and see, thanks.
N
Newboy
Weight it down and leave it for at least 24 hours
Thanks, everyone - well the topography of the sink meant that contact with the top of the base unit was quite limited, but I used about 200ml of silicone and various bits of scrap wood to bridge some gaps and then weighted it down for a day or two. It does seem pretty solid now, as in I could pick the base unit up by the sink.
The sink has a ~20mm "mini backsplash" type rise at the back as well and I drilled through that at each side and screw it to the wall for extra security.
For anyone interested who comes across this topic in future, this is a triple-section sink, abut 150cm wide, with a draining board on each side of the central sink. What I've done is install the sink into a base 100cm base unit, so that one of the draining boards is overhanging freely so that I can put a washing machine under it. Having screwed the back of the sink to the wall, as mentioned above, the flex in that flying draining board is minimal and I think it will work alright.
have you got a pic?
What make and model is it?
I suppose you are supporting (at least) the back of the "flying drainer" with a batten screwed to the wall.
I guess I should. The base unit has no rail at the back, either - reckon I should remedy that?
DIYnot Local
Staff member
If you need to find a tradesperson to get your job done, please try our local search below, or if you are doing it yourself you can find suppliers local to you.
Select the supplier or trade you require, enter your location to begin your search.
Please select a service and enter a location to continue...
Are you a trade or supplier? You can create your listing free at DIYnot Local
Sponsored Links
Similar threads
- Replies
- 1
- Views
- 3K
- Replies
- 2
- Views
- 523
- Replies
- 2
- Views
- 1K
- Replies
- 5
- Views
- 1K
