Fixing a 3 kite winder in place?

Joined
14 Sep 2010
Messages
7,034
Reaction score
874
Location
Rochdale
Country
United Kingdom
I got a staircase delivered today, I roughly assembled it to check it fits and plan to fix it properly at the weekend.

Could anyone give me advice on when/where to screw, glue, clamp, wedge and bolt it?

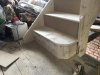
It's a 3 kite winder with 3 newels, top middle and bottom. Picture shows it assembled dry and simply propped up. I will be building a wall level with the lower left hand side so also want to fix to that.

Thanks

IMG_0074.JPG
 
Sponsored Links
I called into the place I bought them and they gave me some advice and 12mm newels.

So today I bolted it out of sight:
IMG_0142.JPG


Used loads of glue on the steps, risers and dowels
IMG_0145.JPG


And then left it to set.
IMG_0147.JPG


I'm going to move the bottom newel post back so it's level with the existing stair top post. I should have ordered them like that in the first place but wasn't sure if it would have worked.
 
in my humble opinion the wedges should be thinner to finish about 10mm short off the nosing to give a bit more support to avoid movement in years to come but will be fine for a few years :D
 
Last edited:
Sponsored Links
Could I use something to fill any of the left over gaps at the end of the wedges?
 
my only word of advice would have been too pack stairs of the wall so you could have stuck your plasterboard behind string and not on top
 
I did think that might have been better but every mm counts at the bottom, there needs to be a door there at 90degrees to the bottom 3 steps.

I was thinking of either using a 9mm board or seeing if the plasterer could bond then skim the brick above the stairs.
 
Would you put some fixings into the wall on the top side of the steps? We could hide them with filler and paint.
 
if you put any fixings into the wall they need to be spaced so the string will be supported but not pulled towards the wall 0.5 -1mm is ok and quite normal but definately less than 2mm if possible
as for the wedges i would personally go for foaming pu glue and part wedges that fit
or as you have some D4 glue i would go for timber ripped down to the correct thickness to need a slight bit off compression to be a friction fit at the nose so the glue will take up the 0.5-1mm deviation along the length
 
I've not done the wedges yet but today I fitted the lower newel but moved it to be level with the existing one.

Hacked it
IMG_0154.JPG


Sanded it
IMG_0158.JPG


Glued and screwed it
IMG_0163.JPG


And then curved the bottom step with some 8x2 under it
IMG_0167.JPG


I've not dared to walk on it yet, want to build the wall first. I'm going to do a thread about the door in the woodwork section now.
 

Attachments

  • IMG_0167.JPG
    IMG_0167.JPG
    183.1 KB · Views: 154
Last edited:
good job in general well impressed buuuuuuutttttt

THE GLUE you only need about a micron thick film to stick lol
a 1mm bead will cover about 25mm with some to spare:D
 
excessive glue can actually delay the glue setting as it skins over and stops it drying where as with a minimum amount it will dry fairly instantly as the wood will suck all the moisture out
 

DIYnot Local

Staff member

If you need to find a tradesperson to get your job done, please try our local search below, or if you are doing it yourself you can find suppliers local to you.

Select the supplier or trade you require, enter your location to begin your search.


Are you a trade or supplier? You can create your listing free at DIYnot Local

 
Sponsored Links
Back
Top