Hive install with Drayton LP241 !

Joined
31 Jan 2019
Messages
3
Reaction score
0
Country
United Kingdom
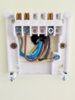
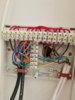
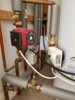
Have just brought Hive to self install but have run into problems !!
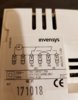
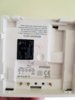
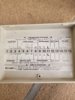
took the Drayton LP241 programmer off the wall hoping to find wires where i thought they would be but No !
now i'm no expert on electrics but looked into this before buying it and it looked quite easy
but i'm now stumped and confused with the wiring can anyone help or steer me in the right direction have attached some pics
thanks
 

Attachments

  • lp241.jpeg
    lp241.jpeg
    166.4 KB · Views: 1,541
  • lp241wiring.jpeg
    lp241wiring.jpeg
    251 KB · Views: 2,481
  • thermo.jpeg
    thermo.jpeg
    143.3 KB · Views: 1,132
  • thermowiring.jpeg
    thermowiring.jpeg
    157.4 KB · Views: 1,598
  • mainbox.jpeg
    mainbox.jpeg
    312.7 KB · Views: 1,601
  • mainboxwiring.jpeg
    mainboxwiring.jpeg
    222.7 KB · Views: 1,571
  • ????.jpeg
    ????.jpeg
    280.8 KB · Views: 1,144
Sponsored Links
First of all, you will need a Hive Dual Channel Version of the Hive. The wiring of which is the exactly the same as the existing programmer. They are a straight swap, as you can see from the diagrams below. The Hive receiver simply replaces the existing programmer.

D.JPG


Hive.JPG


The most difficult part is decommissioning the existing room thermostat. Because the Hive also carries out the functions of the room thermostat, the old wired thermostat needs to be decommissioned to prevent it overriding the Hive. It can't simply be disconnected as this would leave the heating wiring 'open circuit' and it will not operate.

The best way to decommission a thermostat is to trace the old thermostat cable back to its origin. So looking at your photo below.

stat.jpeg


Trace the cable back to its origin (find the other end). Note where the wires are connected at their origin and disconnect the cable. Be careful not to disturb any other wires in the same terminals. Then link the terminals where the two ‘live’ switching wires (the brown wire in L, and the back wire with the brown sleeve in 3) have just been removed from so that the terminals are electrically connected together.
 
So i just need to remove the brown wire in 3, and the black wire with the brown sleeve in 2

Screenshot 2019-01-31 at 17.09.39.png

and the link terminals 2 & 3

Screenshot 2019-01-31 at 17.09.09.png

if thats the case then will be on that tomorrow
thanks
 
That looks like the right wires; you are lucky! Often the wiring centre isn't labelled, and if it is the installer doesn't always stick to the convention.

You could just disconnect the thermostat wires and move the red link at the top now in 2 & 4 to 3 & 4, to achieve the same thing.

The earth and neutral from the same cable are just disconnected, make sure any other wires that are in the same terminals are not disturbed, then the old thermostat cable can be removed.
 
Last edited:
Sponsored Links

DIYnot Local

Staff member

If you need to find a tradesperson to get your job done, please try our local search below, or if you are doing it yourself you can find suppliers local to you.

Select the supplier or trade you require, enter your location to begin your search.


Are you a trade or supplier? You can create your listing free at DIYnot Local

 
Back
Top