Hive to a Nest

Joined
21 Nov 2021
Messages
4
Reaction score
0
Country
United Kingdom
I was hoping someone could assist me please?

I've recently moved into a house which has a hive system that controls the hot water and heating but I'd like to convert it to a Nest.

However I can't translate what's currently there into where the wires should go on a nest.

Can anyone help please?

 
Sponsored Links
Live & neutral 1 is hot water off 3 hot on 4 heating on
I take it you have a 3 port valve system?
Could do with rewire not a great idea to used green&yellow as a carrier.
 
Could it be the green / yellow us actually earth and they've wired it incorrectly?

I'm not sure what system I have to be fair. Sorry, useless at this
 
No the bottom right is where the earth should be, so green/yellow is being used as a live wire, which as exedon has pointed out, shouldn’t be used in this way. A 3 port valve is where the water is diverted to in certain systems.
 
Sponsored Links
Green/yellow should be earth, its been used as a carrier because they were too lazy to use correct cable or indeed use 2 cables.
The earth is there to protect the cable,
Also any core on a cable that is used as a live should be sleeved in brown to identify it as a carrier.
 
  • Thanks
Reactions: CBW
Thanks for all the replies.

Do you know how this would translate to the nest cables? As in where would each corrosponding cable go in the nest heat link?

Looking at the hive manual online,

Cable 1 is for hot water off (nc)
3 is for hot water on (No)
4 is for heating on (No)


Thanks
 
Last edited:
The wires move from the terminals of Hive Dual Channel receiver, to the Nest Heat link terminals that have exactly the same function as per the diagrams below. The terminology is slightly different for some terminals but it's not difficult to work out. For example Hive "Hot Water On" corresponds to Nest "Hot Water Call for Heat" and Hive "Heating On" corresponds to Nest "Heating Call for Heat"

Hive.JPG


Heat link.jpeg


The Nest Heat link, then needs a link between the terminals L 2 and 5 [Hive has this link already made internally]

If you want to use the Heat link to provide 12v power (instead of a separate plug in power supply) for the Nest thermostat then T1 and T2 at the Heat link would be connected to T1 and T2 at the thermostat. Don't forget the earth connection.
 
The wires move from the terminals of Hive Dual Channel receiver, to the Nest Heat link terminals that have exactly the same function as per the diagrams below. The terminology is slightly different for some terminals but it's not difficult to work out. For example Hive "Hot Water On" corresponds to Nest "Hot Water Call for Heat" and Hive "Heating On" corresponds to Nest "Heating Call for Heat"

View attachment 251595

View attachment 251594

The Nest Heat link, then needs a link between the terminals L 2 and 5 [Hive has this link already made internally]

If you want to use the Heat link to provide 12v power (instead of a separate plug in power supply) for the Nest thermostat then T1 and T2 at the Heat link would be connected to T1 and T2 at the thermostat. Don't forget the earth connection.

Thank you for this!

I did wire it like for like last night and couldn't figure out why it wasn't working until I saw that it needed a link between l and 2 and 2 and 5

Ill see how I go today.

Thanks again
 
If there isn't a live connected to each of the common terminals 2 and 5 whilst the Heat link will power up and appear to work, there is no power at the switches.

The other connection is of course is Hive "Hot Water Off" which corresponds to Nest "Hot Water Satisfied"

As a minimum a brown sleeve over it would indicate that the green/yellow wire is being used as a live connection.
 
@stem has answered most of the questions, technically you are permitted to over sleeve green/yellow when part of a cable, not permitted with singles, however
BS 7671:2008 411.3.1.1 said:
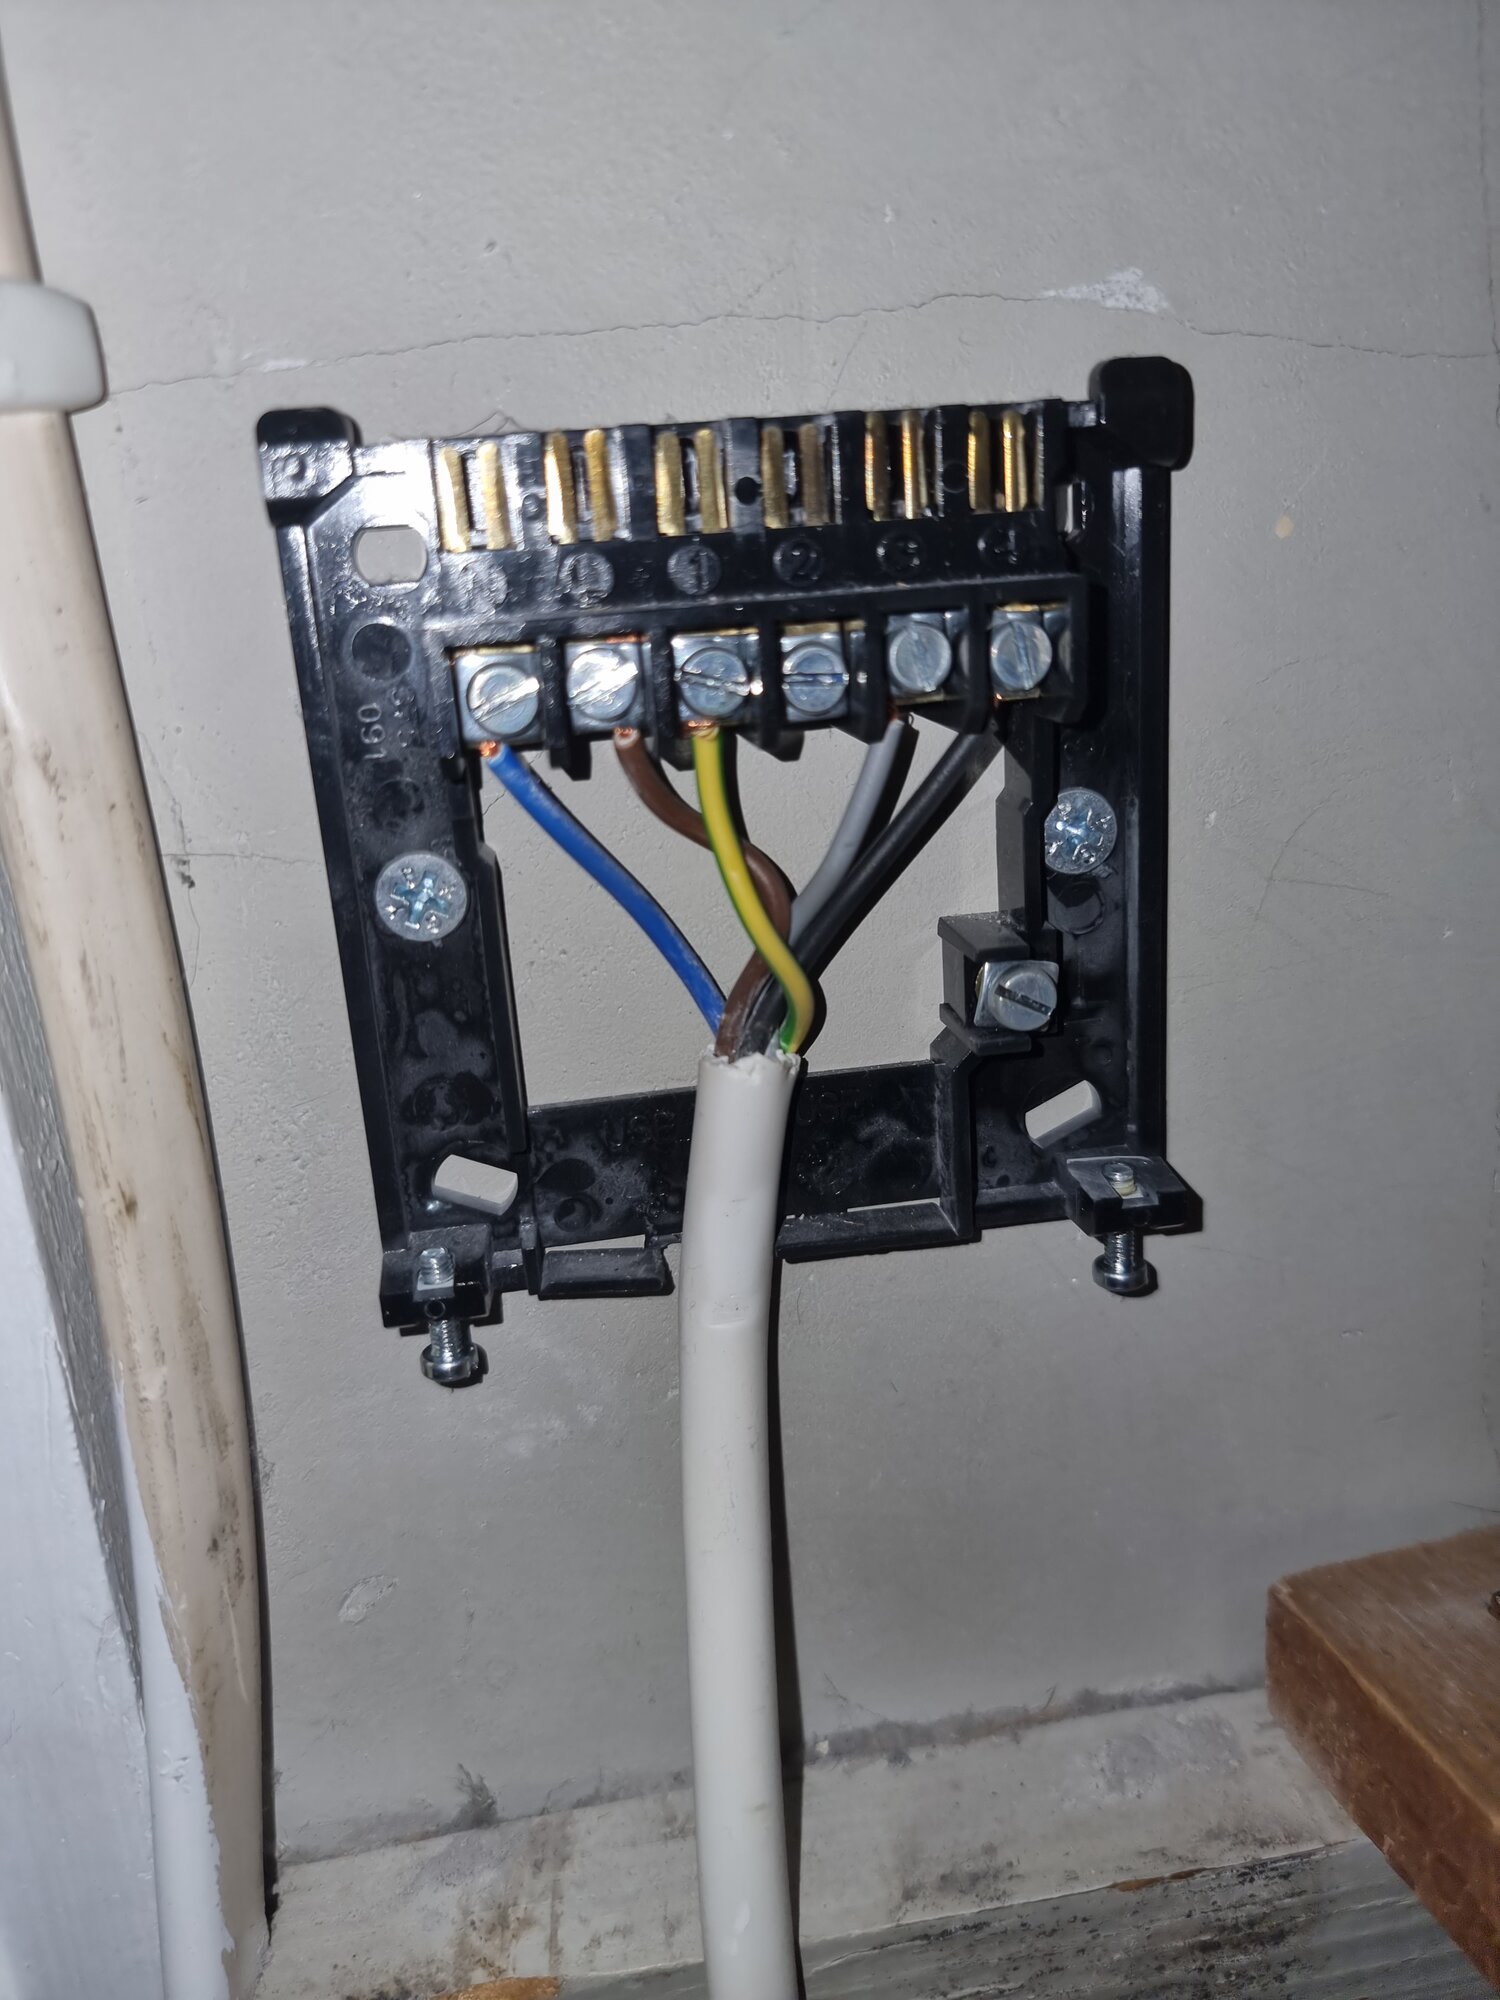
A circuit protective conductor shall be run to and terminated at each point in wiring and at each accessory except a lampholder having no exposed-conductive-parts and suspended from such a point.
This came in 1966, so an earth (protective conductor) must be present.
BS 7671:2008 514.4.2 said:
Single-core cables that are Coloured green-and-yellow throughout their length shall only be used as a protective conductor and shall not be over-marked at their terminations, except as permitted by Regulation 514.4.3.
since it stipulates single core, where two cables are used, it is permitted to over sleeve one of them, although ill advised, to do so.

As to Hive v Nest not sure good move, at least until the Nest temperature sensor is released in the UK, only released in USA at moment. Although the Nest Gen 3 algorithms are far better than Hive, and Nest can be used with OpenTherm, it can only detect the temperature in one room. Hive however as long as the wall thermostat has not reached 22°C can accept a demand for heat from a Hive TRV head and run the boiler for ½ hour to allow cool rooms to catch up. By setting the TRV's so room with wall thermostat does not exceed 22°C and putting the Hive TRV in any room which tends to lag behind you have a better system with Hive.

I have Nest Gen 3, and will admit it was a mistake, my excuse was when I bought the Energenie MiHome TRV heads they were supported by Nest, but when Google took over that support was dropped. So as it stands in most case Hive is better than Nest. In hind sight I should have used Honeywell EvoHome or Drayton Wiser, the latter has algorithms built into the TRV to speed up heating of rooms without over shooting. But not worth cost to change now.

16th Edition said:
471-08-08 In every installation which provides for protection against indirect contact by automatic disconnection of supply, a circuit protective conductor shall be run to and terminated at each point in wiring and at each accessory except a lampholder having no exposed-conductive-parts and suspended from such a point.
Don't have any earlier editions. So it seems never wired correct since installed.
 
Last edited:

DIYnot Local

Staff member

If you need to find a tradesperson to get your job done, please try our local search below, or if you are doing it yourself you can find suppliers local to you.

Select the supplier or trade you require, enter your location to begin your search.


Are you a trade or supplier? You can create your listing free at DIYnot Local

 
Sponsored Links
Back
Top