Hotpoint wm56 service manual or advice please

Joined
7 Jul 2012
Messages
8
Reaction score
0
Country
United Kingdom
My machine went bang, I'm perfectly capable of swapping out parts or even repairing a pcb but I cannot figure out how to get access to the timer control board, so a service manual would be useful or can someone tell me how to get the front switch panel off to gain access to the timer control board. Many thanks in advance.

PS, for all you people out there who trawl these forums looking to make unhelpful posts, criticising people for not searching, I have searched google, this forum AND I'm not looking for a user manual.........

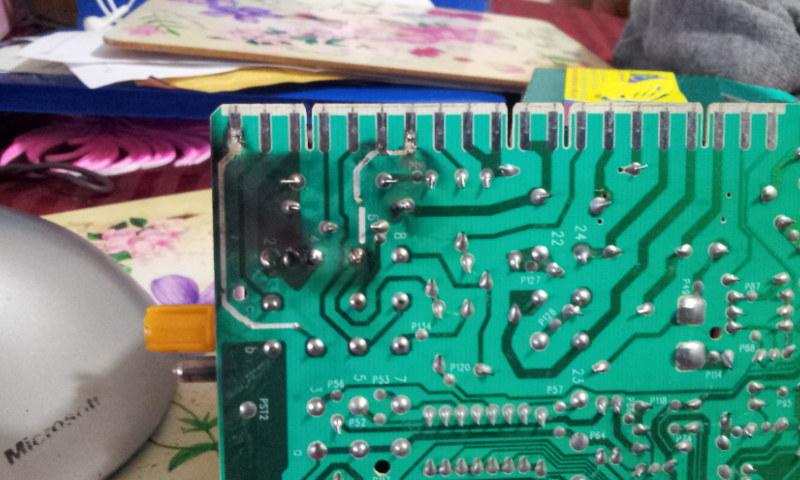
EDIT: Never mind, I figured it. Dead PCB and door switch :(
 
Sponsored Links
You won't get a service manual trade only. To remove the timer first remove the dispenser then remove the 4 screws round it. Then pull the knobs off. Consol just pulls off , the timer is held on by 2 fat screws. Look at the pcb and the first black block of wires you will find a burnt track from the door lock netural supply solder that with a link and change the door lock. Try that first.
 
You won't get a service manual trade only. To remove the timer first remove the dispenser then remove the 4 screws round it. Then pull the knobs off. Consol just pulls off , the timer is held on by 2 fat screws. Look at the pcb and the first black block of wires you will find a burnt track from the door lock netural supply solder that with a link and change the door lock. Try that first.

thanks, you were spot on. There are 2 tracks burnt and no continuity reading from the door switch.

see this here.


Are both tracks burnt-out due to the door switch then?
Seems like I can save £33 if thats the case
 
Yes. Door lock has caused it. Replace it.
 
Sponsored Links
Many thanks, machine now works. I probably would've bought a new timer control assembly had it not been for your fast, accurate advice.

I now have to stop the machine from leaking. I have checked the sump drain pipe, that seems ok. I suspect it is the drum/tub seal. I think I have to remove the bottom concrete block to have a good look. I think it might be worth changing the door seal at the same time, given what an obvious pain it seems to be. I have already changed the shocks/springs, but I fear the damage was done to the seals when it was shaking itself apart. I inherited it from a previous tenant so I'm not worried about spending a few more £££.

Can you advise how to change both seals? I think I have a good idea but always best to get some hints from an expert.

Thanks in advance,

Kristyon
 
Once the consol panel is off 2 screws at the top of the front panel then 2 more under the kick strip. The white clip on the front panel just Unclips remove the wire band and flick off the edge of the door seal. Front panel just lifts off. Then u will see 13 black clips and 3 green round the front of the drum pull clips off and seal is behind front plate round the drum , just clean it or replace it same with door seal no need to remove the weight.
 
Thanks again for your expert advice. The front part of the outer drum had a small hole in it, probably damage done when the shocks and springs had gone.
I have repaired it with chemical metal on the outside and a a hot glue gun to give extra sealing on the inside

If anyone is interested, chemical metal is below

http://www.ebay.co.uk/itm/Rapid-Ste...016?pt=LH_DefaultDomain_3&hash=item35b9e46248[/url]

Even the cheapo stuff from poundland or 99p stores works just as well.

Its excellent stuff, I've used in on commercial diesel engines to repair holes in intercoolers, radiators, repair block threads, emergency gaskets and I've heard it been used to repair cracks in engine blocks. It's oil, petrol, diesel, and waterproof, heat resistant to at least 250 degrees centrigrade. All these repairs are still going strong after many years so I'm confident the machine won't leak, at least not from my repair lol!

I wonder what will go wrong with this machine next?
 
Links in this post may contain affiliate links for which DIYnot may be compensated.
It lasted 3 months......

The fuse has blown on the controller board. Drum motor no longer turns.
Any advice would be appreciated.
 
Link out the fuse or solder another one . And check motor brushes. The fuse is linked to the motor
 
Thanks again. I searched a bit more and found the fuse probably blew due to stuck drum, which indeed it was. I removed the clothes and put them back in and then drum rotated fine. Replaced fuse but I only had a 13~Amp. Can't tell if fuse is 16.3 or 6.3Amp (is that 1 an I?). Any ideas? quick or slow blow? I will buy a few and replace with correct one when I get them.
At I type this, the machine started squeaking. That would be the motor squealing on the belt, stuck drum again. Messed around turning on and off and back and forth on the rinse/spin cycle, (needed to get these clothes rinsed and spun, school uniforms!) and got the drum to turn under motor power again. Guess I'll be taking the front of outer drum off and checking for debris.

Edit: OK, they're not 16.3amp lol fast or slow?

Edit 2: Seems there are more than 2 kinds of fuses but I can't read it. Is this supposed to be Timed(T), quick(F) or low break(L),(A)or(AL)?
 
Could be a sock in drum, take belt off and see if drum squeaks by hand or put on spin and listen to the motor spinning. As for fuse it will be a quick blow 1 amp.
 
Could be a sock in drum, take belt off and see if drum squeaks by hand or put on spin and listen to the motor spinning. As for fuse it will be a quick blow 1 amp.

Yeah sock wrapped around heating element. Had this thing apart too many times now lol. Pretty sure it says 6.3amp on fuse though.....

Thanks again rocks1

Kristyon
 

DIYnot Local

Staff member

If you need to find a tradesperson to get your job done, please try our local search below, or if you are doing it yourself you can find suppliers local to you.

Select the supplier or trade you require, enter your location to begin your search.


Are you a trade or supplier? You can create your listing free at DIYnot Local

 
Sponsored Links
Back
Top