How do -you- prepare glossy wood for repainting?

Joined
15 Jan 2025
Messages
145
Reaction score
4
Country
United Kingdom
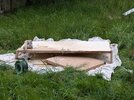
Hello all! I am planning to repaint an interior door in my house which is badly in need of it.

But this door has a previous coat of paint, in a glossy magnolia shade which has a very smooth surface (on the parts where it hasnt flaked off)
And i know from experience, that this surface will not take paint. Not well, at least, it'll struggle to adhere, and even when dried, the first coat will slide off from the force of the roller when i try to do a second coat. I really ought to do something about it before applying new paint

This isnt the first door ive worked on like this, it'll be my third. For the past two, i used the same strategy. I set my belt sander at 40 grit, and spent about four hours on each door, meticulously stripping every tiny fragment of paint off them.


This worked! But its not a perfect solution.

For one, it was a little costly, i went through about five sander belts on each door
Secondly, its pretty destructive, the door surface was noticeably thinner afterwards, i suspect that if i tried to repeat process on onne of those same doors, it'd cause holes
Thirdly and most importantly, the fine particles of sawdust being kicked everywhere cause a mess in every corner of the house, it took me quite a bit of effort to clean it last time, and i have resolved now, to stop using the belt sander indoors

so i need another way, any ideas?
 
Take it off and lay it flat. Give it a light sanding by hand, give it several thin coats. Do one side at a time.
 
Sand with 180 or 320 grade. Just enough to key on paint.
Zinsser BIN one coat.
It's not got much opacity but don't worry about that as your using as an adhesion primer.
2 acrylic primer undercoats or similar.
Then your top coats.


As above.
Screw some wood legs to the ends and lay down.
Paint one side and with help flip over and paint the other.
Legs mean you don't have to wait for paint to dry to paint both sides
 
Take it off and lay it flat. Give it a light sanding by hand, give it several thin coats. Do one side at a time.
it never ocurred to me that i could take a door off, but it makes sense

if i can take it off though i guess i could take it outside and use the belt sander there

how do i take a door off the hinges? would i be best just removing the hinges from the doorframe? they're attached with four screws each
 
Yeah. Take the screws out. Does it need belt sanding though, often just roughing the surface will do.
 
Sand with 180 or 320 grade. Just enough to key on paint.
Zinsser BIN one coat.
It's not got much opacity but don't worry about that as your using as an adhesion primer.
2 acrylic primer undercoats or similar.
Then your top coats.


As above.
Screw some wood legs to the ends and lay down.
Paint one side and with help flip over and paint the other.
Legs mean you don't have to wait for paint to dry to paint both sides
why all these coats? I've never done such a thing before, i just use multiple coats of my final color

as long as the surface is clean and smooth ( but not too smooth) underneath, this hasn't caused any problems. What is there to gain with your approach ?
 
Don't use a belt sander unless you really want to rip it back

If it has that much paint on get a heat gun on it.

I used legs but here is another way
 
Last edited:
Yeah. Take the screws out. Does it need belt sanding though, often just roughing the surface will do.
Its worth noting that aside from the parts ive recently repainted, most of the paintwork in my house hasn't been touched for 20+ years, it is all dried out and flaking off

The problem i kept running into before i started using the belt sander, is that where paint has flaked off, there is a very noticeable change in height between the intact areas of paint, and the bare areas where it fell off. in reality its less than half a millimetre, but the human eye notices things
And if i just paint over that, the topology of the underlying surface is clearly visible and highlighted by the paint, creating something that is immortalized in looking horrible forevermore

stripping off every last vestige of the old paint was the best way I could think of to prevent this, and it sure does work. But it is slow, destructive, messy and costly, as outlined above. I am open to other ideas
 
Last edited:
There will be lead in that paint. Just been mindful
 
There will be lead in that paint. Just been mindful
So surely not a good idea to use a heat gun, then? Hand scraping with a carbide scraper such as a Linbide or Bahco is a bit slower, but a lot safer.

The OPs concerns about belt clogging (and presumably glazing - where the belt turns brown/black and smooth/gloss) are well founded. Belt life often can be extended by applying a crepe sanding belt cleaner before the belt is completely glazed or worn out. But do I think you is over sanding, and that a belt sander with a P40 belt is way too aggressive. Try scraping first, then maybe proceed with a higher grit belt

Abrasive clogging on paint can be overcome to an extent by using stearated abrasives (often white, grey or green), but AFAIK you can't get stearated sanding belts - only discs, sheets and rolls
 
Last edited:
So surely not a good idea to use a heat gun, then? Hand scraping with a carbide scraper such as a Linbide or Bahco is a bit slower, but a lot safer.
Yeah.
When they said how old door was I thought. Oooh! Could have lead.
I'd be testing that before I did anything or just buy a new door

@Nanako

I use waterbased paints and just easier to use a good adhesion primer first on old gloss.
Waterbased paints will stick well but you have to key surface and clean well. I've been using BIN aqua and that sticks really well so another alternative that's waterbased. Takes about 5 mins to cost a door side then after an hour get the primer on.

What paints you using to go straight on?
 
Last edited:
it never ocurred to me that i could take a door off, but it makes sense

In my limited experience, a door laid flat will collect more dust and crud while the paint dries than a door that is vertical. Do you have somewhere relatively dust-free where you can do the painting? This is more of an issue for slower-drying paints.

why all these coats?

While Wayners’ method will surely give excellent results, I think most people would do something a bit simpler - for example, light sanding, 1 water-based primer/undercoat, and 2 top coats.

The flaky bits are difficult to get perfect. If you really need to remove all the paint to deal with that, personally I’ve found a heat gun easier to use than a sander.
 
Don't use a belt sander unless you really want to rip it back

If it has that much paint on get a heat gun on it.

I used legs but here is another way
ive been thinking about this method all day, i want to do it!

i dont have saw horses though, nor a budget to buy them, not sure if i have anything that could take the weight of a door on two screws

would wheelie bins do the job perhaps?
 
Make some of these from Ply


Or cut 18 inch wood and drill holes in the centre (9 inch) X4
Make legs.
Screw 2 at door ends
Can flip door over with helper at one end of the door...
 
Make some of these from Ply


Or cut 18 inch wood and drill holes in the centre (9 inch) X4
Make legs.
Screw 2 at door ends
Can flip door over with helper at one end of the door...
I'm doing it! See attached

Some things i have discovered in the process

1. Doors are MUCH heavier than i thought, its about twice the weight i expected
2. Screws are weaker than i thought. The door is connected to each leg with one of these:

And three times now, a screw has bent
3. This arrangement is not very stable, the legs dont hold up incredibly well if the door is pushed against them. Maybe i needed some cross slats to stabilise them, I cut up a big panel of plywood which was about 40x60cm, into quarters

I am managing though, its not perfect but im getting there
 

Attachments

  • WhatsApp Image 2025-05-23 at 18.02.07_63091d08.jpg
    WhatsApp Image 2025-05-23 at 18.02.07_63091d08.jpg
    597.1 KB · Views: 26

If you need to find a tradesperson to get your job done, please try our local search below, or if you are doing it yourself you can find suppliers local to you.

Select the supplier or trade you require, enter your location to begin your search.


Are you a trade or supplier? You can create your listing free at DIYnot Local

 
Back
Top